A cell in Excel can grow in two directions: wider, by changing the column width, or taller, by changing the row height. Either way, Excel resizes the whole column or row, never one cell on its own. To make a cell longer from side to side, drag the right edge of its column letter, or right-click the column letter, choose Column Width and type a number. Double-clicking that edge fits the column to its longest entry.
Make the column wider by dragging
Dragging is the fastest way when you just need a bit more room and do not care about an exact size. These steps are for Excel for Microsoft 365 on Windows (the same labels appear in Excel 2016 through 2024), with Mac and web notes later on.
- Find the letter above the cell you want to lengthen, such as C for cell C4.
- Point at the right edge of that column letter, on the line between it and the next letter. The pointer turns into a double-headed arrow.
- Drag to the right. Excel may show the width in a small tip while you drag. Release when the text fits.
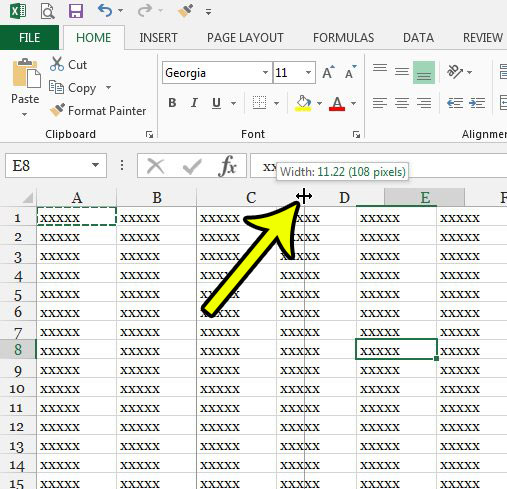
Older Excel version shown; current screens look different.
Every cell in column C gets wider, not only C4. Dragging to the left makes the column narrower again.
Type an exact column width
When several columns should match, or a form needs a fixed layout, typing a number gives you a repeatable result.
- Right-click the column letter and choose Column Width. (You can also go to Home > Cells > Format and, under Cell Size, choose Column Width.)
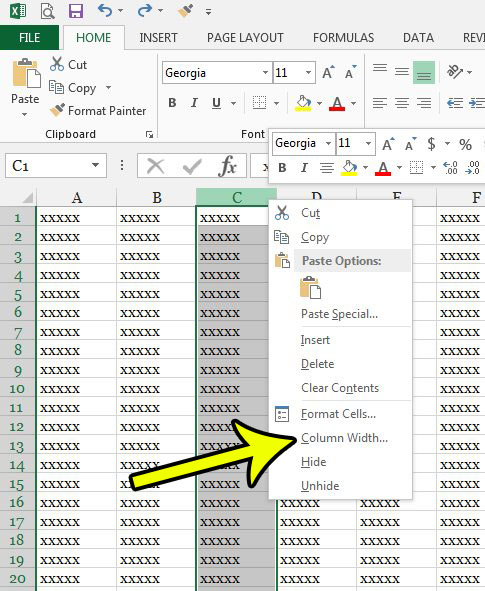
Older Excel version shown; current screens look different. - In the Column width box, type the value you want and click OK.
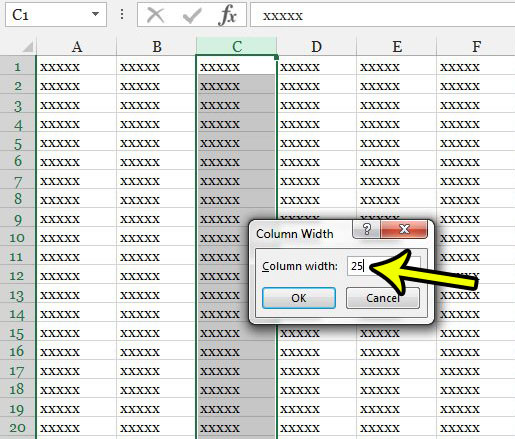
Older Excel version shown; current screens look different.
The number is not inches or pixels. Column width uses a character-based unit: roughly how many characters of the default font fit in the cell. Row height, by contrast, is measured in points. Microsoft lists these limits:
| Setting | Unit | Default | Maximum |
|---|---|---|---|
| Column width | Characters of the default font | 8.43 | 255 |
| Row height | Points | 15 | 409 |
Setting either value to 0 hides the column or row. For a printed form where a column must be, say, 1.5 inches wide, use Page Layout view, which accepts real measurements; the details are in how to set Excel column width in inches.
Fit the column to its contents with AutoFit
AutoFit sizes a column to its widest entry, so you do not have to guess.
- Double-click the boundary. Point at the right edge of the column letter and double-click instead of dragging.
- Use the menu. Select the column, then go to Home > Cells > Format > AutoFit Column Width.
- Fit every column on the sheet. Click Select All (the triangle where the row numbers and column letters meet), then double-click any boundary between two column letters.
AutoFit works from what is in the cells right now. If you later type a longer entry, run it again.
Resize several columns at once
Select the column letters first: drag across neighbors, or hold Ctrl and click columns that are apart. Then either drag the edge of any selected column letter or use Column Width; every selected column takes the same size. Select All followed by a drag sets every column on the sheet to one width.
Two smaller tools help with consistency:
- Copy a width from another column. Copy a cell in the column that already has the right width, right-click a cell in the target column, choose Paste Special and pick Keep Source Column Widths.
- Change the default. Home > Cells > Format > Default Width sets the standard column width for that sheet (select all sheet tabs first to change it for the whole workbook).
Make the cell taller instead
If the cell needs to grow downward, for a notes field or a cell with several lines of text, change the row height. The methods mirror the column ones:
- Point at the bottom edge of the row number on the left side of the sheet and drag down. Double-click that edge to fit the row to its contents.
- For an exact size, go to Home > Cells > Format > Row Height (or right-click the row number and choose Row Height), type a value in points and click OK.
- To fit the row automatically, choose Home > Cells > Format > AutoFit Row Height.
A taller row only shows more text if the text can break onto new lines. Turn on Wrap Text for the cell so long entries flow onto extra lines and the row grows with them. To start a new line at a specific spot, press Alt+Enter while typing in the cell. When a large sheet has rows that are too short to show their contents, see how to expand all rows in Excel.
Working in Google Sheets instead? The menus differ, so follow how to set row height in Google Sheets.
When only one cell should be bigger
Microsoft states that individual rows and columns can have only one setting, so a single cell cannot be sized apart from its column or row. If a heading needs to span more room than its own cell, these are the realistic options:
- Merge cells. Select the cell and the empty cells next to it, then on the Home tab choose Merge & Center. The arrow next to it offers Merge Across and Merge Cells if you do not want centering. Warning: only the data in the upper-left cell is kept; the contents of the other cells are deleted. Use merging for titles rather than for data tables. Unmerge Cells on the same menu reverses it.
- Center across the selection. This gives the look of a merged title without merging. See how to center text across multiple cells.
- Shrink the text. If widening is not an option, Shrink to Fit reduces the font size so the entry fits the current width.
- Wrap it. Wrap Text plus a taller row keeps the column narrow.
A quick decision rule: if a whole column of entries is cut off, widen the column. If one long title is the problem, merge or center across. If one long sentence is the problem, wrap it.
Excel for Mac and Excel for the web
Excel for Mac
- Drag the separator on the right edge of the column heading (or below the row heading). Double-click the separator to fit the contents.
- For an exact width, select the column and, on the Format menu, point to Column and click Width.
- For an exact height, on the Format menu point to Row and click Height.
Excel for the web
Microsoft’s web instructions use the mouse: drag the boundary to the right of a column heading or below a row heading, and double-click the boundary between headings to fit the size to the text. The web help does not describe the exact-value dialogs, so for a precise width it is simplest to open the file in the desktop app.
If the text still looks cut off
- The cell shows #####. Microsoft explains that Excel can show ##### when a column is not wide enough to show all of the cell contents (formulas that return negative dates or times can also show #####). Widen the column or double-click its edge.
- Text stops at the next cell. Long text usually spills into the next cell only when that cell is empty. Widen the column or wrap the text.
- The column will not get wider. 255 is the maximum width. Past that, wrap the text instead.
- A column seems to be missing. A width of 0 hides it. See how to hide and unhide rows and columns.
- AutoFit seems to ignore a merged cell. If so, set the row height or column width by hand instead.
Resizing cells: common questions
Does a new column width apply to every sheet in the workbook?
No. Widths and heights belong to the worksheet you change. Group the sheets first (Ctrl+click their tabs) if several sheets need the same layout, then ungroup them before typing anything else.
Can I undo a resize?
Yes. Press Ctrl+Z straight after the change, or set the width back to the default of 8.43 (or the row height back to 15).
Why does the number in Column Width not match what I measure on screen?
Because the unit is characters of the default font, the on-screen size changes with the font and your zoom level. For physical sizes, use Page Layout view and inches.
Once the columns are the right size, the next thing many people check is how the sheet prints. The Excel printing walkthrough covers fitting columns on a page and other print settings. Microsoft’s full reference for every method above is Change the column width and row height, with separate pages for Excel for Mac, the web app, merging cells and fixing the ##### display.

Kermit Matthews runs Live2Tech from just outside Philadelphia. He is an IT specialist with over 20 years of experience, from a university help desk to small-business IT, IT management and his own consulting practice, and has written tech guides full time since 2020. Steps are checked against the current software on a real device or the maker’s official documentation. More about Kermit.