You want a report title centered over the columns of a table, but you do not want merged cells getting in the way of sorting, selecting or pasting later. Excel has a built-in answer: type the title in the leftmost cell, select that cell and the cells to its right, press Ctrl+1, open the Alignment tab, choose Center Across Selection in the Horizontal list, and click OK. The text looks merged and centered, but every cell stays separate.
For entries that simply do not fit, see how to make a cell wider or taller in Excel.
Center a title across a table
These steps are for Excel for Microsoft 365 on Windows, and the same Format Cells dialog appears in Excel 2013 through 2021. Say your table runs from column A to column E and the title “Quarterly Sales” sits in row 1.
- Type the title in A1, the leftmost cell of the area you want to center across. Leave B1 through E1 empty.
- Select A1:E1 by clicking A1 and dragging to E1, or by clicking A1 and then Shift+clicking E1.
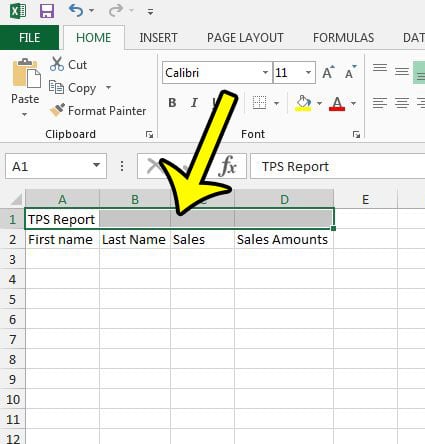
Excel 2013 shown; current screens look different. - Open the Format Cells dialog. Press Ctrl+1, or right-click the selection and choose Format Cells.

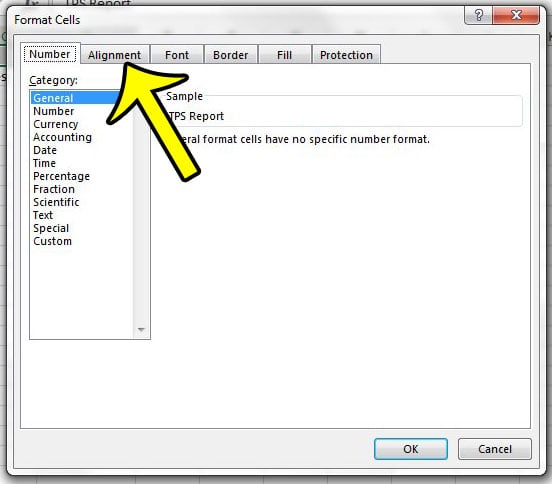
Excel 2013 shown; current screens look different. - Click the Alignment tab at the top of the dialog.
Excel 2013 shown; current screens look different. - Open the Horizontal drop-down, choose Center Across Selection, then click OK.
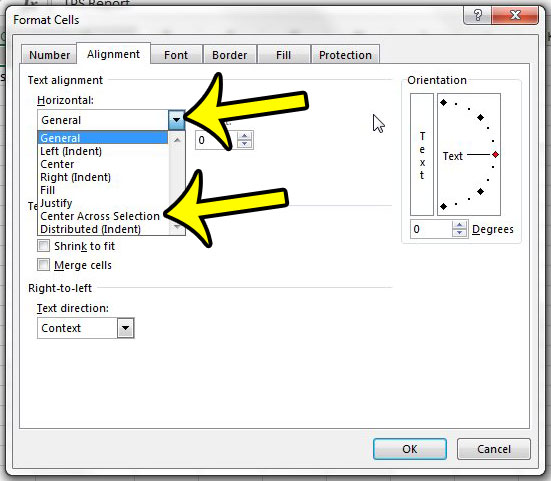
Excel 2013 shown; current screens look different.
The title now sits in the middle of A1:E1. Click B1 or C1 and the formula bar is empty, because the text still belongs to A1. That is the whole point: you can still click, select and sort column C on its own. Microsoft’s Excel object model lists this as a standard horizontal alignment setting (the XlHAlign alignment values include “Center across selection”), so it is not an add-in or a workaround.
Center Across Selection or Merge & Center?
The Merge & Center button on the Home tab gives a similar look, but it changes the grid. According to Microsoft’s merge and unmerge help, a merged cell keeps only the contents of the upper-left cell, and the contents of the other cells are deleted.
| Question | Center Across Selection | Merge & Center |
|---|---|---|
| Are the cells still separate? | Yes | No, they become one cell |
| What happens to text in the other cells? | Nothing; filled cells simply stop the centering | Only the upper-left value is kept |
| Selecting a single column under the title | Works normally | Can pull in the merged columns too |
| Sorting, filtering, copying and pasting | Behaves like any other row | Can complicate these tasks |
| Works vertically? | No, horizontal only | Yes, you can merge down a column |
| Quick ribbon button? | No, it lives in Format Cells | Yes, on the Home tab |
For titles and headings over data that people will sort or filter, Center Across Selection is the safer choice. Merge & Center still makes sense when you need a label to span several rows, such as a side heading down a block of cells, or on a printed form nobody will sort.
Switch a merged header to Center Across Selection
If a workbook already has merged titles that keep getting in the way, convert them:
- Click the merged cell.
- On the Home tab, select the down arrow next to Merge & Center, then choose Unmerge Cells. The text drops back into the leftmost cell.
- With the same cells still selected, press Ctrl+1 and apply Center Across Selection from the Alignment tab as above.
On a large sheet with many merged areas, Microsoft’s merge help notes that you can use the Find command to locate merged cells quickly, so you do not miss any.
Excel for Mac and Excel for the web
Excel for Mac also has a Format Cells dialog with an Alignment tab. Select the range, Control-click the selection, choose Format Cells, and pick Center Across Selection in the Horizontal list.
Excel for the web is more limited. Microsoft’s alignment help for the web describes the ribbon buttons (Align Left, Center, Align Right) and Merge & Center, and does not mention Center Across Selection. If you cannot find the option in the browser, open the workbook in the Excel desktop app, apply the setting there and save; the file keeps it.
Google Sheets has no Center Across Selection setting at all. If you work in both programs, see the workarounds for centering across cells in Google Sheets.
When the text will not center
- The text is not in the leftmost cell. The setting spreads text from a filled cell over the empty cells next to it. If the title sits in C1 while you selected A1:E1, it will not be centered over the whole table. Cut it and paste it into A1.
- A neighbouring cell has something in it. Even a space typed into D1 counts as content and stops the centering at that cell. Select the stray cell and press Delete.
- The title disappeared after hiding a column. The text lives in the first cell, so hiding that column hides the title, even though the other columns are still visible. Unhide the first column, or put the title in a column you will not hide. If you are not sure which columns are hidden, turning on row numbers and column letters helps; see how to show row numbers and column letters in Excel.
- The selection still contains merged cells. Unmerge them first, as described above, then apply the setting.
- You wanted vertical centering across rows. There is no vertical version of this setting. Use Merge & Center down the rows, or set the row height and use Middle Align for a single cell.
- The title is too long for the selection. Text wider than the selected cells spills past the edges. Select more columns or reduce the font size. If a long heading really needs two lines, read up on wrapping text in Excel first, since wrapping works within a cell’s own width rather than across the selection.
Reuse the setting with a cell style
If you build many reports, save the alignment as a style. On the Home tab, open Cell Styles, choose New Cell Style, give it a name such as “Report title”, click Format, and set Center Across Selection on the Alignment tab (add a bold font while you are there). Next time, select the title range and click the style. Other formatting options in the same dialog are covered in this walkthrough of the Format Cells dialog.
Center Across Selection questions
Can I apply it to several title rows at once?
Yes. Select a block such as A1:E3 with each row’s text in column A and the rest empty, then apply the setting once. Each row centers independently across A to E.
What happens if I later type in one of the empty cells?
The centering shrinks to stop before that cell, and both values show. Clear the cell and the title spreads back across the full selection.
Does it carry over when I copy the cells?
Copy the whole range, empty cells included, or use Format Painter across the full width of the new range, so every cell gets the setting.
How do I remove it?
Select the range, press Ctrl+1 and set Horizontal back to General, or click Align Left on the Home tab.
Try it on one report title first, then sort the table below it to see that the columns still behave normally.

Kermit Matthews runs Live2Tech from just outside Philadelphia. He is an IT specialist with over 20 years of experience, from a university help desk to small-business IT, IT management and his own consulting practice, and has written tech guides full time since 2020. Steps are checked against the current software on a real device or the maker’s official documentation. More about Kermit.