You type a long product description or note into a cell, and Excel either spills it across the empty cells to the right or chops it off at the border as soon as the next cell holds something. Wrap Text fixes that by breaking the text onto several lines inside the same cell. In current Excel for Microsoft 365 (and Excel 2024, 2021, 2019 and 2016), select the cells, then select Home > Wrap Text in the Alignment group.
Why the text spills over or gets cut off
By default, a cell shows its contents on one line. When the text is wider than the column, Excel does one of two things:
- Overflow: if the cells to the right are empty, the text keeps running across them. It looks fine on screen, but it is still all stored in the one cell.
- Truncation: if the next cell has anything in it, the display stops at the column border. The full text is still there, and you can see it in the formula bar when you select the cell.
Wrap Text changes only how the cell is displayed. It does not edit, split or delete your text. With wrapping on, Excel breaks the text into lines that fit the column width and, as long as the row height has not been fixed by hand, makes the row taller so every line shows. If you later widen or narrow the column, the line breaks move to match the new width.
Turn on Wrap Text from the ribbon
This is the method Microsoft documents for Excel for Microsoft 365 and Excel 2016 through 2024 on Windows.
- Open the workbook and go to the sheet with the long text.
- Select the cell or cells you want to wrap. You can drag across a range, click a column letter to select the whole column, or click a row number to select the row.

Older Excel version shown; current screens look different. - Select the Home tab on the ribbon.

Older Excel version shown; current screens look different. - In the Alignment group, select Wrap Text. The button stays highlighted while the selected cells are wrapped.
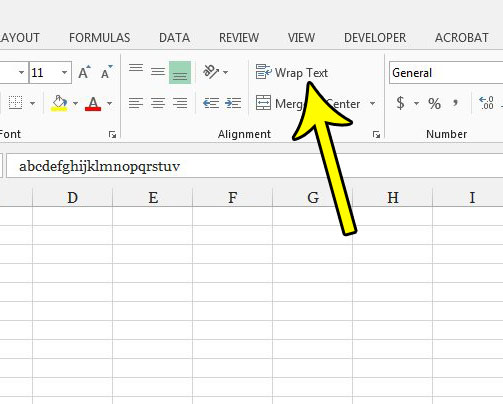
Older Excel version shown; current screens look different. - Check the result. The text should now sit on several lines inside each cell, and the rows should be taller.
Wrap Text is a toggle. Selecting it again on the same cells turns wrapping off. To wrap every cell on a sheet at once, select the whole sheet first (the Select All triangle at the top left corner of the grid, or Ctrl+A in an empty area), then select Wrap Text.
If you use wrapping often, you can right-click the Wrap Text button and choose Add to Quick Access Toolbar so it is always one click away, no matter which ribbon tab is open.
Keyboard route
You can also use the keyboard: press and release Alt, then H (Home tab), then W (Wrap Text), one after another. Pressing the same sequence again turns wrapping off.
Use the Format Cells dialog instead
The Format Cells dialog lets you turn on wrapping and set alignment in one place, which helps when you also want the text centered vertically or indented.
- Select the cells.
- Right-click the selection and choose Format Cells. On Windows, Ctrl+1 opens the same dialog.
- Open the Alignment tab.
- Under Text control, check Wrap text.
- Optionally set Vertical to Top or Center so short entries in tall rows line up neatly.
- Select OK.
The same Text control area holds Shrink to fit and Merge cells. Shrink to fit is covered later; leave Merge cells alone unless you have a reason to merge, because merged cells are the most common cause of wrapped text that stays hidden.
Choose where each line starts with a manual line break
Automatic wrapping breaks lines wherever the column edge falls. If you want a line to start at a specific word, for example a street address with the city on its own line, insert a line break yourself.
- Double-click the cell, or select it and press F2, to start editing.
- Click (or move the cursor) to the spot where the new line should begin.
- Press Alt+Enter on Windows. On a Mac, press Control+Option+Return.
- Press Enter to finish editing the cell.
In Excel for Windows, adding a line break this way usually turns on Wrap Text for the cell; if the text still shows on one line, turn Wrap Text on. If you later turn wrapping off, the break is still stored in the cell, but the text shows on one line again until you turn wrapping back on. Unlike Wrap Text, a manual line break does change the data: it adds a line feed character, which can matter if you export the sheet or use the text in a formula.
Line breaks with a formula
To join text from two cells onto separate lines, use the CHAR(10) line feed character. For example, with a name in A2 and a department in B2, enter =A2&CHAR(10)&B2 in C2. The break only appears when Wrap Text is on for C2, so turn it on after entering the formula.
To remove manual line breaks from many cells, a widely used approach is Find and Replace (Ctrl+H): click in the Find what box, press Ctrl+J to enter a line break (the box looks empty), type a space in Replace with, then select Replace All. Try it on a copy of the data first.
When wrapped text still does not show
Wrap Text is on, but the cell still shows only the first line or two. Work through these causes in order.
| What you see | Likely cause | Fix |
|---|---|---|
| Only the top line shows, row did not grow | The row height was set by hand earlier, so Excel stops adjusting it | Home > Format > AutoFit Row Height |
| Text cut off in a merged cell | Wrapped text in merged cells can stay hidden | Set the row height manually, or unmerge and use Center Across Selection |
| Nothing changes at all | Wrap Text was toggled off by a second click, or the column is already wide enough | Check that the Wrap Text button is highlighted for the cell |
| Long numbers show as #### | The column is too narrow for the number or date | Widen the column instead |
Fit the row height
To fix text hidden by a fixed row height, use the Cells group:
- Select the rows (click the row numbers).
- On the Home tab, in the Cells group, select Format.
- Under Cell Size, select AutoFit Row Height.
To pick an exact height instead, choose Row Height in the same menu and type a value in the Row height box. You can also drag the bottom border of the row number down, or double-click that border to fit the row to its tallest cell.
Merged cells
If a heading spans several merged columns, Microsoft lists merged cells as a reason wrapped text stays hidden, and AutoFit Row Height may not fix it. Either drag the row taller until all lines show, or unmerge the cells and use Center Across Selection (Format Cells > Alignment > Horizontal), which gives a similar look without merging. See centering text across several cells for that layout.
Excel for the web and Excel for Mac
Excel for the web: open the workbook in your browser, select the cells, and select Home > Wrap Text. If you need other alignment options there, the post on changing cell formats in Excel Online walks through the web Format Cells options.
Excel for Mac: select the cells, then select Wrap Text on the Home tab. You can also right-click the selection, choose Format Cells, open the Alignment tab and check Wrap text. The manual line break shortcut differs from Windows, as noted above.
Wrapping is saved with the file, so a workbook wrapped on one platform keeps its wrapping when opened on another.
Turn wrapping off, or pick another fix
To unwrap, select the cells and select Home > Wrap Text again so it is no longer highlighted, or clear Wrap text in Format Cells. Rows that Excel sized automatically shrink back; rows you sized by hand keep their height until you AutoFit them.
Wrapping is not always the best answer. Pick the option that matches the job:
- Wrap Text: best for notes, descriptions and addresses where readers need the full text and taller rows are acceptable.
- Widen the column: best for short labels that are only slightly too long. Double-click the right edge of the column letter to AutoFit the width, or set it exactly as shown in setting column width in inches.
- Shrink to fit: keeps the row and column size and reduces the font size instead (Format Cells > Alignment). It works for short overruns, but long text becomes too small to read. Shrink to fit is unavailable while Wrap text is on, so turn wrapping off first. The walkthrough on shrinking text to fit inside a cell covers it.
- Make one cell bigger: if a single cell needs more room, adjusting its row and column is covered in elongating a cell.
A quick example: a team tracking support tickets keeps column B narrow for ticket numbers and column E for long problem descriptions. Wrapping column E and setting its width to about 40 characters keeps the whole sheet on screen while every description stays readable. Ticket numbers in column B never need wrapping, so leave that column alone.
Older versions of Excel
Excel 2013 and Excel 2010 use the same Home > Alignment > Wrap Text button shown in the older screenshots above, and Alt+Enter works for manual line breaks. Microsoft’s current wrap text page lists Excel 2016 and later, so the ribbon may look a little different in those older versions, but the steps are the same.
Wrapping text questions
Does wrapping text affect formulas that refer to the cell?
No. Wrap Text is formatting only, so formulas, sorting and filtering see the same text as before. Only manual line breaks (Alt+Enter or CHAR(10)) add a character to the cell value.
Why did copying a cell bring the wrapping with it?
Wrapping is part of the cell format, so copying and pasting carries it along. Use Paste Special > Values if you want the text without the formatting.
Will wrapped text print the way it looks on screen?
Generally yes, because rows keep their height on the printed page. Tall wrapped rows can push data onto extra pages, so check Print Preview, and see these Excel printing options if the layout needs adjusting.
Can I make wrapping the default for new cells?
There is no single switch for that. You can wrap the whole sheet before typing (select all, then Wrap Text), or modify the Normal cell style on the Home tab so its alignment includes wrapping. For more cell formatting options, see formatting Excel cells.
Next time text runs into the neighboring column, select it, apply Wrap Text, and use AutoFit Row Height if the row does not grow on its own.
Source: Microsoft Support, Wrap text in a cell in Excel and Wrap text.

Kermit Matthews runs Live2Tech from just outside Philadelphia. He is an IT specialist with over 20 years of experience, from a university help desk to small-business IT, IT management and his own consulting practice, and has written tech guides full time since 2020. Steps are checked against the current software on a real device or the maker’s official documentation. More about Kermit.