Thanks to Google, now we can create some amazing presentations by using Google Slides. And this service is absolutely free, which makes things even sweeter.
However, some of us may still not know how to utilize its features, such as adding columns and rows. And to help you with that, we’ve come up with this article.
Here we’ll discuss how to make columns in Google Slides and add some tips that will help you understand the full potential of this service. So, without wasting much time, let’s get started right away!
How to Create Columns in Google Slideshows
- Open your Google Slides file.
- Choose a slide.
- Select Insert at the top of the window.
- Choose Table, then the desired table layout.
Our guide continues below with additional information on making columns in Google Slides, including pictures of these steps.
If you are working on spreadsheets too, and you want to improve their reliability, then follow this background color in Excel tutorial and learn about a way to do it.
How to Make Google Slides Columns (Guide with Pictures)
The steps in this article were performed in the desktop version of the Google Chrome Web browser. These same steps will work for other desktop browsers like Mozilla Firefox, Microsoft Edge, or Apple’s Safari browser.
Google Slides doesn’t give you any limitations, so there is no rule for how many slides you can create, just like Microsoft Powerpoint.
Now it is time to tell you how to insert columns or do a column break in your slides to make them more informative and attractive. We’ll cover all the aspects you need to learn, so tighten your seatbelts!
Step 1: Open your Google Slides presentation.
First of all, go to the Google Docs Presentation’s slide thumbnail. And then, you can create a new slide from there. Alternatively, you can create a new Slides file by clicking New, then Google Slides.
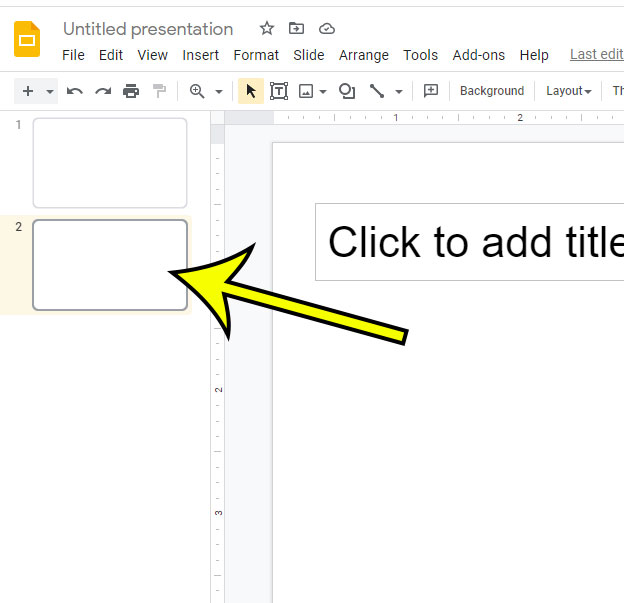
Step 2: Select the slides at the left side of the window to which you wish to add columns.
You can add a new slide by choosing Insert > New slide at the top of the window or using the Ctrl + M keyboard shortcut.
You can change the layout of a slide by right-clicking on it, then choosing the Apply layout option. When the layout options appear, you will see a number of different options that you can select from, including things like Title slide, Section header, Title and two columns, Title only, One column text, and more.
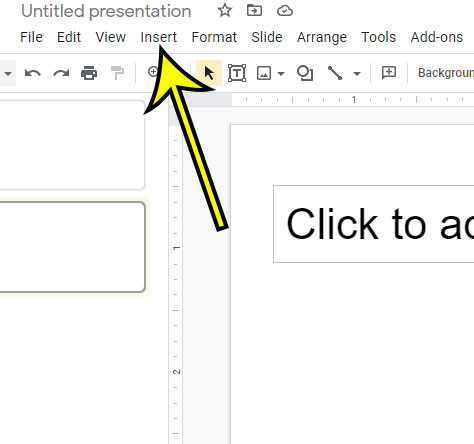
Step 3: Choose the Insert tab at the top of the window.
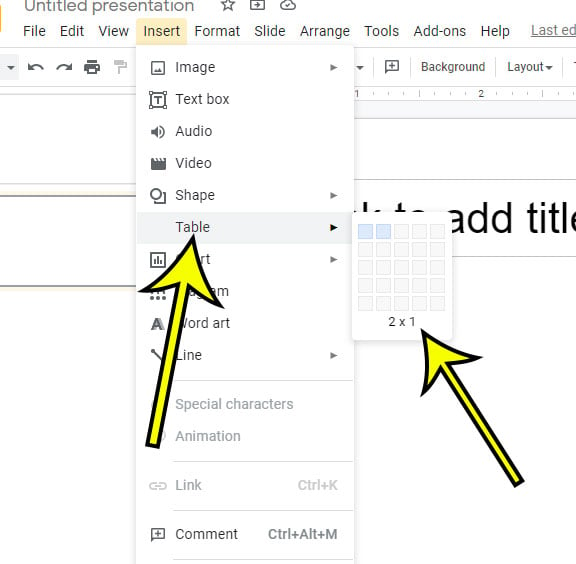
Step 4: Select the Table option, then click the box that indicates the number of rows and columns that you want to use in your slide.
If you only want to create two columns, for example, then you might want to select the 2 x 1 option. Note that the cells will extend vertically as you add more content to them. You can also resize them manually by dragging the controls on the border of the table.
Once you have your columns in the slide you can add more columns by right-clicking on a cell in the table then choosing the Insert column left or Insert column right option. You can use a similar technique to delete unwanted columns as well.
Once you are done picking layouts, add all your details, such as pictures, titles, or anything you want to put in the slide. You can access the Insert Menu to add photos, tables, video clips, and any other thing in all the slides.
After opening the slide layout, right-click a cell on the table and insert rows and columns in this manner: Insert column left > Insert column right > Insert row above > Insert row below.
Related Article: Want to know more about changing the number of columns in a document? This how to switch columns in Google Docs tutorial can answer some of those questions.
How Do I Delete Rows and Columns?
If you have made any mistakes or just want to delete an entire column or row, here’s how to do it.
- Firstly, move your cursor to the column or row you want to delete.
- After pointing to the cursor, use the right-click. When the options appear, select the delete row or delete column option. You can do the same for the next column or row you want to delete.
How Can I Merge Cells in a Table?
When you have to merge two cells to create titles or insert several details in one cell, this is the way to combine cells.
- Open your slide or document at first.
- After that, click on the cells you want to combine and drag to highlight the part.
- Now, do the right clicking, and multiple options will pop up. Next, click on the “Merge Cell.” And if you are not happy with the merging, simply click the unmerge option. And that’s how you combine cells to make an entire table.
How to Split Text into Two Columns in Google Sheets
Here is the instruction on splitting text into two columns in Google Sheets.
- Open your document and select the column. Now, you have to click on the “Data menu” and pick the “Split text to Columns” option.
- After that, Sheets will give you access to a small menu beside the text. From there, you will get the option to split the text with a comma, space, period, or you can use any custom character you want.
- Now, pick the diameter used by your text, and Google Sheets will split your selected text.
How Do I Split Google Docs in Half Horizontally?
Sometimes you may have to split your documents in half for different reasons. And here is how you do it on Docs.
- First of all, access Google Docs and open the document you want to split in half horizontally.
- Now, go to the toolbar, which is located at the top left corner of the window.
- After accessing that, click on the format tab and choose the Columns option.
- You will see a button with two columns; you have to click on that to split the document.
Understanding the Toolbar and Menu Bar
To enjoy the full potential of Google Slides, you should know how to use the toolbar. This way, you can create an intriguing Google presentation effortlessly. These options can be used on all your slides without any trouble.
Paint Format
Thanks to this tool, you can copy/paste the formatting of an object and then use it on another one. Here you will get options such as fill color to make your slides creative. Here’s how you use it.
- Pick a shape and then click on the Paint Format tool.
- Now, choose another shape and watch the formatting of the previous shape; you will see that the similar solid color, line width, etc., will be applied.
Zoom
Well, the zoom functionality on Google Slides comes with limitations; you will not have many options to utilize. However, you can zoom up to 50 to 200 percent, which is enough.
To do that, you can use these keyboard shortcuts; CTRL+ALT++ and CTRL+ALT+–. Furthermore, you can also click on the zoom button from the toolbar.
Images
If you want to insert google images in your slide from your Google Drive, you can do that too! Moreover, you can add pictures from your computer or the web, whatever you prefer. Google Slides also allows you to edit images to make them more amazing!
Bullet Points
Slides aren’t usually text-heavy content, and you mostly need to add bullet points. And in Google Slides, you have the liberty to do that pretty effortlessly.
All you have to do is type whatever you want to say and highlight the text. Then, go to the dropdown menu and select what type of bullet point you want to use. Well, that’s all you need!
Slide Layouts
You can apply slide layouts or change slide layouts to a slide by right-clicking on that slide, choosing Apply layout, then selecting the desired option.
One of the options here allows for multiple columns without using a table, so this could be a preferable solution if you know how many columns you want, it’s only two columns, and you don’t think you will need to add more rows or more columns to one slide in the same manner that’s available when you are using a tabular layout.
More Information on How to Make Columns in Google Slides
Our tutorial above provided you with a way that you can insert a table into one of your presentation slides in Google Slides so that you can include additional columns.
When you add a table to a slide it is going to have some borders that separate the cells. If you don’t want these borders then you can use your mouse to select the entire table, then click the Border color button in the toolbar and select the Transparent option.
If you don’t want to use a table to present your information, another option that you have is to simply add multiple text boxes in one of your slides. You are able to resize and reposition text boxes on a slide, allowing you to create the layout that you want.
If you have added multiple text boxes to one of your slides but find that you need to delete one, simply click on the border of that text box, then press the Delete key or the Backspace key on your keyboard. This will delete the text box as well as any information contained within it.
The Bottom Line
So, here is how you add columns in Google Slides. Well, it is pretty easy to do; hence, you only need to try it once. After that, you can do that in seconds whenever you’re making presentations.

Kermit Matthews is a freelance writer based in Philadelphia, Pennsylvania with more than a decade of experience writing technology guides. He has a Bachelor’s and Master’s degree in Computer Science and has spent much of his professional career in IT management.
He specializes in writing content about iPhones, Android devices, Microsoft Office, and many other popular applications and devices.


