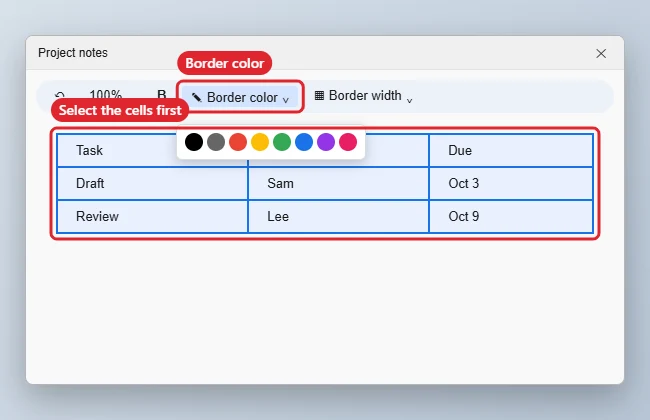
To change table border colour in Google Docs, select the cells (or the whole table), then click the Border color button (pencil icon) in the toolbar and pick a colour. You can also right-click the table, choose Table properties, open Color and set the Table border colour and width. Use the border-width button next to it to make lines thicker, or 0 pt to hide them.
Quick Answer
Select the cells > toolbar Border color > pick a colour. Or right-click > Table properties > Color.
Steps to Change the Border Colour
- Click and drag to select the cells whose borders you want to change.
- Click Border color in the toolbar (it appears when cells are selected; check the three-dot overflow if it’s hidden).
- Choose a colour, or click Custom to enter a hex code.
- Use Border width to adjust thickness.
- To change the entire table at once, right-click > Table properties > Color > Table border.
Border Options
| Goal | How |
|---|---|
| Colour some borders | Select cells > border-position menu > Border color |
| Colour the whole table | Table properties > Color > Table border |
| Thicker lines | Border width |
| Hide borders | Border width 0 pt |
| Cell background | Background color (paint bucket) |
Troubleshooting
- Only one edge changed: Use the border-position menu to choose all borders before picking a colour.
- Removing lines: See removing a table border.
- Paragraph and image borders: See changing border colour in Google Docs.
- Table too big: See fitting a table on one page.
Frequently Asked Questions
Can I use different colours for inner and outer borders?
Yes. Select the cells, choose outer or inner borders from the position menu, then set each colour.
Does it work in the mobile app?
Border colour options are more limited in the mobile apps; use a computer for full control.
Will colours carry over to Word?
Usually yes when you download as .docx.
Summary
- Select the cells.
- Click Border color.
- Pick a colour and width.
- Use Table properties for the whole table.

Kermit Matthews is a freelance writer based in Philadelphia, Pennsylvania with more than a decade of experience writing technology guides. He has a Bachelor’s and Master’s degree in Computer Science and has spent much of his professional career in IT management.
He specializes in writing content about iPhones, Android devices, Microsoft Office, and many other popular applications and devices.