Any tables added to a Google Documents document will almost certainly be positioned to the left side of the page.
Many document editors are unconcerned about table alignment or positioning, but you may dislike the way it looks.
If you want a table to appear in the center of the page, you can learn how to modify its alignment.
Our tutorial below will show you how to center a Google Docs table if you need it to be in the center of the page instead of the left or right side that it’s currently aligned to.
How to Center a Table in Google Documents
- Open the table-containing document.
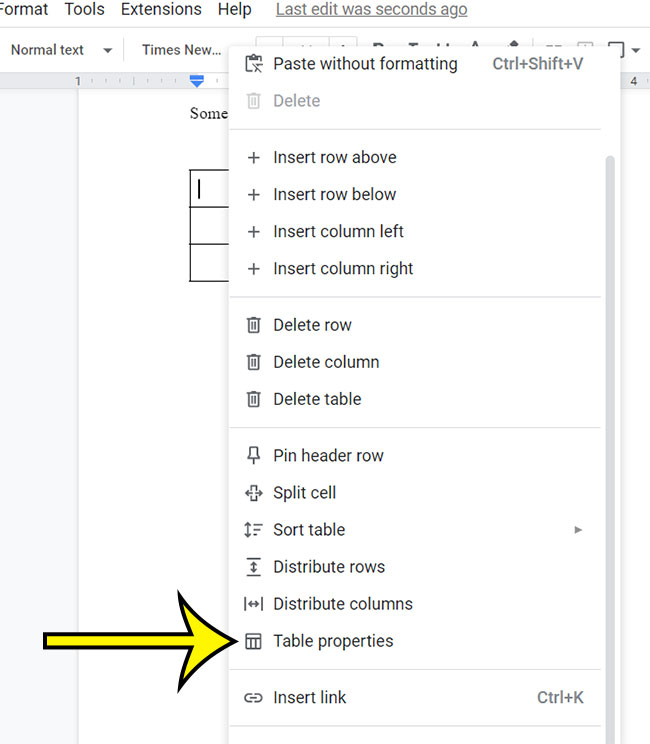
- Right-click within one of the table cells and select Table properties.
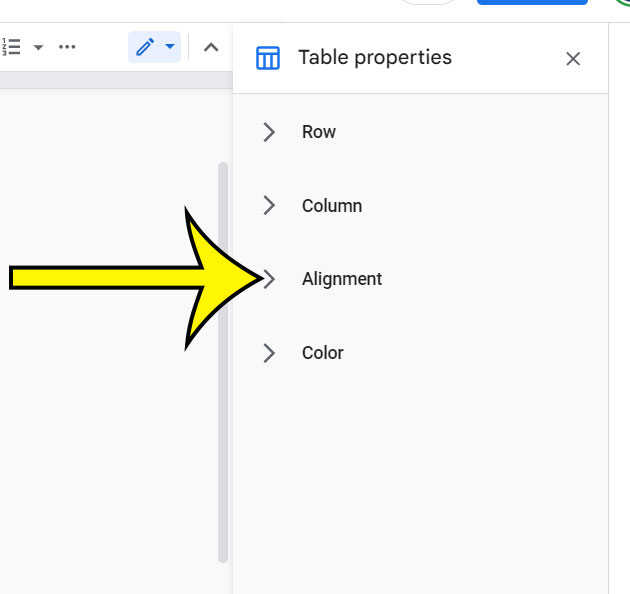
- In the right column, click the Alignment button.
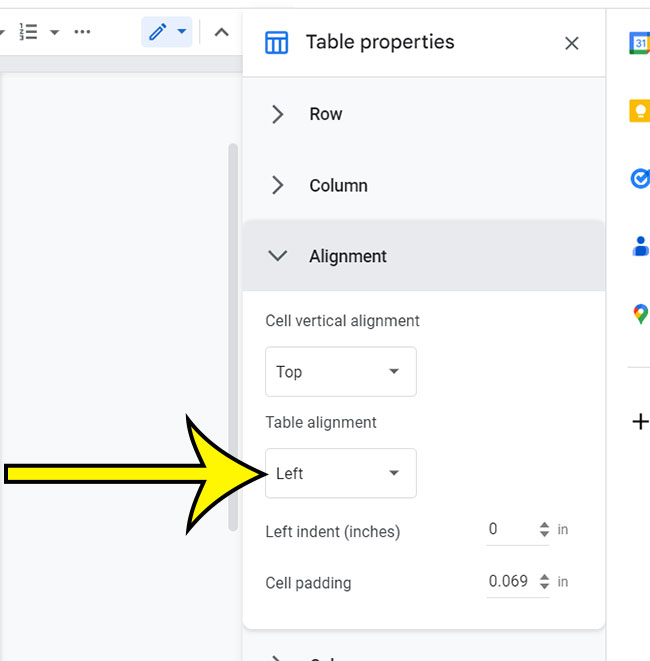
- Choose Table alignment from this section.
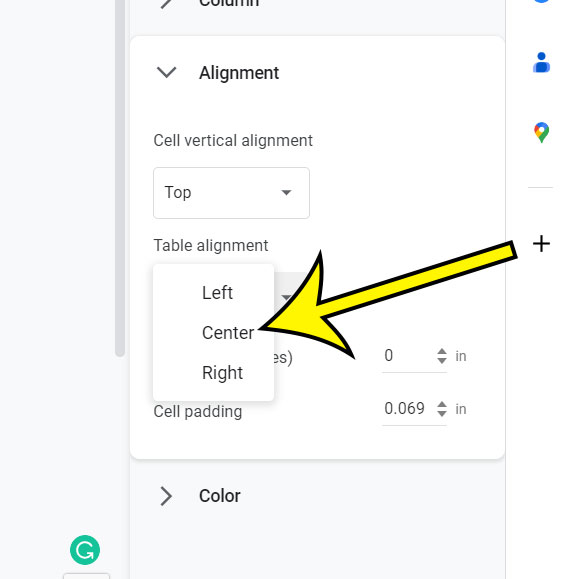
- Choose Center.
Our post continues below with more information, including screenshots, on how to center a table in Google documents.
Making things in a document seem attractive is critical to how your readers interpret that document. This can involve things like cropping or modifying a picture correctly, as well as properly aligning objects on the page.
So you may be wondering how to center a table in Google Documents to improve its appearance.
When you add a table to a Google Documents document, it is automatically aligned to the left side of the page. Sadly, this may not express the appearance you want to portray in your document, and you would prefer the table to be in the center of the page.
In a Google document, you can center a table by right-clicking on it, selecting Table properties, clicking Alignment on the right side of the window, then clicking Table alignment and selecting Center.
This Table properties menu not only allows you to center the entire table, but it also provides you with a number of other settings that you may have been looking for to adjust the layout and design of your table.
The primary sections of this article will concentrate on the table-centering element for a table in your document and whether or not it will offer you with the appropriate centering effect.
Fortunately, this can be done by using the Table properties menu for that table. Our article below will show you how to locate this option and center your Google Documents table.
Related: If you have a horizontal line in your document and you want it to be thinner or thicker, then our Google Docs horizontal line thickness article can help.
How to Add Center Alignment to a Table in Google Documents(Guide with Pictures)
The steps in this section were carried out in the version of Google Docs available at the time this article was last updated.
Step 1: Launch your Google Doc.
Step 2: Choose Table properties from the context menu after right-clicking on the table.
Step 3: In the Table properties column on the right side of the window, select the Alignment option.
Step 4: Choose Table alignment from the Alignment section.
Step 5: Choose Center from the table alignment options.
You can also opt to position the table to the left or right if you want.
You will be able to modify the alignment of a document table whenever you need to center it or align it to the left or right side of the page now that you know how to center a table in Google Documents.
You might wish to adjust the orientation of the data inside the table cells now that you know how to center a table in Google Documents.
The next section outlines how to go about doing so.
How to Align Data in a Google Documents Table Center
To center align all of the data inside your table cells, click and hold the bottom-right cell, then drag your mouse to the top-left cell to select each cell. Then, on the toolbar, click the Center align button.
Because all of the data in your table should now be in the center of the table cells, you may use this method whenever you need to know how to center text in table in Google Documents.
Our lesson continues below with more information about this Google Documents center table option, as well as other ways to customize the look and feel of a Google Docs table.
Making little numbers that go above or below the baseline is a less common formatting option in Google Documents. This tool will be demonstrated in our article on how to conduct subscript in Google Docs.
More on Table Centering in Google Documents and the Table Properties Window
While the steps detailed above showed you how to center an entire table in a Google Doc when you already have one, you may be seeking for other ways to adjust the appearance of the tables in your Google docs.
The Table Properties box is probably the simplest way to make many of these modifications. You can access this menu by right-clicking on a table cell and selecting Table properties.
This brings up a new “Table Properties” column on the right side of the window, which serves as the Format menu for any tables you’ve added to your project. There are several possibilities available here, including:
- Minimum row height
- Pin header row
- Allow row to overflow across pages
- Column width
- Cell vertical alignment
- Table alignment
- Left indent
- Cell padding
- Table border color
- Table border width
- Cell background color
Take note that the right-click menu where you located the Table properties option includes the majority of the additional settings you’ll need to change the layout of your table, such as:
- Insert row above
- Insert row below
- Insert column left
- Insert column right
- Delete row
- Delete column
- Delete table
- Pin header up to this row
- Sort table
- Distribute rows
- Distribute columns
- Table properties
- Insert link
Questions and Answers About the Google Documents Center Table Procedure
In Google Documents, how can I center text in a table?
While you may have followed the steps in our article above to figure out how to center a table in Google Documents, you may just want to center the text within one of the cells in your table.
This can be done by selecting the data to be centered and then pressing the Center Align button in the toolbar above the document.
You may also center text by selecting it, going to the Format tab at the top of the window, selecting Align & indent, and then selecting Center.
Can I center text in a Google Documents cell?
If you need to center some text within one of the cells in a Google Docs table, you can do so in the same manner you would center text in the document body.
- Choose the text.
- On the toolbar, click the Center Align button.
You may use the same procedure to align your text to the left or right instead.
How can I make a column in a Google Documents table wider?
You may have centered the text in one of your table cells, but you can’t tell because there isn’t much empty space on either side of that data.
By clicking and holding on the column border, then dragging it to the left or right to extend the column, you may make it broader and the centering more visible.
The same logic works if you want to make a row taller. Instead, click the row border and then drag it up or down.
On Google Documents, how can I make a table?
While the instructions in our previous post presume that you already have a table in your document that you want to center, it’s possible that you don’t have that object in place. That is an important first step in the process, which will be discussed further below.
You can create a table in Google by following the steps below:
- Determine where you want the table to appear in the document.
- At the top of the window, click Insert.
- Choose the Table option.
- Choose the number of columns and rows for your table.
If you no longer require a table, this instruction on how to delete a Google Documents table might help you get rid of it.
With Google Documents, can I insert two tables adjacent to each other?
Yes, it is possible to arrange two documents next to each other in one of your documents, however, you must utilize a workaround to do so.
- Choose Insert, Table, and then the 2 x 1 option.
- Place your cursor within the left cell.
- Choose Insert, Table, and then the dimensions for the left table.
- Click inside the appropriate cell.
- Choose Insert, Table, and then the appropriate table dimensions.
If you wish to remove the border from the outermost table, simply right-click inside one of its cells and select Table attributes.
Then, under the right Table properties column, pick the Color section, click the Border color button, and select white.
Google Docs Table Centering Video

Kermit Matthews is a freelance writer based in Philadelphia, Pennsylvania with more than a decade of experience writing technology guides. He has a Bachelor’s and Master’s degree in Computer Science and has spent much of his professional career in IT management.
He specializes in writing content about iPhones, Android devices, Microsoft Office, and many other popular applications and devices.


