Adding a table to a document in Microsoft Word gives you the ability to present data in a way that could be difficult to read in paragraphs.
The Word table tool is quite robust, and there are many ways that you can format the appearance and layout of a table in your document.
But if you have added a table from the Insert menu and discovered that the table’s not big enough, then you might need to add one more column.
Our tutorial continues below more about how to add columns to a table in Word for Office 365 if you need to update your table’s layout.
How to Insert a Column in a Microsoft Word Table
- Open your document.
- Click inside the column next to where you want the new one.
- Click Layout next to “Table Design.”
- Select Insert Left or Insert Right.
Our guide continues below with more information, including pictures of these steps.
Documents created in programs such as Google Docs or Microsoft Word are rarely perfect on the first try. Most documents require extensive editing or reworking before they are considered acceptable. This relates to more than just the substance of paragraphs. It can also apply to other document objects, such as photos or tables.
Tables are an excellent way to present specific sorts of data, and Microsoft Word 2010 makes creating and editing tables simple. If you discover that your table does not have enough space for all of the information that you want to include, you may be looking for a means to add more cells to the table.
One effective method is to add a new column to the table. Word 2010 allows you to introduce a new column at any time within an existing table, eliminating the need to remove and recreate a completely new table. You can add a column to an existing table in your document by following the steps outlined below.
Related: Learn how to remove section breaks in Word if you currently have document breaks that need to be deleted.
How to Put Another Table Column in Word 365
The steps in this article were performed in the Microsoft Word for Office 365 version of the application.
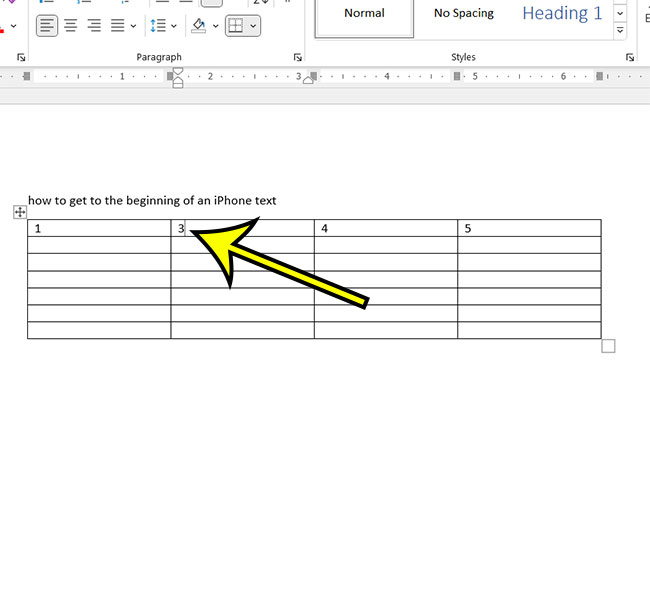
Step 1: Open your Microsoft Word document with the table that you want to modify.
Step 2: Click inside a column in the table that is left or right of where you want the new column.
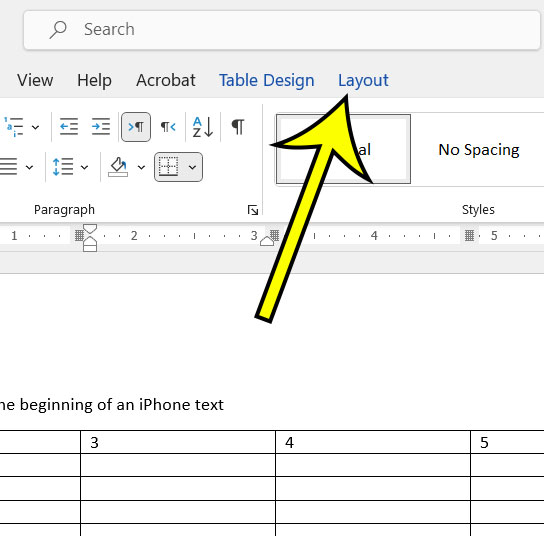
Step 3: Select the blue Layout tab at the top of the window.
Note that there are two “Layout” tabs at the top of the window. You need to click the one that’s next to Table Design.
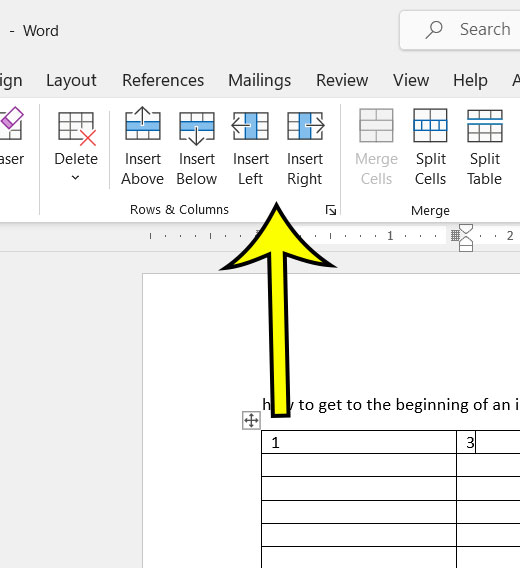
Step 4: Choose either the Insert Left or Insert Right option, depending on where you wish to add the new column.
You can find these buttons in the Row & Columns group in the ribbon, along with buttons to add new rows.
Now that you know how to add columns to a table in Word, you will be able to fix the layout of a table in which you need to include some more data.
More About Adding Word Table Columns
If your table already fills the entire width of the page, Word will change the widths of the existing columns to accommodate the new column.
There are also buttons in the Rows and Columns group that allow you to add new rows to the table. You can accomplish this by clicking the Insert Above or Insert Below buttons.
If you need to add a table to your document, go to the Insert tab at the top of the window, then click the Table button, and then define the number of rows and columns. If you can’t construct a large enough table using the cell icons, you can use the Insert Table button to specify the number of rows and columns.
If you add too many columns or rows to your table, you may remove them by selecting one of the cells in the row or column, then clicking the Delete button and selecting Delete Columns or Delete Rows. You can also choose to delete specific cells or the entire table.
Is your table partially omitted from the page? This can occur if you copy and paste a table from a different document or program. You may need to use some of the tools on the table’s Layout tab to fix this, such as the AutoFit button.
Is it possible to create a Microsoft Word document with more than one column?
While the majority of this post has focused on adding table columns in Microsoft Word, you may be more interested in adding two or more columns to your text. This is cmmon while writing pieces for newspapers or newsletters.
To add a new column to a document, go to the Layout tab at the top of the window, then click the Columns button and enter the number of columns you want on the page.
Alternatively, you can access the Columns dialog box by clicking the More Columns option. You can define the number of columns in the document there. You can also set different column widths and spacing for each column in the document or just have them all be the same column width.
In Word 2010, can I insert or remove column breaks?
Column breaks may be used when adding columns to a document in Microsoft Word 2010, rather than adding columns to a table. A column break, like a page break, instructs Word that the next section of the document should begin in the next column.
The first step is to position your cursor at the location in the document where you want to insert the column break. Then, at the top of the window, select the Page Layout tab, and then click the Breaks button in the Page Setup group in the ribbon. The Column Break button is located there. By selecting that option, a column break will be inserted at that position in the document.
To remove a column break, click the Home tab at the top of the window and then display formatting marks by clicking the Show/Hide button in the Paragraph group of the ribbon.

Kermit Matthews is a freelance writer based in Philadelphia, Pennsylvania with more than a decade of experience writing technology guides. He has a Bachelor’s and Master’s degree in Computer Science and has spent much of his professional career in IT management.
He specializes in writing content about iPhones, Android devices, Microsoft Office, and many other popular applications and devices.


