To remove a section break in Word, turn on formatting marks with Ctrl + Shift + 8 (or click Show/Hide ¶ on the Home tab), click just before the Section Break line, and press Delete. To remove every section break at once, press Ctrl + H, type ^b in Find what, leave Replace with empty, and click Replace All. Before you delete, know that removing a break can change the formatting of the text above it, like margins, page orientation, or headers.
How to delete a single section break
- On the Home tab, click Show/Hide ¶, or press Ctrl + Shift + 8 (Command + 8 on a Mac).
- Find the double dotted line labeled Section Break (Next Page), Continuous, Even Page, or Odd Page.
- Click just to the left of the break, or double-click it to select it.
- Press Delete.
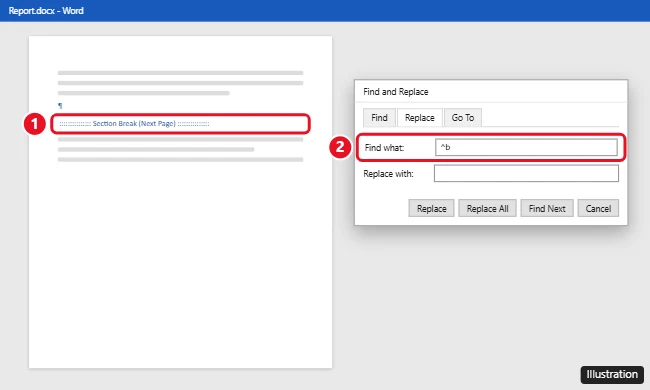
If the break is hard to see, switch to View > Draft. Section breaks appear as clear lines across the page, which makes them easier to select.
How to remove all section breaks at once
- Press Ctrl + H to open Find and Replace.
- In Find what, type ^b. (Or click More > Special > Section Break.)
- Leave Replace with empty.
- Click Replace All.
This also removes the formatting differences between sections, so the whole document takes on one set of margins, orientation, and headers. Save a copy first if your document uses landscape pages or different headers in different parts.
Why the formatting changes when you delete a section break
A section break stores the formatting for the section before it. When you delete it, the text before the break merges into the following section and takes on that section’s formatting. For example, if a landscape page is followed by portrait pages, deleting the break after it turns the landscape page portrait.
Keep the formatting: change the break type instead
If you just want to stop a break from starting a new page, change it to continuous rather than deleting it:
- Click in the section right after the break.
- Go to Layout and click the small arrow in the corner of Page Setup.
- On the Layout tab, set Section start to Continuous.
- Click OK.
Can’t delete a section break?
- Track Changes is on. The break is marked as deleted but stays visible. Turn off Track Changes on the Review tab, then accept the deletion.
- The document is restricted. Check Review > Restrict Editing, or ask the document’s owner.
- You’re selecting the wrong spot. Use Draft view and click right at the start of the break line.
- It’s a page break, not a section break. Page breaks are labeled Page Break and can be removed with ^m in Find and Replace.
Section breaks in Word for the web and Mac
- Mac: Press Command + 8 to show marks, select the break, and press Delete. Use Edit > Find > Advanced Find and Replace for ^b.
- Web: Turn on Show/Hide ¶ on the Home tab, click just before the break, and press Delete.
Frequently asked questions
What’s the difference between a section break and a page break?
A page break just moves text to the next page. A section break lets different parts of the document have different formatting, like margins, columns, orientation, or headers and footers.
How do I see section breaks in Word?
Turn on Show/Hide ¶, or use Draft view.
Why did my headers change after deleting a section break?
Each section can have its own headers and footers. Deleting the break merges sections, so the headers from the following section take over. Press Ctrl + Z to undo.
Can I remove a blank page caused by a section break?
Yes. Delete the break or change it to Continuous. Odd Page and Even Page breaks often add blank pages. See how to delete a page in Word for more fixes.

Kermit Matthews is a freelance writer based in Philadelphia, Pennsylvania with more than a decade of experience writing technology guides. He has a Bachelor’s and Master’s degree in Computer Science and has spent much of his professional career in IT management.
He specializes in writing content about iPhones, Android devices, Microsoft Office, and many other popular applications and devices.