A thin vertical line between columns makes newsletters, brochures, and multi-column reports easier to read. Word 2013 (and every newer version, including Microsoft 365) has a built-in Line between option in the Columns dialog, so you don’t need to draw lines by hand. This guide shows how to turn it on, apply it to only part of a document, and customize the look when the default line isn’t enough.
Quick Answer
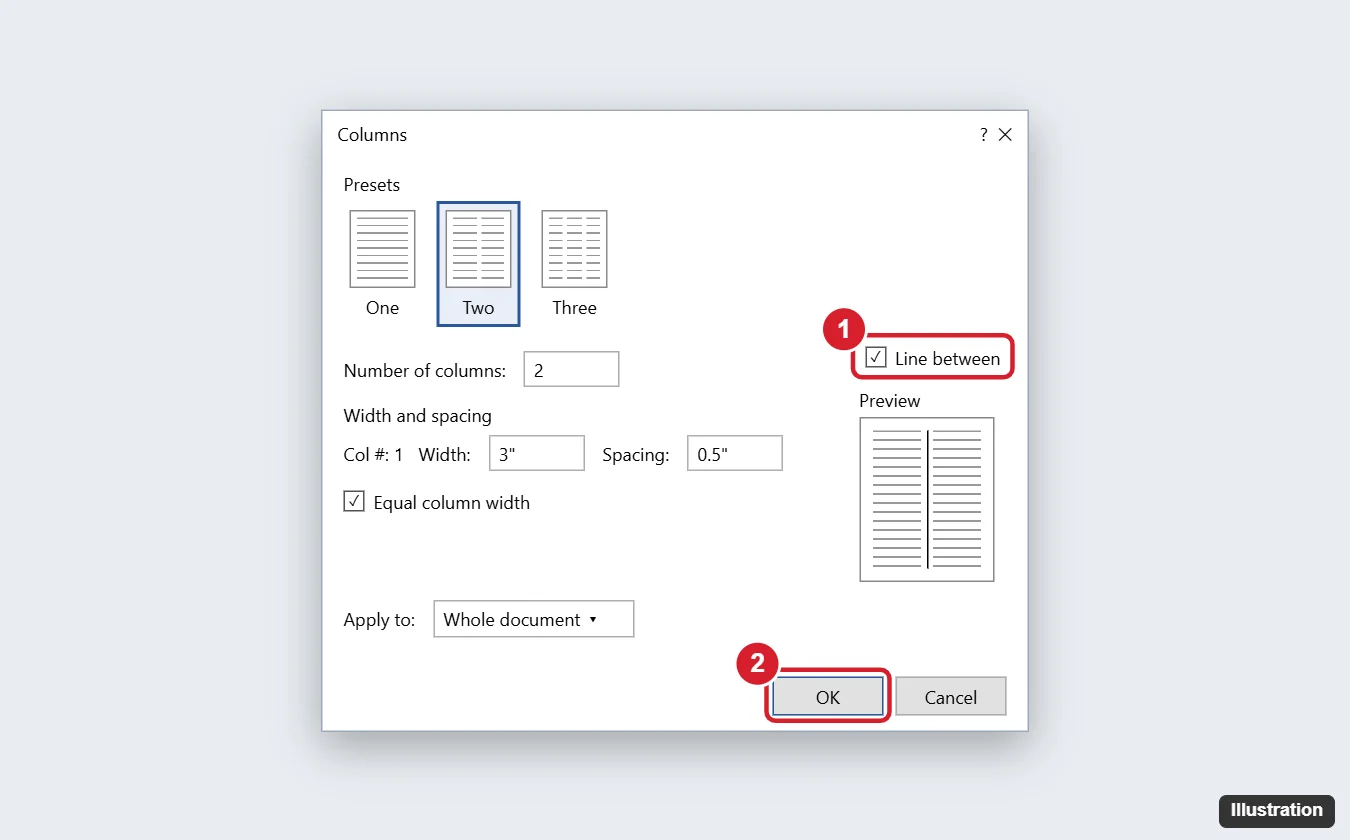
Click in the column text, go to Page Layout (Word 2013) or Layout (newer versions) > Columns > More Columns, check Line between, and click OK.
Add a Line Between Columns
- Click anywhere in the text that’s already in columns. (If it isn’t yet, select the text first.)
- Open the Page Layout tab in Word 2013, or Layout in Word 2016 and later.
- Click Columns and choose More Columns at the bottom of the menu.
- Choose a preset such as Two or Three, or set Number of columns.
- Check Line between. The Preview shows the line.
- Make sure Apply to is set correctly, then click OK.
Apply Columns and Lines to Part of a Document
- Selected text only: select the text before opening More Columns. Word adds section breaks before and after it automatically, and Apply to shows Selected text.
- From a point onward: click where columns should begin and choose Apply to: This point forward.
- Existing sections: click in the section and choose Apply to: This section.
Why the Line Isn’t Showing
- Only one column has text: Word draws the line only as far as the text in the second column extends. Add a column break (Layout > Breaks > Column) or balance columns with a Continuous section break at the end of the text.
- You’re in Web Layout or Draft view: switch to View > Print Layout.
- Different section: each section has its own column settings. Click in the right section and check the setting again.
Customize the Line
The built-in line is always a thin, black, solid line. For a different color, thickness, or style:
- Draw a line shape: Insert > Shapes > Line, hold Shift while dragging to keep it straight, then use Shape Format > Shape Outline to change color, weight, and dashes. Set Wrap Text to Behind Text or In Front of Text.
- Use a table: put content in a two- or three-column table, remove all borders, and add only an inside vertical border with Table Design > Borders.
- Paragraph border: apply a left border to paragraphs in the second column through Home > Borders > Borders and Shading. This works best when columns are separated by column breaks.
Remove the Line Between Columns
Click in the columns, open Columns > More Columns, uncheck Line between, and click OK.
To set up the columns first, see how to make two columns in Word.
Related: How to Change Column Spacing in Word.
Frequently Asked Questions
Does Word for Mac have Line between?
Yes. Go to Layout > Columns > More Columns and check Line between.
Can I add lines in Word for the web?
Word for the web supports columns in recent versions but has limited options. Open the file in the desktop app to add a line between columns.
Will the line print?
Yes. It’s part of the page layout and prints like any other content.
Summary
- Click in the columns and open Layout > Columns > More Columns.
- Check Line between and click OK.
- Use column or continuous section breaks if the line is too short.
- Draw a line shape or use a table for custom styles.

Kermit Matthews is a freelance writer based in Philadelphia, Pennsylvania with more than a decade of experience writing technology guides. He has a Bachelor’s and Master’s degree in Computer Science and has spent much of his professional career in IT management.
He specializes in writing content about iPhones, Android devices, Microsoft Office, and many other popular applications and devices.