Google Documents includes a plethora of formatting choices that you may use to change the appearance of your text as well as the layout of the page.
Indentation for parts of your paragraphs is one type of formatting that you may require.
The hanging indent option that you might need when citing other works is accessible in Google Documents. However, it is under a menu that you may not have used previously.
Further information about how to do a Google Docs hanging indent can be found below.
How to Create a Hanging Indent in Google Documents
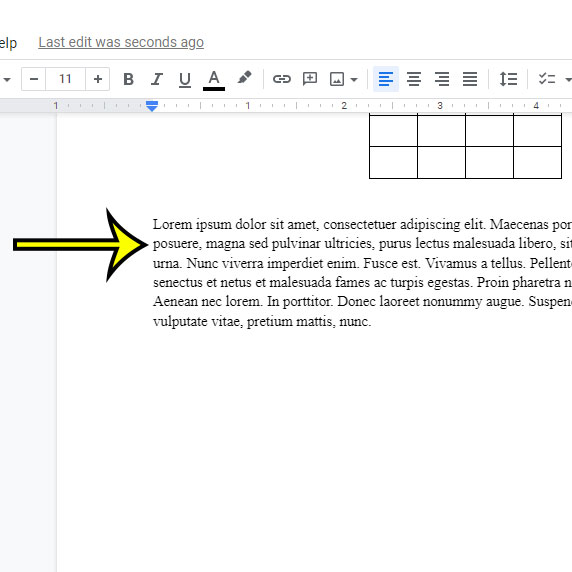
- Open a document.
- Choose a line.
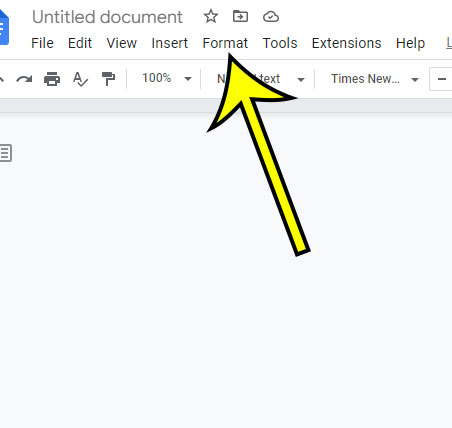
- Select Format.
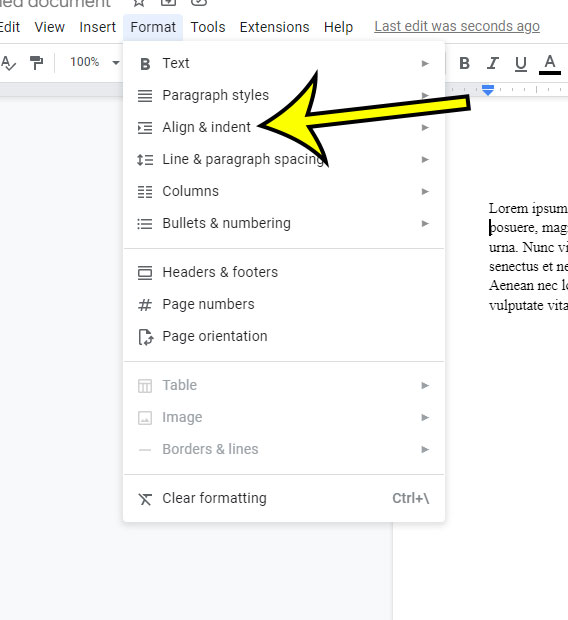
- Choose the Align and indent option.
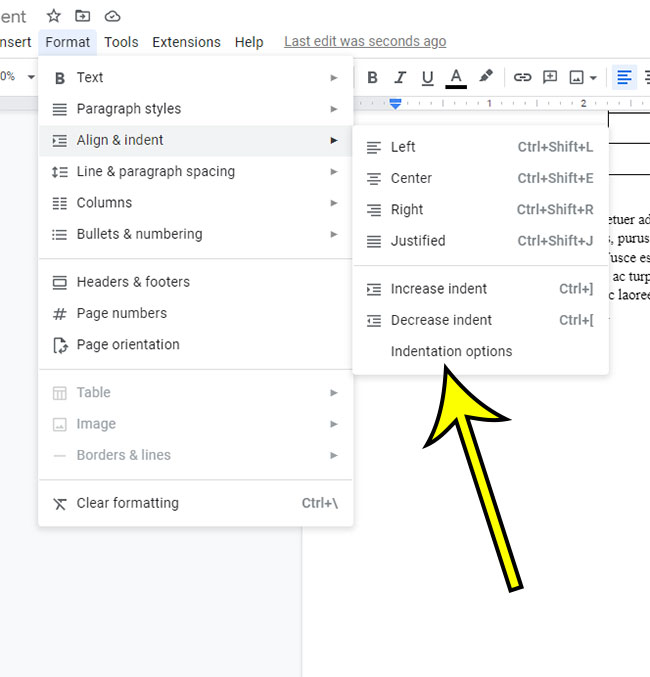
- Select the Indentation options menu item.
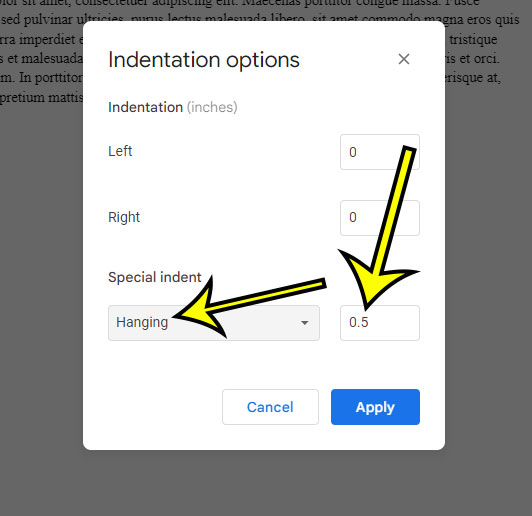
- Choose Hanging from the Special indent menu and enter a size value.
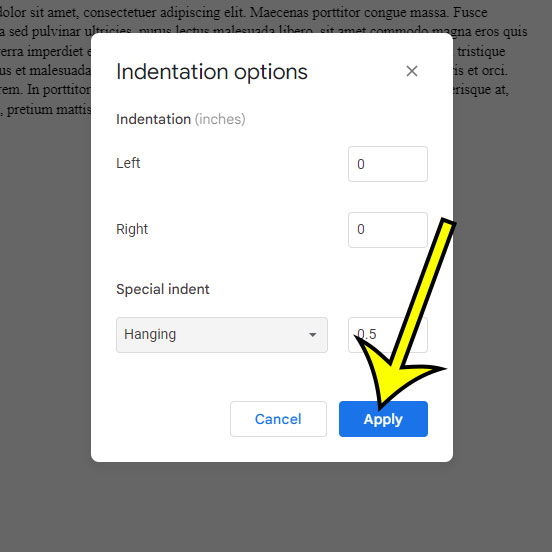
- Click the Apply button.
This guide continues below with further information, including images of this process.
A hanging indent is a formatting option in word processing programs such as Google Docs and Microsoft Word that adds a left indent to a paragraph while leaving the first line in place.
It is a lesser-known but crucial function of the application, analogous to subscripts in Google Documents.
When using a traditional indentation setting, the first line of the paragraph is usually indented rather than the following lines, which are applied off the left margin.
However, because of formatting rules from organizations such as the MLA, some instances, such as on the works cited page, may necessitate that the indent begins on the second line of the paragraph rather than the first.
The approaches described above make use of the Google Documents software from the Google Apps suite to swiftly indent your entire paragraph while leaving the first line of a paragraph in place and modifying your indentation settings.
Related: If you also need specific margins in your document, then this 1-inch margin article can help you set that up.
How to Use a Hanging Indent in a Google Doc
These steps were carried out on the Google Chrome desktop Web browser, but they will also work in most other laptop or desktop browsers.
Step 1: Open your file in Google Documents.
Step 2: Choose the line you wish to indent.
Step 3: At the top of the window, click the Format tab.
Step 4: Choose the Align & indent option from the menu.
Step 5: Choose Indentation Options from the drop-down menu.
Step 6: Choose Hanging from the Special indent menu and enter a size.
Step 7: Choose the Apply option.
You’ll be able to use this style in future documents now that you know how to make a hanging indent in Google Docs.
Hanging Indent Video in Google Docs
If you want to learn more about making this style of indentation in your document, see the video below.
Additional Details about Google Hanging Indents
A blue triangle in the ruler will indicate the placement of the left indent after the hanging indent has been applied. A blue rectangle will show next to the indent marker for the first line.
If the rulers on your document are not visible, go to View > Show ruler to enable them.
Look at the margin settings under File > Page setup if you need more control over the margins in your work.
When using MLA format, you must double-space your document on a regular basis. You may find out what the value is by going to Format > Line spacing and selecting the Double option.
To add this style of indentation, select the paragraph to be formatted, then drag the Left indent icon (the upside-down blue triangle) until the indentation is the appropriate size.
The initial line indent icon (the tiny blue rectangle) can then be moved to the left margin.
To apply the hanging indent to many paragraphs in a Google Doc, use either the ruler approach or the Indentation choices method, first selecting all of the relevant paragraphs by clicking and dragging.
When adding hanging indents, a drop-down menu containing alignment and indentation options like as: will show.
Align the center
Align to the right
Align to the left
Indent the text slightly.
While the hanging indent option allows you to easily indent the second and subsequent lines for many citation entries or other sections of your document, these choices allow you to rapidly alter certain formatting to mimic the appearance of the hanging indent.
In Google Documents, how do you create a hanging indent?
To make a hanging indent, open the document in Google Documents and then select the location in the document where the indent should be placed. Then, select Hanging from the Format > Align & indent > Indentation menu. The dangling indent’s size can then be chosen. After you’re done, press the OK button.
What is a Hanging Indent, exactly?
A hanging indent is a formatting option that places the initial line of a paragraph along the document’s left margin before indenting the rest of the paragraph.
The initial line of a paragraph must be selected in Google Documents to generate a dangling indent. Afterwards, proceed as directed in the preceding instruction.
You will be able to determine how much space to use for the hanging indent during the process.
Is it possible to remove a hanging indent in Google Docs?
Along with the majority of formatting options, you can remove a hanging indent from your page.
To remove the hanging indent in Google Documents, first click within the paragraph that contains it.
Then, select None from the Special Indent drop-down menu under Format > Align & Indent > Indentation choices. Then, click OK to save the modification.
What is the purpose of a hanging indent?
Citations are a prominent example of when people must use hanging indents in their writing.
Your school or employer may utilize any of the following style guides:
Chicago Manual of Style
The American Psychological Association (APA) (American Psychological Association)
Modern Language Association (MLA) (Modern Language Association)
Although each of these style guidelines has its own set of restrictions, it’s usual to need to indent the initial line of your reference, which Google Docs allows you to do with a hanging indent.
If you are also creating a bibliography for your paper, you may need to utilize hanging indents to format your cited works.
Although leaving blank spaces can accomplish the same effect, using the hanging indent style makes it much easier to check that everything is done correctly.
How deep is the average hanging indent?
Set the size to .5 to ensure that the hanging indent you’re creating corresponds to the provided settings.
When dealing with situations in formats such as APA, MLA, or Chicago Style, this is the most typical solution.
What is the purpose of hanging indents?
While there are many uses for these indents, citations and reference lists are the most popular.
They make it easier for readers to understand how each item in a list differs from the one before or after it by providing a quick and easy way to differentiate specific citations from one another.
How do I insert a hanging indent in MS Word?
Some word processing programs, such as Microsoft Word, may demand text alignment.
Despite the fact that Word does not have an Indentation Options window like Google Docs, it does feature a Paragraph Settings dialog box with such an option.
Step 1: Launch Microsoft Word and navigate to the paragraph where you wish to create a hanging indent.
Step 2: Right-click on the selection and choose paragraph.
Step 3: From the Special drop-down menu, select the Hanging option.
Step 4: Click on the “OK” button.
Another Way to Hang Indents in Google Documents
You may also use the ruler to add a hanging indent to one of the paragraphs in your manuscript.
Step 1: Choose Show ruler from the View option at the top of the screen.
Remember that you don’t need to do anything further if the ruler is visible above the page.
Step 2: Indent the paragraph by clicking inside it.
Step 3: To position the indentation, click and drag the ruler’s down arrow.
Step 4: Move the blue rectangle back to its original spot.
You should now have a blue rectangle and a left indent marker, as shown below.
Continue reading if you’re using Google Docs on a mobile device to learn how to insert a dangling indent.
How can you place hanging indents in Google Documents on an Android or iPhone?
Many of the tools you’ll find and use in Google Documents on your computer are also available in the Google Docs app for iPhone and Android devices.
If you want to do it through the mobile app, you’ll need to find a workaround, and one of the options isn’t a hanging indent.
Step 1: Open Google Documents and go to the document you want to modify.
Step 2: In the lower right corner of the screen, tap the pencil icon.
Step 3: Tap twice on the second line of the text.
Alternatively, you can move your cursor to the end of the previous line and hit “Enter” to begin a new line.
Step 4: In the top-right corner of the screen, tap the highlighted “A” icon.
Step 5: Click the Paragraph button.
Step 6: Choose the option for Right indent.
In your text, you should now have a paragraph with the first line aligned to the left margin and the subsequent lines indented to the right.
Your document should have the correct indentation pattern if you followed our steps for establishing a hanging indent on Google Docs mobile above.

Kermit Matthews is a freelance writer based in Philadelphia, Pennsylvania with more than a decade of experience writing technology guides. He has a Bachelor’s and Master’s degree in Computer Science and has spent much of his professional career in IT management.
He specializes in writing content about iPhones, Android devices, Microsoft Office, and many other popular applications and devices.
