The header section of your document is a useful place to put important information like your last name or page number.
Many schools and corporations have strict formatting requirements for documents, which typically involve putting some information in those locations.
Google Docs also has a lot of tools and settings that you can take advantage of if you need to apply some certain or unusual formatting to your document. This even means that you can completely eliminate the header area from your document.
You can remove a Google Docs header by either double-clicking in the header, choosing Options, and selecting Remove header, or you can go to File > Page setup and change the Top margin to “0.”
But if you are creating a document that doesn’t need any information in the header, and you would prefer to eliminate the white space at the top of your document, then it’s possible to remove the header in Google Docs.
Our tutorial below will show you how to do this by reducing the size of the top margin to 0.
How Can I Remove the Header Area in Google Docs?
- Open the document.
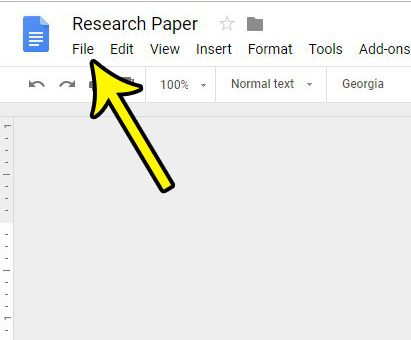
- Select the File tab.
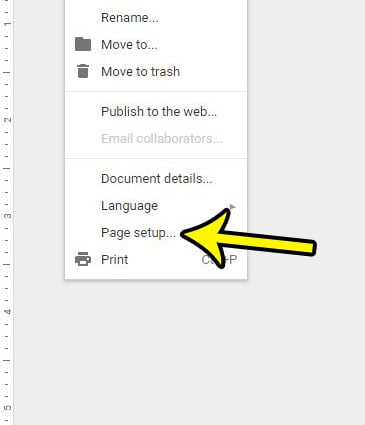
- Choose Page Setup.
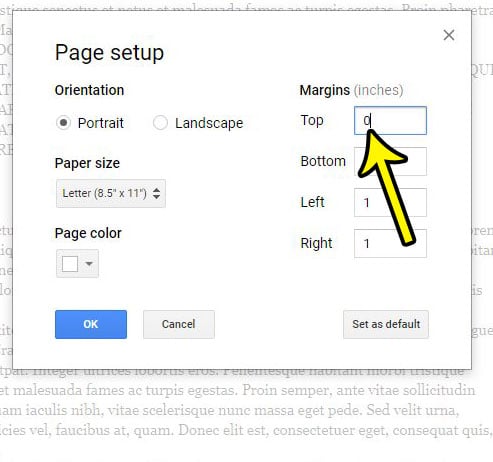
- Change the top margin to “0” then click OK.
Our guide continues below with additional information on the Google Docs removing header process, including pictures of these steps.
How to Get Rid of the Google Docs Header (Guide with Pictures)
The steps in this guide were performed in the desktop version of Google Chrome, but will also work in other desktop browsers like Chrome and Firefox.
Note that you can set the size of the Google Docs header to 0, but there will still be a small amount of white space at the top of the page. The same goes for other margins as well, such as the left, right, or bottom.
Do you need to add a page in the middle of a document? Read our guide on how to add a new page on Google Docs.
Step 1: Sign in to your Google Drive account and open the document where you want to remove the header.
Step 2: Click the File tab at the top of the window.

Step 3: Choose Page Setup at the bottom of this menu.

Step 4: Click inside the Top field under Margins, then delete the current top margin value and set it to 0. Click the OK button when you’re done.

Our guide continues below with additional discussion on removing the top margin in Google Docs documents.
How to Remove or Add Content in the Header of a Google Docs Document in the Google Docs App
If you are using the mobile version of Google Docs on your Android or iOS device then you may need to know how to edit the header content there as well. You can do this with the following steps.
- Open the Google Docs app.
- Open the document.
- Tap the three dots icon at the top-right of the screen.
- Touch the Print layout toggle switch.
- Select the pencil icon at the bottom-right of the screen.
- Tap inside the header section and edit the content as needed.
If you need to remove the header section in the mobile app then you can tap the three dots at the top-right of the app and choose Page setup. There you will select the Margins option, choose Custom, then change the top margin value to 0.
More Information on How to Get Rid of Top Margin in Google Docs
Note that if you have information in the header currently, such as your name or a page number, then the header will still display that information. If you delete it the header will reduce to reflect the 0 margin size.
Effectively this means that you will have a header or top margin with a size of 0, it’s just forced to expand to include the page numbers or title or whatever you currently have in the header space.
While we have focused on how to remove header sections from a Google Docs document in this guide, you can go more than just modify Google Docs headers from the Page Setup menu.
This is a good way to change the other margins in your document if your school or organization has specific document formatting requirements that have margin specifications.
if you need to make changes to your header format, rather than choosing to remove headers entirely, then you may need to go to a different location.
For example, if you need to customize page numbering for your document, then you would do so by going to Format > page numbers. This “Page Numbers” Menu gives you options for putting the page numbers in the header or footer, a “Show on first page” box that you can check or uncheck depending on whether or not you wish to include the page number on the first page header or footer, and you can even select a number at which you would like the page numbering to begin.
If you double-click inside the header text space in the document you will see a check box for Different first page, as well as an Options dropdown menu that includes options for Header format, Page numbers, and Remove header. This is another option that you have if you want to completely remove the header from your Google Docs document.
Are you adding Web addresses to your document and Google Docs keeps converting them to hyperlinks? Find out how to stop this automatic link conversion so that you can display those URLs as plain text.
How to Create Google Docs 1 Inch Margins
Margin setting is a crucial stage of document formatting. The use of margins helps your page’s text and other content to be properly aligned and organized. Margin settings in Google Docs are easy to do. In this post, we’ll show you how to set margins in Google Docs that are one inch wide.
Our 1 inch margins Google Docs article will provide you with additional information on margin settings in the application, as well as how to change them in the mobile app.
Step 1 – Launch Google Docs.
To begin, open a new or existing document in Google Docs. You can start a new document by clicking the “Blank” or “New Document” options on the homepage.
Step 2 – Click the Page Setup Menu.
To set margins in Google Docs, you must open the Page Setup menu. By selecting “Page Setup” from the “File” menu located in the top-left corner of the screen, you can accomplish this. You can also use the “Ctrl+Shift+P” (Windows) or “Cmd+Shift+P” (Mac) keyboard keys to open the Page Setup menu.
Step 3 – Establishing Margins
Under the Page Setup menu, you can adjust the margins for your page. Top, bottom, left, and right are the four options offered under the “Margins” section. Simply type “1” next to “Top,” “Bottom,” “Left,” and “Right” to define margins of one inch on all four sides. The up and down arrows can also be used to modify the margins.
Step 4: Click “OK”
After choosing your margins, click the “OK” button to preserve your modifications. Your paper will now have 1 inch margins on all sides.
Extra Guidance
You may easily modify the margins by moving the margin lines on the ruler at the top and left of the document. Simply click and drag the margin line to alter the margin size.
If you need to adjust the margins for a specific section of your document, select the text you wish to modify, open the Page Setup menu, and select “Apply to [Selected text]” under the “Margins” section.
A document’s content might move if the margins are changed while it still has content. Make sure to double-check the document’s layout after making any necessary margin adjustments to ensure that everything is positioned correctly.
Finally, setting the margins in Google Docs to one inch is a quick and easy process. By following the preceding instructions, you can make sure that your page is correctly formatted with even margins on all sides.

Kermit Matthews is a freelance writer based in Philadelphia, Pennsylvania with more than a decade of experience writing technology guides. He has a Bachelor’s and Master’s degree in Computer Science and has spent much of his professional career in IT management.
He specializes in writing content about iPhones, Android devices, Microsoft Office, and many other popular applications and devices.