The sizes of the margins in a Microsoft Word document might not be something that you normally pay a lot of attention to, but they can look bad if they are too big or too small.
Luckily this is a setting that you can adjust for the documents that you are editing, and you can usually make them bigger or smaller than their current settings.
Our tutorial below will show you how to make the margin smaller in Word 2013 if the current margins are too large.
How to Change Word 2013 Margin Sizes
- Open the document.
- Choose the Page Layout tab.
- Click Margins.
- Select a margin size.
Our guide continues below with additional information about making margins smaller in Word 2013, including pictures of these steps.
A document that you create in Microsoft Word will have a margin that separates the body of the document from the edge of the paper. The size of that margin can vary based on the type of document you are creating, but it’s possible that that margin could be too large for your current needs.
If you are creating a document that requires a smaller margin than what you are currently using, then it’s possible that change the margin on the document to meet the specifications that you need. Our tutorial below will show you where to find the Margins setting so that you can choose from one of the default options, or specify custom margins.
How to Decrease the Size of the Margins in Word 2013
The steps in this article were performed in Microsoft Word 2013, but work in other versions of Word as well, such as 2007, 2010, and 2016.
Note that these steps only apply to the document that is currently open. This will not change the default margin settings for future documents, nor will it affect any other existing documents.
Step 1: Open your document in Microsoft Word 2013.
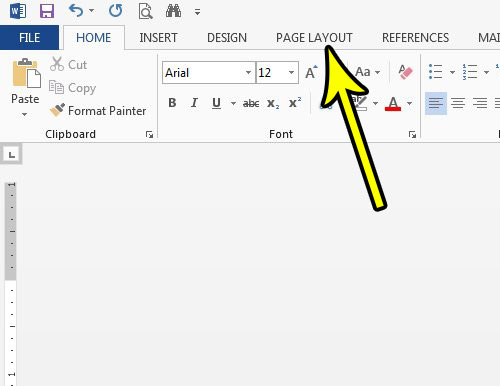
Step 2: Choose the Page Layout tab at the top of the window.

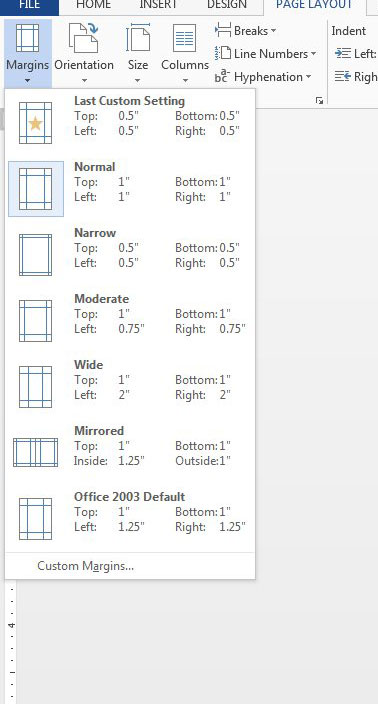
Step 3: Click the Margins button at the left side of the ribbon, then click a margin option that is smaller than the one that you are currently using.
If you don’t see an option that you like, you can click the Custom Margins option at the bottom of the menu.

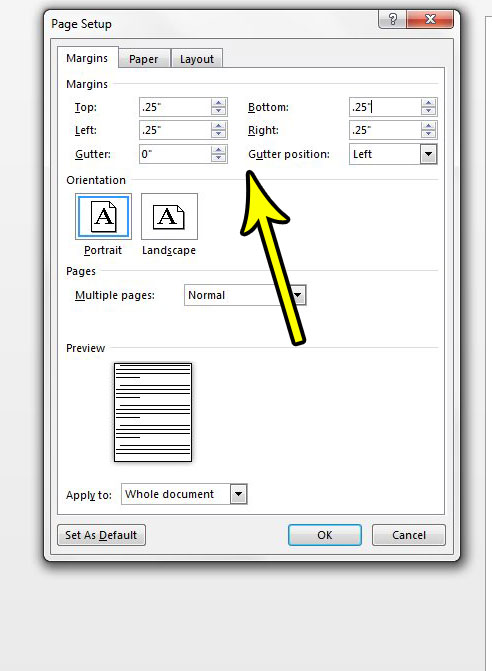
If you chose the Custom Margins option, then you will see the window below, where you can specify the margin size that you want to use.

Now that you know how to make the margin smaller in Word 2013, you can use this technique to fix margin size issues that you encounter in other documents as well.
Note that some printers will have difficulty printing documents with very small or no margins, so it’s possible that this is an issue you may encounter if you go that route.
Does the header section at the top of your document contain a bunch of information that you don’t need? Find out how to delete header information in Word 2013 and make that area of the document blank.
Setting 1 Inch Margins in Google Docs
Setting margins is an essential step in document formatting. Margins aid in the appropriate alignment and organization of the text and other information in your page. Setting margins in Google Docs is a simple procedure. We’ll walk you through the process of setting 1 inch margins in Google Docs in this article.
Step 1: Open Google Docs first.
Open a new or existing document in Google Docs to get started. By selecting the “Blank” or “New Document” option on the homepage, you can begin a new document.
Step 2: Open the Page Setup menu.
You must access the Page Setup option in Google Docs in order to set margins. You can accomplish this by choosing “Page Setup” from the “File” menu in the top-left corner of the screen. The Page Setup menu may also be accessed by pressing the “Ctrl+Shift+P” (Windows) or “Cmd+Shift+P” (Mac) keyboard shortcuts.
Step 3: Establish Margins.
The margins for your document can be set under the Page Setup menu. There are four possibilities available under the “Margins” section: top, bottom, left, and right. Simply enter “1” in the slots next to “Top,” “Bottom,” “Left,” and “Right” to specify 1 inch margins. The margins can also be changed using the up and down arrows.
4th step: select “OK.”
Click the “OK” button to save your changes after setting your margins. Now, all sides of your paper will have 1 inch margins.
If you are using Google Docs and you need to edit the margins in a document there, then you can read this guide for additional information.
Extra Advice
By dragging the margin lines on the ruler at the top and left of the document, you may easily change the margins. To change the margin size, merely click and drag the margin line.
Select the text you want to modify, open the Page Setup menu, and choose “Apply to [Selected text]” under the “Margins” section if you need to change the margins for a particular piece of your document.
Changing the margins on a document that already contains content could cause part of the content to move. After adjusting the margins, make careful to double-check the document’s layout to make sure everything is properly aligned.
In conclusion, adjusting the margins in Google Docs to one inch is a simple and quick operation. You can make sure that your document is correctly formatted with even margins on all sides by following the directions given above.

Kermit Matthews is a freelance writer based in Philadelphia, Pennsylvania with more than a decade of experience writing technology guides. He has a Bachelor’s and Master’s degree in Computer Science and has spent much of his professional career in IT management.
He specializes in writing content about iPhones, Android devices, Microsoft Office, and many other popular applications and devices.