If Excel keeps printing the same small block of cells and ignores the rest of the sheet, the worksheet most likely has a saved print area. To remove it, click anywhere on that sheet, open the Page Layout tab, and in the Page Setup group choose Print Area > Clear Print Area. The next printout includes everything on the sheet that has content.
Why a print area sticks around
A print area is a range you tell Excel to print instead of the whole sheet. Microsoft notes that it is saved when you save the workbook, so it travels with the file. That is why a spreadsheet you got from a colleague, or one you set up months ago for a single report, can quietly limit every printout until someone clears it.
Three details shape how clearing works:
- A print area belongs to one worksheet. Clearing it on Sheet1 does nothing to Sheet2.
- A sheet can hold several print areas. Microsoft states that clearing a print area removes all the print areas on that worksheet, so you do not have to remove them one at a time.
- Clearing only removes the print instruction. Your data, formatting and other page settings are not touched.
Check whether the sheet has a print area
Before you change anything, it helps to see what Excel thinks it should print.
- Click the worksheet tab.
- On the View tab, in the Workbook Views group, click Page Break Preview.
- Look at the sheet. The part that will print is shown normally with page labels; cells outside it look grayed out. If a small range is lit up while the rest of your data is gray, a print area is the cause.
- Click Normal on the View tab to go back.
Another place to look is the Name Manager (Formulas > Defined Names > Name Manager). Excel stores a print area as a defined name, which may appear in the list as Print_Area with the sheet name in the Scope column. If you see it there, that sheet probably has a print area.
Clear the print area on one sheet
The steps below are for Excel for Microsoft 365 on Windows, which matches Excel 2016 through 2024. Mac and web notes follow.
- Open the workbook and click anywhere on the worksheet whose print area you want to clear. You do not need to select the print area itself.
- Click the Page Layout tab at the top of the window.

Older Excel version shown; current screens look different. - In the Page Setup group, click Print Area, then click Clear Print Area.
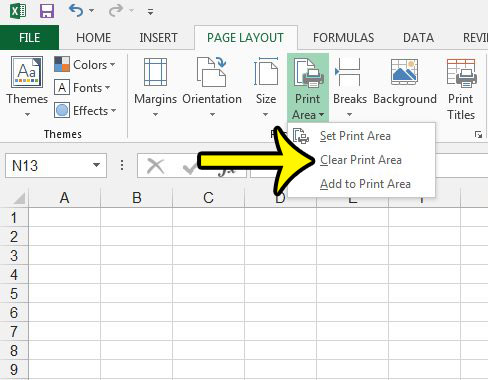
Older Excel version shown; current screens look different. - Press Ctrl+P and check the preview. It should now show the whole used range of the sheet.
- Save the workbook so the change sticks for the next person who opens it.
Nothing seems to happen on screen when you click Clear Print Area; the result shows up in the print preview and in Page Break Preview. If you want to print a different range rather than everything, you can skip clearing and choose Set Print Area on a new selection instead, as explained in how to set the print area in Excel.
Clear print areas on several sheets
Microsoft’s help describes clearing the print area one worksheet at a time, and it does not document what happens with grouped sheets. The dependable approach for a few sheets is to click each tab in turn and run Clear Print Area on each one.
For a workbook with many sheets, a short macro does the same job in one pass. Microsoft’s VBA reference says that setting a sheet’s PrintArea property to an empty string sets the print area to the entire sheet. To use it:
- Save a copy of the workbook first in case you need to go back.
- Press Alt+F11 to open the Visual Basic Editor, then choose Insert > Module.
- Paste these lines:
Sub ClearAllPrintAreas()
Dim ws As Worksheet
For Each ws In ActiveWorkbook.Worksheets
ws.PageSetup.PrintArea = ""
Next ws
End Sub - Run the macro (Run > Run Sub/UserForm, or F5), then close the editor and save the workbook.
Macros must be allowed in the workbook for this to run. If the file is an .xlsx workbook, Excel may ask when you save whether to save without the VB project; keeping the .xlsx format is fine, because the macro is not needed after it runs. Microsoft documents the property on its PageSetup.PrintArea reference page.
Print everything once without clearing the print area
Sometimes the print area is there on purpose. A finance team might keep a print area that covers only the summary table, while you need the full sheet just this once. Excel can skip the print area for a single print job:
- Go to File > Print (or press Ctrl+P).
- Under Settings, click the arrow next to Print Active Sheets.
- Select Ignore print area, check the preview, and print.
The saved print area stays in the workbook for next time. Here is the difference in short:
| Option | What it does | Lasts |
|---|---|---|
| Clear Print Area | Deletes every print area on the active sheet | Permanently, once you save |
| Ignore print area | Prints the whole sheet this time only | One print job |
| Set Print Area | Replaces the print area with your current selection | Until changed, once you save |
To print a selected range just once without saving any print area, see how to print part of a spreadsheet in Excel.
Excel for Mac and Excel for the web
Excel for Mac
Microsoft’s Mac instructions use the menu bar: click anywhere on the sheet, then on the File menu point to Print Area and click Clear Print Area. The same menu has Set Print Area if you want to define a new one.
Excel for the web
Microsoft’s help for Excel for the web does not describe a Clear Print Area command. When you print from the browser (File > Print > Print), the print options let you choose Current Selection, Entire Sheet or Entire Workbook. If a saved print area still limits the output, select Open in Excel to open the file in the desktop app and clear it there.
If the whole sheet still does not print
Clearing the print area fixes the most common cause, but a few other settings can make a printout look incomplete.
- Hidden rows or columns. Hidden rows and columns never print. To show them all, click the Select All triangle above row 1 and to the left of column A, right-click any column letter and choose Unhide, then right-click any row number and choose Unhide. More detail is in how to hide and unhide rows and columns.

Older Excel version shown; current screens look different. - Print Selection is chosen. On the Print screen, make sure the first setting says Print Active Sheets, not Print Selection.
- The print area is still listed. If Page Break Preview still shows a lit-up range after clearing, check that you were on the right sheet. If the Name Manager still lists a Print_Area name for that sheet, run Clear Print Area again on that sheet.
- Columns spill onto extra pages. That is a scaling issue rather than a print area. Learn about making an Excel worksheet fit on one page, and see how to stop extra blank pages from printing.
- Pages split in odd places. Manual page breaks are a separate setting from the print area; see how to remove all page breaks in Excel.
Print area FAQ
Does Clear Print Area delete any cells?
No. It removes only the instruction about what to print. Every value, formula and format stays where it was.
Can I get a cleared print area back?
Select the same range again and choose Page Layout > Print Area > Set Print Area. If you have not saved yet, you can also close the workbook without saving to keep the old print area.
Does clearing the print area reset my other print settings?
No. Orientation, margins, scaling, print titles and the option to print headings are separate. If you want the row numbers and column letters on paper, that is covered in how to print row and column headings in Excel.
With the print area gone, it is a good moment to look at the rest of the page setup before the next print run. If the printed sheet will be signed, you can also add a signature line in Excel so there is a marked place for it. Microsoft’s own steps are on Set or clear a print area on a worksheet, with the Ignore print area option on Print a worksheet or workbook and the Mac menu on Print part of a sheet in Excel for Mac.

Kermit Matthews runs Live2Tech from just outside Philadelphia. He is an IT specialist with over 20 years of experience, from a university help desk to small-business IT, IT management and his own consulting practice, and has written tech guides full time since 2020. Steps are checked against the current software on a real device or the maker’s official documentation. More about Kermit.