Printers and printing can be frustrating, so it would be great if everyone would view spreadsheets, grids, and other similar types of documents on their screen inside the Microsoft Excel program.
However, that is an impractical solution for many situations, so you will often find yourself printing out the spreadsheets you have created.
But if all of your data doesn’t comfortably fit on one page, then you will need to make some changes so that it’s easier to read.
You can make an excel spreadsheet fit on one page by clicking the File tab, selecting the Print tab, then clicking the No Scaling button, and choosing the Fit Sheet to One Page option.
If you are dealing with a large enough amount of data, then you will inevitably encounter the situation where part of the spreadsheet is printing on an additional page, which effectively duplicates the number of pages of paper on which it is printed.
Additionally, aside from wasting paper, it makes for a very difficult read. Luckily Excel recognizes this problem, and you can use a built-in print setting to force your document to print on one page, or you can adjust the settings of your document manually and fix the printout problem yourself.
For additional information about working in Excel, you can visit innovisionaward.org for more tutorials.
How to Get Excel to Fit on One Page – Quick Summary
- Click the File tab.
- Select the Print option in the left column.
- Click the No Scaling button, then choose Fit Sheet on One Page.
- Click the Print button.
For additional information on how to make an Excel sheet fit on one page, continue reading our guide with pictures below.
How to Use The Easy Way to Print a Spreadsheet on One Page in Excel 2010 (Guide with Pictures)
In an ideal world, you would be able to click a button and have your spreadsheet print out exactly how you need it. But not all spreadsheets are created equally, so Excel gives you a menu that you can use to modify the printout of your spreadsheet.
This is a simple, elegant solution that doesn’t require you to make any adjustments to your data or spreadsheet layout. So read below to see where this setting is and how you can use it to your advantage.
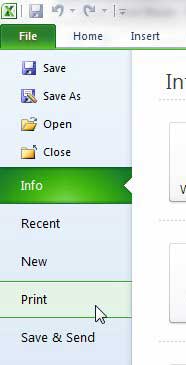
Step 1: Click the File tab at the top-left corner of your Excel window, then click Print in the column at the left side of the window.
Step 2: Click the No Scaling button at the bottom of the window, then choose one of the options you see there.
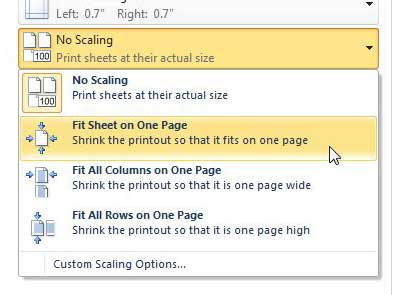
The actual choice you are going to make here is going to depend upon the layout and structure of your spreadsheet.
If you are lucky, you will be able to choose the Fit Sheet On One Page option and wind up with a sheet that is readable and still looks good.
However, particularly in the case of a spreadsheet with a considerable number of rows or columns, the data might simply be too small to read. In this situation, you will need to choose either the Fit All Columns on One Page option, or the Fit All Rows On One Page option.
Clicking each option will adjust the Print Preview at the right side of the window to show you what the printed document will look like with that setting.
How to Use the Slightly More Difficult Way to Print a Spreadsheet on One Page in Excel 2010 (Guide with Pictures)
Occasionally you will run into a situation where adjusting the settings on the Print menu following the instructions above will not provide you with a suitable solution.
In these cases, you are usually better served by making adjustments to your layout yourself. Below are a few of the settings you should look at.
1. The Margins
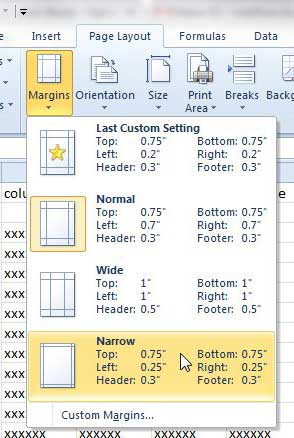
The default margin settings in Excel 2010 are pretty wide, and most printers can comfortably print with substantially smaller options.
This is a great option to look at it you only need to fit one or two more columns or rows on the page. You can adjust the margin settings by clicking the Page Layout tab, then clicking the Margins drop-down menu.
2. The Orientation
If you have too many columns to comfortably fit on the default Portrait orientation, try out the Landscape option.
You can choose between the different orientation options by clicking the Page Layout tab, then clicking the Orientation drop-down menu.

3. The Page Setup menu
Then there are the situations where you just need to change just about everything regarding the way the page is structured and laid out.
In these predicaments, it is easier to just open the Page Setup menu. Click the little Page Setup button in the bottom-right corner of the Page Setup section on the Page Layout tab to access it.
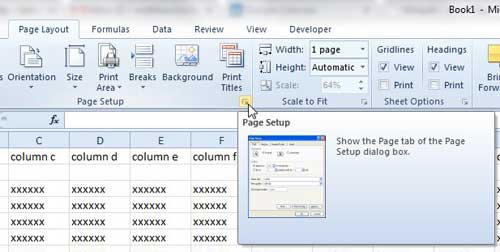
Then just start making any necessary changes to this menu. There are several tabs at the top of the window that you can use to navigate through the various settings.
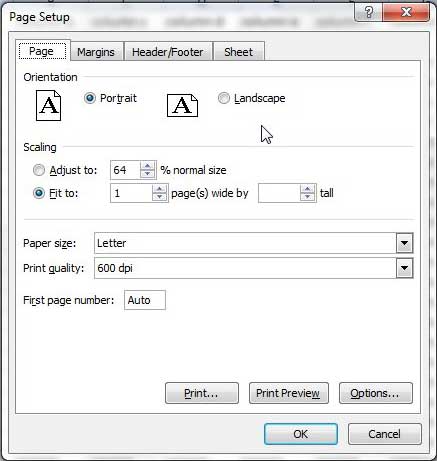
If you find that you need to constantly make the same changes to spreadsheets but you don’t want to change your default settings, it is usually faster to just open this menu and make all of your changes in the same spot.
Some Helpful Tips on How to Make Excel Sheet Fit to Page
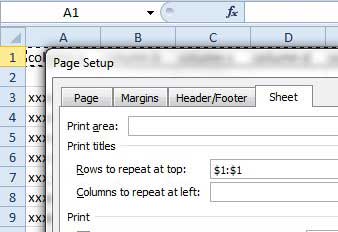
There is a setting on the Page Setup menu that allows you to repeat a row at the top of each page.
If you are dealing with a report that is printing out on a lot of pages and contains a number of columns with similar information, then you should use this setting to repeat the row with your column headings on each page.
See the image of the Page Setup dialog box below to find the setting, then simply click the row number containing the column headings that you want to repeat on each row.
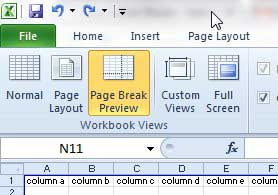
You can also use an option on the View tab called Page Break View that will let you see how your spreadsheet will print out with the current settings.
This will give you an idea of the changes that you still need to make if you are manually adjusting the layout of your document.
Finally, look over all of the information in your document before you print it out if you are having trouble getting all of your information on one sheet.
Often times you can hide a column of data that might not be that important to your situation, or you can adjust the width of a column or the height of a row.
When you click the Page Setup dialog box launcher in the Page Setup group of the ribbon you will see a Page tab at the top of that window. Here you will be able to customize additional items that will affect the page layout of your printed page, including things like paper size and orientation. There is also a “Scaling” section here where you can fit your spreadsheet to a single page, or scale to fit on however many pages you would like.
A spreadsheet that has been printed incorrectly can look very unprofessional, so take the time to adjust your file before you print it out and share it with your boss or colleagues. The easier it is to read, the better you look.
Summary – How to fit a spreadsheet on one page in Excel 2010
Our guide above showed you how to find the option to print on one page in Excel 2010 by going to File > Print > and choosing the Fit Sheet to One Page option.
You can even select from additional printing fit options that will force all of your columns on one page, or force all of your rows on one page.
Along with some of the other settings that we mentioned above this can be a real timesaver when you need to format a spreadsheet for printing.
The above method for printing a sheet on one page is just one of many options to consider when making your Excel files easier to read. Read about repeating the top row on every page to see another setting that can make your data easier to understand.
Additional Reading

Kermit Matthews is a freelance writer based in Philadelphia, Pennsylvania with more than a decade of experience writing technology guides. He has a Bachelor’s and Master’s degree in Computer Science and has spent much of his professional career in IT management.
He specializes in writing content about iPhones, Android devices, Microsoft Office, and many other popular applications and devices.