The first time you try and print a large spreadsheet in Microsoft Excel, there’s a good chance that something will go wrong.
There won’t be gridlines, there may not be titles, or you might have a single column on its own page.
Our tutorial below will show you how to prevent extra pages from printing in Excel 2010 by changing a setting on the Print menu.
How to Stop Printing Extras Pages in Microsoft Excel
- Open the Excel file.
- Select the File tab.
- Choose Print.
- Click the No Scaling button and choose Fit All Columns on One Page.
- Click Print.
Our guide continues below with additional information on how to prevent extra pages from printing in Excel 2010, including pictures of these steps.
Excel documents are not primarily designed for printing, so it’s pretty common to encounter situations where a spreadsheet printout is kind of a mess.
Whether all of your cell contents seem to run together or column headers don’t print on anything but the first page,
Excel’s default print settings need to be adjusted in most situations.
But perhaps one of the biggest problems is when your spreadsheet has a couple more columns than what will fit on one page, so Excel forces them onto a second page.
This can easily turn a ten-page document into a twenty-page document, which you will then either need to fix and reprint or tape together.
But there is a simple way to fix this on the Print menu and save yourself some paper.
Looking for a simple backup solution? Start with this external hard drive and create backup copies of important files you can’t afford to lose.
How to Print All Excel Columns on One Page (Guide with Pictures)
One important factor to be aware of before you do this is that Excel will force all of your columns onto one page, regardless of how small that might make the text.
So whether you have 12 columns or 120 columns, they will all be forced to one page.
If fitting everything to one page is not realistic, then you might be better served by switching the page orientation, hiding unneeded columns, or printing in landscape orientation on legal paper.
But if you just have a couple of columns that aren’t fitting on a page, follow the steps below to have all of those columns print on one page.
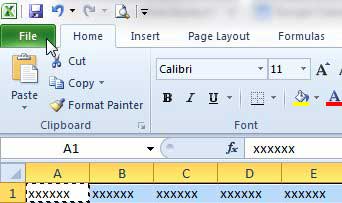
Step 1: Open your spreadsheet in Excel 2010.
Step 2: Click the File tab at the top of the window.

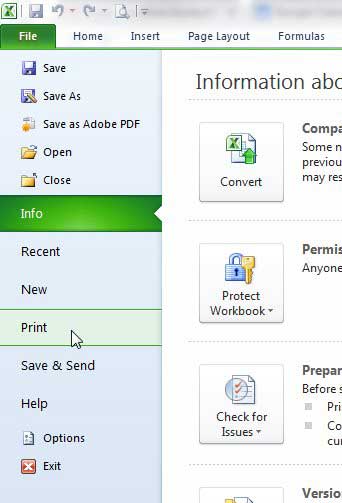
Step 3: Click the Print option in the column at the left side of the window.

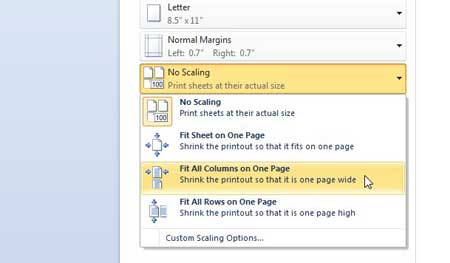
Step 4: Click the No Scaling button in the center column, then click the Fit All Columns on One Page option.

Step 5: Click the Print button at the top of the window.
Now that you know how to prevent extra pages from printing in Excel 2010 you can adjust this setting for your spreadsheets so that you don’t waste a lot of paper unnecessarily.
If the ink for your printer is expensive, then you might be able to save some money by purchasing it from Amazon. Visit their Printer Ink store and check pricing on ink for your printer.
There are other ways to improve the appearance of Excel printouts, including this method for fitting a spreadsheet to one page.

Kermit Matthews is a freelance writer based in Philadelphia, Pennsylvania with more than a decade of experience writing technology guides. He has a Bachelor’s and Master’s degree in Computer Science and has spent much of his professional career in IT management.
He specializes in writing content about iPhones, Android devices, Microsoft Office, and many other popular applications and devices.