To hide gridlines in Excel, open the View tab and clear the Gridlines check box in the Show group. The faint gray lines vanish at once, leaving a clean white sheet. Three things to know right away: the change applies only to the worksheet you are on, printed gridlines are a separate setting (and are off by default), and any borders you added stay visible because borders are cell formatting, not gridlines.
Hide gridlines from the View tab
This is the quickest route and the one Microsoft documents for Excel for Microsoft 365 on Windows, which uses the same labels as Excel 2016, 2019, 2021 and 2024. Excel for Mac and Excel for the web have their own short sections further down.
- Open the workbook and click the tab of the worksheet you want to clean up at the bottom of the window.
- Click the View tab on the ribbon.
- In the Show group, clear the Gridlines check box.
The gridlines disappear from that sheet right away. Your data, formulas and formatting are untouched; only the screen display changes. To see the lines again, select the same check box.
Gridlines are not the only thing in the Show group. The Headings box next to it controls the row numbers and column letters, which is a different setting. If those labels are what vanished, here is how to bring back the row and column headings.
Use the Sheet Options group on the Page Layout tab
The Page Layout tab has a second set of gridline controls in its Sheet Options group, with one check box for the screen (View) and one for paper (Print). Older versions of Excel pointed people here, and it is the route Microsoft documents for Excel for Mac. It is handy when you want to set the screen and print behavior in one place.
- Click the worksheet tab you want to change.
- Click the Page Layout tab.
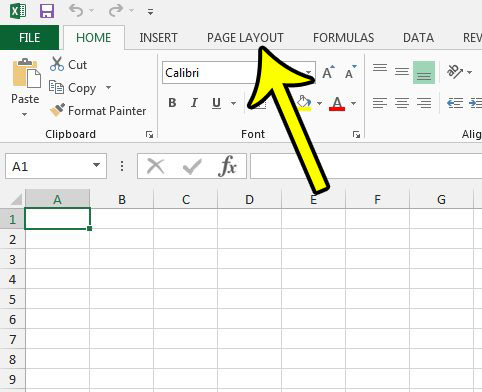
Older Excel version shown; current screens look different. - In the Sheet Options group, under Gridlines, clear the View check box. The lines disappear from the sheet.
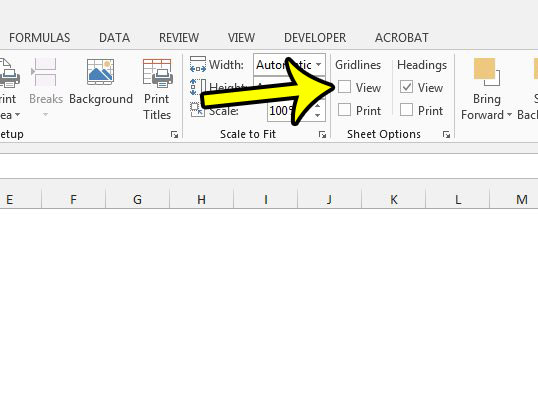
Older Excel version shown; current screens look different. - Leave the Print box under Gridlines clear if you also want a printout without lines.
If the check boxes in Sheet Options look dimmed, a chart, picture or other object is probably selected. Click any cell on the sheet and the options become available again.
Hide gridlines on several sheets at once
Each worksheet keeps its own gridline setting. If a workbook has a summary sheet, a chart sheet and three data sheets, hiding gridlines on the summary does nothing to the others. You can change several sheets in one go by grouping them first.
Be careful while sheets are grouped: anything you type or format on one grouped sheet is applied to every sheet in the group. Make the gridline change, then ungroup before you do anything else.
- Click the first sheet tab, then hold Ctrl and click each other tab you want. To pick a run of neighboring tabs, click the first one and Shift+click the last one. To take every sheet, right-click any tab and choose Select All Sheets.
- Check that Group now appears in the title bar at the top of the window.
- On the View tab, clear the Gridlines check box.
- Right-click one of the selected tabs and choose Ungroup Sheets, or simply click a tab that is not part of the group.
Each new worksheet has its own gridline setting, so check the Gridlines box on any sheet you add later.
Gridlines, borders and fill color: what you are looking at
Microsoft notes that people often confuse borders and gridlines. If you cleared the Gridlines box and some lines are still there, they are usually borders. This table shows how the three things that draw lines or color on a sheet differ.
| Feature | Where it is set | Covers | Prints? |
|---|---|---|---|
| Gridlines | View > Show > Gridlines (or Page Layout > Sheet Options) | The whole worksheet, never single cells | Only if Sheet Options > Gridlines > Print is selected |
| Borders | Home > Font group > Borders | Only the cells you format | Yes |
| Fill color | Home > Font group > Fill Color | Only the cells you format; it also hides gridlines in those cells | Yes |
To remove borders, select the cells, go to Home, click the arrow next to Borders in the Font group, and choose No Border. Microsoft’s page on how to apply or remove cell borders also covers the Erase Border tool for removing single edges. For a wider tour of border, fill and number options, see this guide to formatting Excel cells.
Hide gridlines on only part of a sheet
There is no setting that hides gridlines for a range of cells. The Gridlines box is all or nothing for the worksheet. You can get the look you want with formatting instead:
- White fill. Select the range, then on the Home tab click the arrow next to Fill Color and pick white. Gridlines no longer show in those cells, while the rest of the sheet keeps them. This is how filling a cell with color works in general: any fill covers the gridlines.
- White borders. Apply borders to the range and set the border color to white. White borders also cover the lines between those cells.
Keep in mind that both are formatting, not a gridline setting. If someone later turns gridlines on and wonders why one block still looks blank, the white fill is the reason. To undo it, select the range and choose Home > arrow next to Fill Color > No Fill. Microsoft points out that choosing white instead of No Fill keeps the gridlines hidden.
A practical example: a team budget sheet has an input table at the top and a block of notes below it. Giving the notes block a white fill makes it read like a text box, while the table keeps its grid for easy data entry.
Keep gridlines off the printed page
Gridlines do not print by default, so a printout of a standard sheet is already free of them. They print only if someone selected the Print box under Gridlines in Page Layout > Sheet Options. To check:
- Click the worksheet you plan to print.
- On the Page Layout tab, look at Sheet Options > Gridlines.
- Clear the Print box if it is selected.
- Press Ctrl+P (or go to File > Print) and look at the preview before you print or save a PDF.
If lines still show in the preview with the Print box clear, they are borders. Hiding gridlines on screen and printing them are independent: you can work with no gridlines and still print them, or the other way round. Microsoft’s print gridlines help page explains the print side in more detail. The row numbers and column letters are another print option, covered in how to print row and column headings.
Make gridlines lighter instead of hiding them
Sometimes the lines are useful for lining things up, just too strong. Excel lets you change their color for a particular worksheet:
- Go to File > Options > Advanced.
- Scroll to Display options for this worksheet and pick the sheet from the list next to that heading.
- Open Gridline color, choose a paler color, and click OK.
The color applies to the chosen sheet only. A very light gray keeps cells easy to find without the busy look, which suits sheets you edit every day.
Excel for Mac and Excel for the web
Excel for Mac
Microsoft’s Mac instructions use the Page Layout tab:
- Select the worksheet.
- Click the Page Layout tab.
- Under Gridlines, clear the View check box. Select it again to show the lines.
Excel for the web
In a browser, open the workbook, go to the View tab and clear the Gridlines check box in the Show group. One limit to know: printing gridlines is not currently possible in Excel for the web. If you need visible lines on paper from the web app, Microsoft suggests adding borders (Home > Borders > All Borders) or opening the file in the desktop app.
Bring the gridlines back
Select the Gridlines box on the View tab (or the View box under Gridlines on the Page Layout tab) and the lines return. If they stay missing, a white fill or a changed gridline color is the usual cause; this walkthrough on where the gridlines went in Excel works through those cases.
Two related settings live elsewhere. Chart gridlines are part of the chart, not the sheet: select the chart, then use Add Chart Element > Gridlines on the chart’s Chart Design tab (Design in older versions), as Microsoft describes on its page to display or hide chart gridlines. Word documents also have their own grid, explained in how to show or remove gridlines in Word.
If the lines are still there
- They are borders. Select the cells and choose Home > Borders > No Border.
- You changed a different sheet. The setting is per worksheet. Click the sheet you are looking at and check its Gridlines box.
- Sheets were grouped. If Group shows in the title bar, ungroup the sheets so later edits do not spread.
- The options are dimmed. A chart or picture is selected; click a cell first.
- The lines mark page splits. Lines that mark where pages split are page breaks, not gridlines. See how to remove page breaks in Excel.
Excel gridline questions, answered
Does hiding gridlines change anything in my data?
No. It only changes how the worksheet looks. Values, formulas, borders and fills stay as they were, and you can turn the lines back on at any time.
Will the other person see the sheet without gridlines?
The setting belongs to the worksheet, so it is saved with the workbook when you save. Someone who opens the file sees the sheet the way you left it, and they can turn gridlines back on for themselves.
Can I make new workbooks open without gridlines?
Microsoft’s gridline help does not describe a default option for this. The simple workaround is to keep a starter workbook with gridlines already hidden and make copies of it.
Is there a keyboard route?
Press Alt and then W to open the View tab with key tips showing; the letters that appear tell you which key toggles Gridlines.
Once the sheet looks right on screen, the next step is usually the printout. For page size, margins, scaling and titles, this broader Excel printing walkthrough covers the settings that decide how the page comes out.
For the core show and hide steps, Microsoft’s own reference is Show or hide gridlines on a worksheet.

Kermit Matthews runs Live2Tech from just outside Philadelphia. He is an IT specialist with over 20 years of experience, from a university help desk to small-business IT, IT management and his own consulting practice, and has written tech guides full time since 2020. Steps are checked against the current software on a real device or the maker’s official documentation. More about Kermit.