Timesheets, expense forms and approval sheets often start life in Excel, and sooner or later someone has to sign one. In Excel for Windows, go to Insert > Text > Signature Line (Microsoft’s help pages also call it Add a Signature Line; if a short menu opens, pick Microsoft Office Signature Line), fill in the Signature Setup box and select OK. Keep in mind that the line is only a placeholder until the signer actually signs it.
Signature line, signature picture or plain printed line?
“Add a signature” can mean three different things in Excel, and picking the wrong one is the most common reason people get stuck. Use this table to decide before you start.
| Option | What it is | Best for | Main limit |
|---|---|---|---|
| Signature line | A box with an X, the signer’s name and title. Signing it adds a visible signature plus a digital signature. | Forms that are signed and returned electronically, where you want proof the file has not changed since signing | The signer needs a digital certificate, and the signed workbook becomes read-only |
| Picture of a signature | A scanned or photographed signature inserted as an image | Quick sign-offs on internal sheets | It is just a picture: anyone can copy it, and it does not lock the file |
| Plain printed line | A cell with a bottom border and a label such as “Approved by” | Sheets that get printed and signed with a pen | Nothing happens electronically; the signature exists only on paper |
What you need before you start
- The Excel desktop app. Microsoft’s instructions for signature lines apply to Excel for Microsoft 365 and Excel 2024, 2021, 2019 and 2016, and they are written for the desktop app (“Create a signature line in Word or Excel (desktop)”). Excel 2013 has the same command in the same place; only the look of the ribbon differs.
- A digital certificate for the signer. A digital certificate (also called a digital ID) is a small electronic credential that proves who signed. Microsoft explains that signing a signature line adds a digital signature at the same time, and that creating a digital signature requires a signing certificate, which typically comes from a certification authority and is usually valid for about a year. The person who inserts the line does not need one; the person who signs does.
- A finished workbook. Because a digitally signed file becomes read-only, finish every edit before you send the form out for signing.
Insert a signature line in Excel for Windows
These steps place the signature box on the sheet. Nothing is signed yet.
- Open the workbook and go to the worksheet where the signature belongs. Scroll to the area where you want the box, usually just below the totals or the approval section.
- Select the Insert tab on the ribbon.

Excel 2013 shown; current versions of Excel look different. - In the Text group, select Signature Line. Microsoft’s help pages call this button either Signature Line or Add a Signature Line. If it opens a short menu, choose Microsoft Office Signature Line. If the Excel window is narrow, the Text group may be collapsed into a single Text button; select it to find the command.
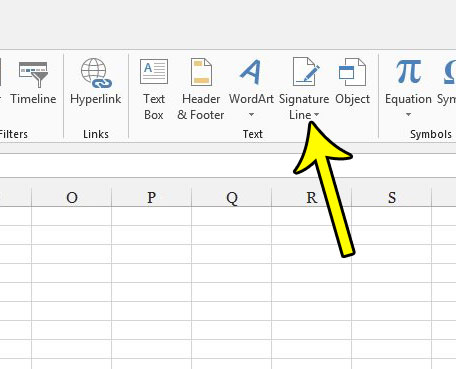
Excel 2013 shown; the button sits in the same Text group in newer versions. - In the Signature Setup dialog box, fill in the fields you need (each one is explained in the next section), then select OK.
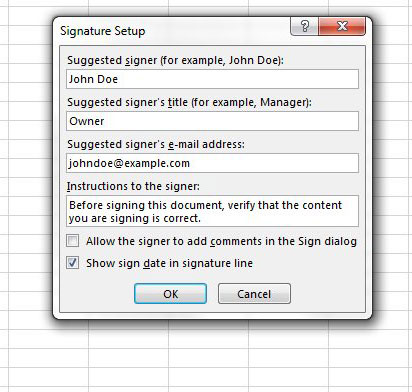
The Signature Setup dialog in Excel 2013; current versions may look different. - The signature box appears on the sheet with an X and the name and title you entered. It floats over the cells like a picture, so drag it into position and drag a corner handle to resize it.

An inserted signature line in Excel 2013, before signing. - Save the workbook and send it to the signer.
When someone opens a workbook that contains an unsigned signature line, Microsoft says the Signatures Message Bar appears at the top. Selecting View Signatures there opens the Signatures pane, which lists the signatures the file still needs.
What each Signature Setup field does
- Suggested signer: the signer’s full name, printed under the line.
- Suggested signer’s title: a job title shown under the name, such as “Department Head”.
- Suggested signer’s e-mail address: the signer’s email address, if you need it on the line.
- Instructions to the signer: text the signer sees when signing, such as “Confirm the hours above match your records before signing.”
- Allow the signer to add comments in the Sign dialog box: lets the signer type a purpose for signing, which is handy on approval sheets (“Approved, subject to receipts”).
- Show sign date in signature line: prints the date of signing on the line itself.
Example: on a monthly expense form, a team lead might enter the manager’s name as the suggested signer, “Budget Approver” as the title, and an instruction to check the totals in column F. With both boxes checked, the signed form shows who approved it, when, and any note they added.
Need a second signature, such as an employee and a supervisor on a timesheet? Repeat the steps to insert another line and fill in the second person’s details.
Sign the line
These steps are for the person who received the workbook and needs to sign it.
- Open the workbook in Excel for Windows. If a yellow Protected View bar appears, select Edit Anyway, but only if the file came from someone you trust. You cannot sign while the file is in Protected View.
- Right-click the signature line and choose Sign. Double-clicking the line does the same thing.
- Add your signature in one of three ways:
- Type your name in the box next to the X.
- On a touch screen or with a pen, write your signature in the box next to the X.
- Choose Select Image, find a picture of your handwritten signature in the Insert Pictures dialog box, and choose Select.
- If the person who set up the line allowed comments, type a reason for signing.
- Select Sign. Because signing adds a digital signature, a signing certificate is needed; if signing fails, check with whoever manages certificates at your workplace.
What signing changes in the workbook
Signing does more than draw a name on the sheet. According to Microsoft, when you sign a signature line you add a visible representation of your signature and a digital signature, and a digitally signed file becomes read-only to prevent changes. After signing, a Signatures button appears at the bottom of the worksheet; select it to see who signed and whether the signature is valid.
In practice this means the signed copy is the final copy. If the numbers need to change after someone signs, remove the signature (next section), make the edit, save, and ask the signer to sign again.
Remove a signature or the whole line
To remove a signature from a signed line:
- Right-click the signature line.
- Select Remove Signature.
- Select Yes to confirm.
You can also open the Signatures pane, select the arrow next to the signature and choose Remove Signature. Removing the signature leaves the empty line in place so it can be signed again.
To get rid of an unsigned line you no longer want, click its border to select it and press Delete, the same way you would remove a picture or shape.
Sign the whole workbook without a visible line
Sometimes you only need to prove the file has not been changed, and nobody needs to see a signature on the sheet. For that, Excel offers an invisible digital signature:
- Select File > Info.
- Select Protect Workbook > Add a Digital Signature.
- In the Commitment Type list, pick the option that fits, such as approving the workbook.
- Type a reason in the Purpose for signing this document box.
- Select Sign.
This also needs a digital certificate and also makes the file read-only. To remove it, go to File > Info > View Signatures, select the arrow next to the signature, choose Remove Signature and confirm with Yes. Microsoft’s page on adding or removing a digital signature covers both the visible and invisible kinds.
Excel for Mac and Excel for the web
Microsoft’s Excel instructions for signature lines are written for the desktop app, and its create and sign a signature line page does not mention Excel for Mac, Excel for the web or the mobile apps. If you don’t see Signature Line on the Insert tab in one of those versions, treat the feature as unavailable there:
- Open the workbook in Excel for Windows to insert or sign the line, if you have access to it.
- Otherwise, use one of the alternatives below: a signature picture, ink from the Draw tab, or a printed line.
Also note that Microsoft’s separate help page for Word does list Mac and web support for its signature line, so a coworker who can do this in Word on a Mac may not be able to do the same in Excel.
Other ways to put a signature on a spreadsheet
A plain line for a printed sign-off
Typing a row of underscores is the quick fix many people reach for, but the line shifts when someone types on it and rarely lines up when printed. A cell border works better:
- Type a label such as “Approved by:” in one cell.
- Select the empty cell, or a few merged cells, next to it.
- On the Home tab, in the Font group, select the arrow next to Borders and choose a bottom border style.
- Repeat for a “Date:” cell if you want one.
The border stays put when text is typed into the cell, and it prints as a clean line. Microsoft’s guide to cell borders shows the other border options, including More Borders for thicker lines.
A picture of your signature
Sign a sheet of white paper, scan it or take a well-lit photo, and crop it tightly. Then in Excel, select Insert > Illustrations > Pictures and choose where the picture goes, then select This Device and pick the file. Microsoft documents a Place in Cell option that puts the picture inside a cell; a floating picture is easier to size over a printed line. Keep in mind that a picture is not a digital signature: it does not identify the signer or lock the workbook.
Draw it with ink
On a touch screen or with a pen, the Draw tab lets you write your signature straight onto the sheet. Microsoft says the Draw tab turns on automatically on touch-enabled devices; on other computers, go to File > Options > Customize Ribbon and check Draw to show it.
Excel signature line questions
Is a signature picture the same as signing the line?
No. A picture pasted onto the sheet is just an image. Choosing Select Image inside the Sign dialog is different: the image becomes the visible part of a signature, and the digital signature is still added behind it.
Is there a lighter way to record an approval?
For an informal “looks good” on a shared sheet, a note on the relevant cell is often enough. See how to add a comment in Excel to leave one beside the totals.
Next step: insert the line on a copy of your form first, sign it yourself if you have a certificate, and check what the signer will see before sending the real file. If the paperwork also involves Word, see placing a signature over a printed name in Word, signing a Word document on an iPad or signing one on an Android phone. If the form ends up as a PDF, signing a PDF on Windows 10 covers that route. For sensitive Word files, password encryption in Word is a separate protection worth knowing about.

Kermit Matthews runs Live2Tech from just outside Philadelphia. He is an IT specialist with over 20 years of experience, from a university help desk to small-business IT, IT management and his own consulting practice, and has written tech guides full time since 2020. Steps are checked against the current software on a real device or the maker’s official documentation. More about Kermit.