Place the picture inside the cell: in Google Sheets on a computer, click the cell, choose Insert > Image, and pick the option that puts the image in the cell, so it moves and sorts with the row instead of floating on top of the grid. If the picture already lives at a web address, or you want a whole column of pictures from a list of links, the IMAGE function is the better choice, and it’s covered right after the menu steps.
Which way to add the picture
Google Sheets gives you three routes, and each one fits a different job:
| Your situation | Best route | Where the image ends up |
|---|---|---|
| The picture is a file on your computer, or you want a snapshot | Insert > Image, in the cell | Inside the chosen cell |
| You have the image’s web address, or a column of addresses | The IMAGE function |
Inside the cell that holds the formula |
| You copied a picture from a web page or another app | Paste, then move it into a cell | Often over the cells at first |
Whatever the route, Google’s limits are the same: images must be under 50 MB and in .png, .jpg or .gif format, and SVG files aren’t supported. A cell that holds an image can’t also hold text, so plan a neighboring column for labels or prices.
Insert a picture file into a cell
These steps follow Google’s Add an image to a spreadsheet help page for computers:
- Open the spreadsheet in Google Sheets in a web browser.
- Click the cell where the picture should go.
- Click Insert > Image.
- Choose to place the image in the cell (the other choice puts it over the cells).
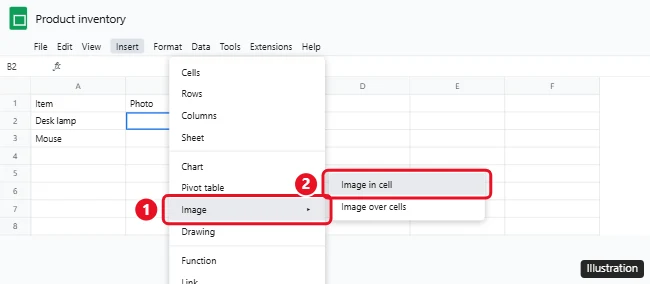
- Choose an image or take a snapshot.
- Click Open or Select, depending on where the picture comes from.
The illustration shows an older menu, so the wording of the in-cell option may look a little different in your browser. Once the picture is placed, it sits inside the cell’s borders. To make it larger, widen the column or make the row taller; adjusting column width in Google Sheets covers both the drag and the exact-size options.
Pull an image from a web address with IMAGE
The IMAGE function is the right tool for product lists, team rosters or anything where the pictures already sit on a website. Its syntax on Google’s IMAGE function page is IMAGE(url, [mode], [height], [width]).
- Click an empty cell.
- Type
=IMAGE("https://www.example.com/photo.png"), with the full address in quotation marks, including the protocol at the start. - Press Enter.
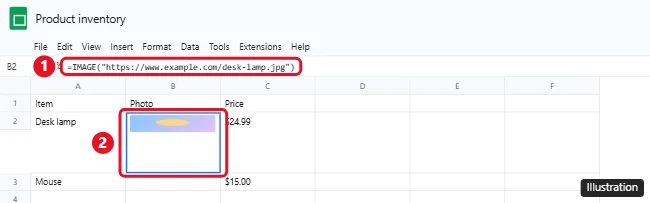
The optional mode number controls the size:
| Mode | Example | Result |
|---|---|---|
| 1 (default) | =IMAGE(A2) or =IMAGE(A2, 1) |
Fits the image inside the cell and keeps its proportions |
| 2 | =IMAGE(A2, 2) |
Stretches or squeezes the image to fill the cell, ignoring proportions |
| 3 | =IMAGE(A2, 3) |
Keeps the original size, which may crop the image |
| 4 | =IMAGE(A2, 4, 100, 150) |
Custom size in pixels: 100 high by 150 wide |
Google notes that no mode resizes the cell to fit the image, so you still size the row and column yourself. Height and width only work with mode 4.
Fill a whole column from a list of links
Put the image addresses in column A, type =IMAGE(A2) in B2, then drag the fill handle down. Each row shows the picture for its own link. For a catalog where you type a product code and want its picture to appear, combine the two functions: =IMAGE(VLOOKUP(E2, A2:C50, 3, FALSE)) finds the code from E2 in the first column of A2:C50 and displays the address stored in the third column. Using VLOOKUP in Google Sheets explains the lookup half if it’s new to you.
Rules the address has to follow
- Addresses hosted at drive.google.com don’t work in
IMAGE. For a picture stored in Drive, use Insert > Image instead. - SVG images aren’t supported here either.
- The address can’t be built from a volatile function such as
NOW,RAND,RANDARRAYorRANDBETWEEN. - The address should point to the image itself rather than to a web page that contains it.
Pasting a copied image
Google’s help page says you can copy an image from your desktop or the web and paste it directly into a spreadsheet, and it may take a moment to appear. A pasted picture may land over the cells, floating on the grid. To anchor it, click the cell you want, click the image, open the image’s More menu (three dots) and choose Put image in selected cell.
In the cell or over the cells
The difference matters most when you sort or filter. An image in a cell belongs to that cell, so it travels with its row when you sort a range in Google Sheets, and only one image fits per cell. An image over the cells floats on top of the grid at a fixed spot: you can drag it anywhere and resize it freely, but it stays put when the rows underneath move.
- Float an in-cell image: right-click the image and choose Put image over cells.
- Anchor a floating image: click the target cell, click the image, then More > Put image in selected cell.
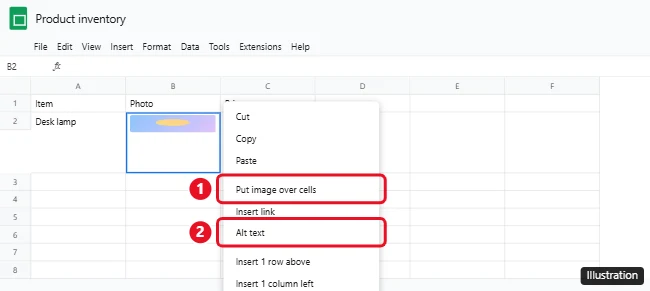
Keeping a picture “locked” to its row this way doesn’t stop other people from editing or deleting it. That’s a separate job for sheet or range protection.
Resize, move, replace and align
- Resize: an in-cell picture follows the size of its cell. A floating picture has blue markers around it when selected; drag them. To select several floating images, hold Ctrl (Command on a Mac) and click each one.
- Move: cut an in-cell image and paste it into another cell. Drag a floating image to its new spot.
- Replace: for a floating image, click it, then More > Replace image, pick the new picture and click Replace or Select.
- Align: Google’s announcement of in-cell images said they start at the bottom left of the cell and can be positioned with the alignment tools, so try the horizontal and vertical align buttons if a picture sits in an awkward corner.
Add alt text
Alt text is a short description that screen readers announce, and it also reminds collaborators what a picture shows. For an image in a cell, right-click it and choose Alt text. For an image over the cells, click it, then More > Alt text. Describe what matters in the sheet (“Red ceramic mug, front view”) instead of the file name.
When the image won’t appear
| What you see | Likely cause | Fix |
|---|---|---|
| The upload fails | File over 50 MB, or an SVG or other unsupported type | Save the picture as PNG, JPG or GIF and keep it under 50 MB |
IMAGE shows nothing or an error |
Missing quotation marks or protocol, a drive.google.com address, or a link to a page instead of the image | Check the address against the rules above, or use Insert > Image |
| The picture is tiny | It fits the current cell size | Make the row taller and the column wider, or use mode 4 |
| The picture didn’t move when you sorted | It’s floating over the cells | Anchor it with Put image in selected cell |
| You can’t type in the cell | Cells with images can’t hold text | Put the text in the next column |
Phones and tablets
Google documents in-cell images in the mobile apps too. In the Sheets app for Android, tap Insert > Image, choose to place the image in the cell or over the cells, then pick where the picture comes from. On iPhone and iPad, tap Insert > Image; to put the picture inside a cell, tap the image and select Insert in cell followed by the cell’s address. For a walk-through of the iPhone app, see inserting a picture in the Google Sheets iPhone app.
Image in cell answers
How do I delete a picture that’s in a cell?
Google’s computer instructions don’t spell this out. Selecting the cell and pressing Delete usually clears it like any other content. In the Android app, Google says to tap the image, then Delete; on iPhone and iPad, tap the cell with the image and choose Clear.
Can a cell hold two pictures?
No. One image per cell. Put the second picture in the next cell, or combine both into a single image file before inserting it.
Does Excel work the same way?
Excel handles pictures differently. If you also work there, see how to lock an image to a cell in Excel and how to add a hyperlink to a picture in Excel.
Building a picture catalog with several sheets? Giving each one its own sheet tab color makes the right tab easy to find.

Kermit Matthews runs Live2Tech from just outside Philadelphia. He is an IT specialist with over 20 years of experience, from a university help desk to small-business IT, IT management and his own consulting practice, and has written tech guides full time since 2020. Steps are checked against the current software on a real device or the maker’s official documentation. More about Kermit.