To make a picture more transparent in Google Docs, click the image, choose Image options in the toolbar, open Adjustments, and drag the Transparency slider to the right. The further you drag, the more faded the whole picture becomes, which is useful for backgrounds, watermarks, and text placed over images.
The slider affects the entire image. Google Docs can’t make just the background of a picture transparent, but there are workarounds below.
Quick Answer
Select the image > Image options > Adjustments > drag Transparency to the percentage you want.
How to Change Image Transparency in Google Docs
- Open the document on a computer and click the picture once to select it.
- Click Image options in the toolbar. You can also right-click the image or go to Format > Image > Image options.
- In the panel on the right, expand Adjustments.
- Drag the Transparency slider. 0% is the original picture; 100% is fully invisible.
- Close the panel. The change saves automatically.
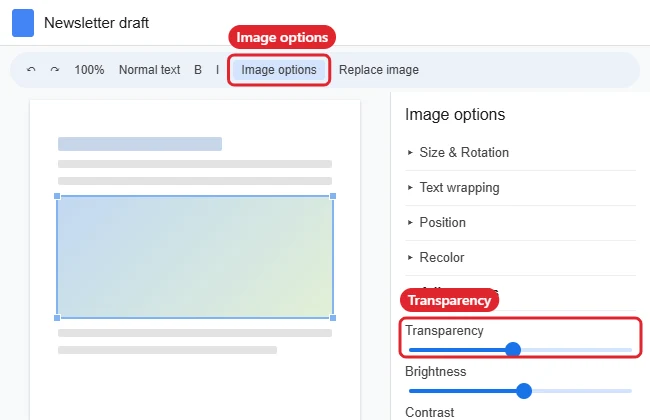
Click Reset under Adjustments to return the image to its original look.
Put Text on Top of a Faded Picture
- Lower the transparency so text will be readable, usually 50–70%.
- Select the image and choose Behind text from the text-wrapping buttons that appear under it.
- Type over the picture, or drag it into place behind existing text.
Use a Faded Image as a Watermark
For a picture that repeats behind every page, go to Insert > Watermark, choose Image, select a picture, and keep Faded checked. The watermark appears on every page and stays behind the text.
Transparency Options Compared
| Goal | Best method |
|---|---|
| Fade one picture | Image options > Adjustments > Transparency |
| Faded image on every page | Insert > Watermark > Image |
| Semi-transparent shape or color block | Insert > Drawing > New, draw a shape, then use Fill color > Custom, which includes a transparency setting |
| Transparent background only | Remove the background in an image editor, save as PNG, then insert it |
Make Only the Background Transparent
Google Docs has no background-removal tool. Use an image editor or a background-removal tool to cut out the subject, save the result as a PNG (JPG files can’t store transparency), and insert the PNG with Insert > Image. The transparent areas will show the page or text behind them.
Working in a spreadsheet instead? See how to insert shapes in Google Sheets.
Tables crowding the page? See how to make a table fit on one page.
Troubleshooting
- Image options is missing: Make sure the image is selected, not the text around it. The option doesn’t appear for images inside drawings; double-click the drawing to edit it there.
- You’re on a phone or tablet: The mobile apps currently don’t offer the Transparency slider. Make the change on a computer; it will show in the app afterward.
- The PNG still has a white box: The file wasn’t saved with transparency. Re-export it as PNG with the background removed.
- A border shows around the faded image: See how to remove a border in Google Docs.
Frequently Asked Questions
Does transparency change the original image file?
No. It only changes how the picture appears in this document. The uploaded image is untouched.
Will the transparency show when I print or download a PDF?
Yes. Printing and downloading as PDF keep the faded look.
Does the same option work in Google Slides?
Yes. In Slides, select the image, click Format options, and use Adjustments > Transparency.
Summary
- Click the image.
- Open Image options.
- Expand Adjustments.
- Drag the Transparency slider.

Kermit Matthews is a freelance writer based in Philadelphia, Pennsylvania with more than a decade of experience writing technology guides. He has a Bachelor’s and Master’s degree in Computer Science and has spent much of his professional career in IT management.
He specializes in writing content about iPhones, Android devices, Microsoft Office, and many other popular applications and devices.