What you click depends on what you want gone: one row, several rows, only the text in a row, or the whole table. For one row on a computer, right-click any cell in it and choose Delete row, as Google’s table help for Docs describes; the phone and tablet apps put the same command behind a small arrow (Android) or a gray bar (iPhone and iPad).
Everything below applies to Google Docs in a browser and the current Docs apps.
Pick the right command for what you want removed
Google Docs keeps the row, column and table commands side by side, so most mistakes come from choosing the neighbor of the option you meant. Use this table to find the right one before you click anything.
| You want to remove | On a computer | Android app | iPhone or iPad app |
|---|---|---|---|
| One row | Right-click a cell in it, then Delete row | Arrow next to the row, then More, then Delete row | Gray bar next to the row, then Delete row |
| Several rows | Repeat Delete row for each, or select across rows and right-click (see below) | Repeat for each row | Repeat for each row |
| Only the text in a row | Select the text and press Delete | Select the text and delete it | Select the text and delete it |
| A column | Right-click a cell in it, then Delete column | Arrow next to the column, then More, then Delete column | Gray bar next to the column, then Delete column |
| The whole table | Right-click any cell, then Delete table | Tap any cell, then More, then Delete table | Gray bar, then Delete table |
Remove a single row on a computer
The steps are the same on Windows, a Mac or a Chromebook, since the menu is part of Google Docs.
- Open the document and make sure you are editing it (the mode button at the top right should read Editing).
- Click inside any cell of the row you want to remove. You don’t need to highlight the whole row.
- Right-click that cell.
- Choose Delete row from the menu.
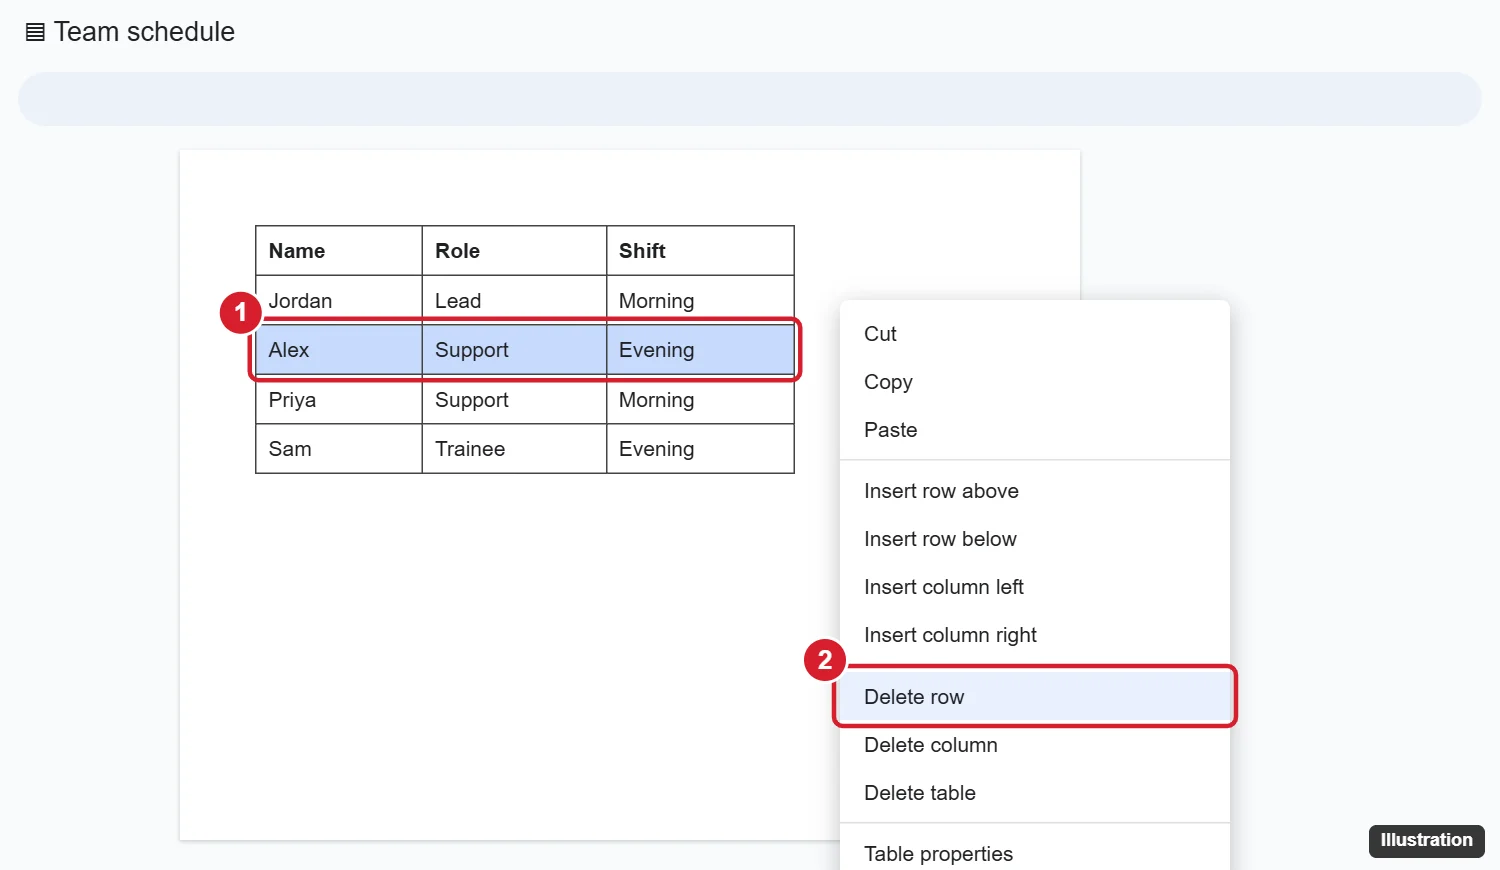
Google’s wording is short: right-click a cell from the row you want to delete, then choose Delete column, Delete row or Delete table from the menu. Read the menu before clicking, since Delete table sits close by and removes everything at once.
If you prefer the keyboard, Google’s Docs keyboard shortcuts list includes shortcuts that open the right-click menu: Ctrl + Shift + \ or Shift + F10 on Windows and ChromeOS, and Command + Shift + \ or Shift + F10 on a Mac. Put the cursor in the row first, open the menu, then pick Delete row with the arrow keys and Enter.
Removing several rows
Google’s help page only documents the single-row command, so there are two ways to approach a bigger cleanup:
- One at a time (always works). Repeat the right-click and Delete row steps for each row. Start at the bottom of the block you are removing, so the rows you still need to delete don’t shift position while you work.
- Several in one go. Drag from a cell in the first unwanted row to a cell in the last one, right-click the selection and look for the delete-row command. Google doesn’t document what the menu shows for a multi-row selection, so the label may read Delete row or Delete rows. Check the result straight away, and undo if more disappeared than you expected.
Deleting a row in the Google Docs app
The phone and tablet apps don’t use a right-click menu. Each one has its own handle next to the row, and the command is a tap or two deeper.
Android phone or tablet
- Open the document in the Google Docs app and tap the table.
- Tap the arrow that appears next to the row you want to remove.
- In the menu that appears, tap More.
- Tap Delete row.
iPhone or iPad
- Open the document in the Google Docs app and tap the table.
- Tap the gray bar next to the row you want to delete.
- Tap Delete row.
Google adds one note for iPhone and iPad: if you don’t see these options, you may have to tap the right arrow in the menu to reveal more commands. The full Android and iPhone wording is on the Android version of Google’s table help page (switch the tab at the top of that page for iPhone and iPad). Older guides that send you through a Format icon to delete a row don’t match Google’s current app instructions; in the iPhone and iPad app, that Format route is for adding rows.
When Delete row is missing or does nothing
Most of the time the cause is access or mode, not the table itself.
- You can only view the file. Google’s help on requesting edit access says that if you can “View only”, you click Request edit access, and the owner decides. Until then, no table commands will work.
- You can only comment or suggest. The same page tells you to ask the owner for more access through the Share button and send the request.
- You are in the wrong mode. Even with edit access, the document may be set to suggesting or viewing. Google’s page on editing and suggesting modes shows the mode button at the top right; choose Editing. If the switch confuses you, here is how to get in and out of editing mode in Google Docs.
- The table has only one row left. In that case the menu may offer only Delete table; use it if you want the whole table gone. One-cell tables used as boxes, like the table method for a text box in Google Docs, are a common example.
- The “row” is really a line or blank paragraph. Empty space under a table, or a horizontal line typed inside a cell, isn’t a table row, so table commands won’t touch it. Click into that space and remove it like normal text.
Undo a deleted row or put it back
Press Ctrl + Z (Command + Z on a Mac) right after the deletion. Google lists this as the standard Undo shortcut in Docs, and it restores the row with its contents.
If you only notice the loss much later, version history is the safety net. Google’s version history help says to click Last edit at the top right, then pick an earlier version. Restoring a version rolls back the whole document, so if the file has changed a lot since, open the older version, copy the row’s text, and paste it into a new row in the current file. This walkthrough of viewing version history in Google Docs covers the screens.
To add an empty row back in the right spot, right-click a nearby cell and choose Insert row above or Insert row below. More detail, including the app steps, is in this explainer on adding a row to a table in Google Docs.
A column or the whole table instead
The same right-click menu handles columns: click a cell in the column and choose Delete column. If you deleted the wrong column and want one back, this post on adding a column to a Google Docs table walks through it.
If every row has to go, deleting them one by one is slower than Delete table. Copy anything worth keeping first, since the table’s contents go with it. The details for computers and phones are in this guide to deleting a table in Google Docs.
Sometimes the real goal is a tidier table rather than fewer rows. In that case, it may be easier to make the table smaller in Google Docs or adjust column width in a Docs table. If you plan to reuse the full table elsewhere before trimming it, copy the table from Google Docs first.
Table row deletion questions
What is the fastest way to delete a row without the mouse?
Open the right-click menu from the keyboard (shortcuts above), then choose Delete row; Google’s Docs shortcut list has no dedicated delete-row shortcut, and its table shortcuts only move the cursor. You can also press Alt + / (Option + / on a Mac) to open the Tool finder and type “delete row”, though results there may vary.
Will deleting a row in a shared document remove it for everyone?
Yes, once you have edit access and are in Editing mode, the change is part of the document that everyone opens. In Suggesting mode your change becomes a suggestion for an editor to accept, which is a gentler option when the table belongs to someone else.
Can I recover just one row from an old version without losing newer edits?
Yes, by copying rather than restoring. Open the older version from version history, select the row’s text, copy it, close version history, then insert a new row in the current document and paste. The rest of your newer work stays as it is.
Next time you trim a table, check the right-click menu label once before you click, and keep Ctrl + Z in mind for the moment right after.

Kermit Matthews runs Live2Tech from just outside Philadelphia. He is an IT specialist with over 20 years of experience, from a university help desk to small-business IT, IT management and his own consulting practice, and has written tech guides full time since 2020. Steps are checked against the current software on a real device or the maker’s official documentation. More about Kermit.