Handing down or selling a PC, or still seeing an old name on the sign-in screen? To remove someone else’s account on current versions of Windows 11, sign in as an administrator, open Settings > Accounts > Other users (family members appear under Family), expand the account, and select Remove next to Account and data. Your own Microsoft account has no Remove button: switch your sign-in to a local account first, then clear it from apps and online.
Pick the part that matches your situation
“Account” means several things in Windows 11, each on a different Settings page. Removing one does not remove the others, which is why an old email address can linger.
| What you want gone | Where it lives | What it deletes |
|---|---|---|
| Another person’s user account (local or Microsoft) on this PC | Settings > Accounts > Other users > Remove | That profile’s files and settings on the PC; nothing online |
| The Microsoft account you sign in with yourself | Settings > Accounts > Your info > Sign in with a local account instead | Nothing; files and apps stay, only the sign-in changes |
| A Microsoft account kept for apps, Outlook or the Store | Settings > Accounts > Email & accounts | The app sign-in only |
| A work or school account | Settings > Accounts > Access work or school > Disconnect | Access to the organization’s resources |
| A child or adult in your Microsoft family group | Settings > Accounts > Family, then the Microsoft family site | The PC sign-in, not their family membership |
| The PC’s entry in your Microsoft account online | account.microsoft.com/devices > Remove device | Only the PC’s entry on your account |
None of these closes the Microsoft account itself. That happens only online and deletes email, OneDrive files and purchases after the 30 or 60 day window described on Microsoft’s page about closing a Microsoft account.
If the PC is leaving your hands for good, unlink your own account (so the encryption key and device record are sorted out), then reset the PC with everything removed, as described in factory resetting Windows 11 or 10.
Save what you need before you delete
Removing a user in Settings is the one step here you can’t easily reverse, so check these first:
- Copy the profile folder. As an administrator, open C:\Users\<name> in File Explorer (click Continue if asked) and copy Desktop, Documents, Downloads, Pictures and any other folders they used to an external drive.
- Check what OneDrive already holds. Files that synced to the person’s OneDrive stay online after the removal; files that never synced exist only on this PC.
- Save the BitLocker recovery key. If device encryption or BitLocker is on, the key is usually stored in the Microsoft account that set up the PC. Copy it before you unlink that account (see the unlink section).
- Ask the owner to sign in once more if you can. They know which app data, bookmarks or game saves matter.
If the person needs less access rather than none, rename the account with the Windows 11 user name settings, or disable it (covered in the scripting section) so nothing is deleted.
Delete a user in Settings
This is the route on Microsoft’s page about managing user accounts in Windows, the same on Home and Pro. You need an administrator account other than the one you are removing.
- Sign in with an administrator account. If the person is still signed in on this PC, have them sign out, or restart the PC.
- Press Windows key + I and select Accounts > Other users (Other user on some builds, Family & other users on older ones).
- Select the account to expand it, then select Remove next to Account and data.
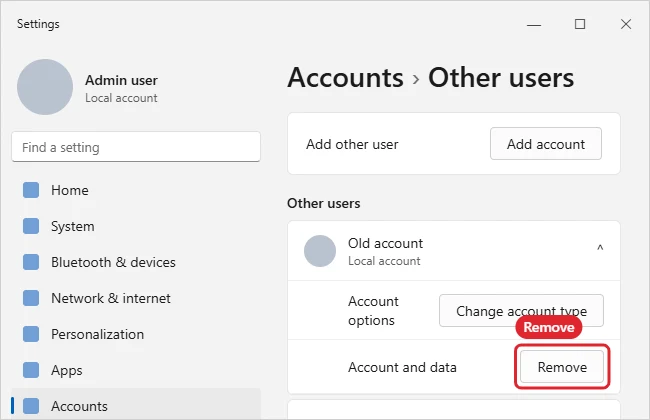
- Read the warning: deleting the account removes that person’s items from this PC, such as desktop files and documents. Select the confirm button (usually Delete account and data) only after your backup is done.
- The account disappears from the Other users list when Windows finishes.
Microsoft’s page notes that this removes the person’s sign-in information and data from the device only; their Microsoft account keeps existing. Other people’s profiles on the PC are not affected.
Other tools that remove accounts
Windows 11 also has older tools that remove accounts, and some leave the person’s files behind. Labels outside Settings come from third-party reports of current builds, so treat them as a guide rather than an exact match.
| Tool | How to open it | Windows 11 edition | Profile folder afterwards |
|---|---|---|---|
| Settings | Accounts > Other users > Remove | Home and Pro | Deleted |
| Control Panel | User Accounts > Remove user accounts | Home and Pro | You choose to keep or delete the files |
| User Accounts dialog | Windows key + R, type netplwiz, select the user, Remove |
Home and Pro | Usually left in C:\Users |
| Computer Management | Local Users and Groups > Users > right-click > Delete | Pro, Enterprise and Education only | Left in C:\Users |
| Command Prompt or Terminal | net user <name> /delete |
Home and Pro | Check C:\Users afterwards |
| PowerShell | Remove-LocalUser -Name "<name>" |
Home and Pro | Check C:\Users afterwards |
For a clean removal, use Settings; to keep the folder for later, use netplwiz or Computer Management. One trap: unticking “Users must enter a user name and password” in netplwiz only skips the sign-in prompt and removes nothing.
Remove several accounts or script it
For a shared PC with many old logins, open Terminal as an administrator (right-click Start, Terminal admin option):
- List local accounts:
Get-LocalUser. Note the exact Name; for a Microsoft-account user it can differ from the name in Settings. - Preview without changing anything:
Remove-LocalUser -Name "<name>" -WhatIf. - Remove it:
Remove-LocalUser -Name "<name>"(add-Confirmfor a prompt each time), then runGet-LocalUseragain to check.
Microsoft’s Remove-LocalUser reference says the command deletes local user accounts but does not say the profile folder goes too, so plan to delete leftover folders yourself. The classic net user <name> /delete does the same, per the net user command reference.
Not ready to delete? Disabling blocks sign-in but keeps everything: run Disable-LocalUser -Name "<name>" or net user <name> /active:no. Per Microsoft’s Disable-LocalUser page, a disabled user cannot log on; Enable-LocalUser reverses it.
Fully unlink your own Microsoft account
When the account to get rid of is the one you sign in with, work through four places in this order. The online step comes last because the recovery key is easiest to reach while the account is still connected.
1. Save the recovery key, then switch the sign-in to local
First check whether encryption is on at Settings > Privacy & security > Device encryption, as Microsoft’s device encryption page describes (if it is missing, the feature isn’t available on this PC or you are not an administrator). If it is on, sign in at aka.ms/myrecoverykey, find the key whose ID starts with the same 8 characters as the key ID on this PC, and copy it off the PC. Microsoft’s guide to finding your BitLocker recovery key covers the other places a key can be, and there is more help on where to look for a BitLocker recovery key.
Then convert the sign-in. The profile, desktop, apps and administrator rights stay; only the way you sign in changes.
- Open Settings > Accounts > Your info.
- Select Sign in with a local account instead (shown only while you sign in with a Microsoft account).
- If Windows asks you to verify, confirm with your PIN or password. Then enter a user name (it must differ from any other account on the PC), password and password hint, and select Next.
- Select Sign out and finish and sign back in with the new details.
Write the password down: Microsoft’s page on changing from a Microsoft account to a local account warns that a forgotten local password can’t be recovered without a password reset disk. You may need to set up your PIN again in Settings > Accounts > Sign-in options. More on what going local changes is in converting a Windows 11 Microsoft sign-in to a local account. For a different Microsoft account rather than none, follow switching the PC to a different Microsoft account instead.
2. Clear the account from Email & accounts
Windows often keeps the account listed for apps after the sign-in is local.
- Press Windows key + I and select Accounts > Email & accounts.
- Under Accounts used by other apps (or Accounts used by email, calendar, and contacts), select the Microsoft account to expand it.
- Select Remove, then Yes.

No Remove button? Windows is probably still using the account as your sign-in, so go back to step 1. For mail-only accounts such as Gmail, see removing an email account from Windows 11.
3. Sign out of the apps that keep their own sign-in
- OneDrive: select the OneDrive cloud icon, then Help & Settings (the gear) > Settings > Account > Unlink this PC > Unlink account. Per Microsoft’s unlink instructions, files stay in OneDrive online. To stop OneDrive starting at all, see turning off OneDrive on Windows 11.
- Microsoft 365 apps: in Word, Excel or Outlook, choose File > Account (Office Account in Outlook) > Sign out, then close the apps. See removing an Office 365 account from Windows 11.
- Microsoft Store and Edge: sign out from your profile picture in the Store, and sign out of or remove the Edge profile tied to the account.
4. Take the PC off your account’s device list
Windows 11 PCs are added to your Microsoft account’s device list automatically when you sign in with that account, and they stay there after you go local. Per Microsoft’s manage devices page:
- On any device, go to account.microsoft.com/devices and sign in.
- Find the PC and select Remove device.
- Tick the confirmation box and select Remove.
That page does not say what removal does to a saved recovery key, one more reason to copy the key in step 1. The list can take a while to update.
Alternatively, create a new local administrator, sign in with it, and delete the old Microsoft account profile with the Settings steps above; until then it keeps its files and stays on the sign-in screen. Confirm the new account is an administrator first (see adding a local user to Windows 11).
When Remove is missing or fails
- You are not an administrator. Standard accounts can’t remove other users. Sign in as an admin, or ask the owner to give your account administrator rights.
- It’s the account you are signed in with. It won’t appear under Other users. Sign in with a different admin account (switching users from the lock screen is the quickest way), or convert it as in the unlink section.
- It is the only administrator. Create a replacement: in Settings > Accounts > Other users, select Add account, choose I don’t have this person’s sign-in information, then Add a user without a Microsoft account. Then use Change account type to make it an Administrator. For admins specifically, see removing an administrator account in Windows 11.
- The PC is managed by an organization. Greyed-out account settings or a “some settings are managed” message mean IT controls accounts on this device.
- The user is still signed in. If removal hangs or errors, restart the PC, then remove the account before anyone else signs in.
Work, school and family accounts
Work or school: go to Settings > Accounts > Access work or school, expand the account, select Disconnect, and confirm with Yes. Microsoft notes this ends the PC’s connection to the organization without deleting the account. On a company-owned PC, ask IT first.
Family group members are listed under Settings > Accounts > Family. Removing a child’s sign-in from this PC does not take them out of your family group or end their limits. To change or end those controls, turn off Microsoft Family Safety from the family site.
Check that it is really gone
- Settings: the name is gone from Accounts > Other users; if you unlinked your own account, Your info says Local Account, and Email & accounts no longer lists it.
- Sign-in screen: after a restart, only expected accounts appear; if an old name lingers, check netplwiz.
- Users folder: if you used a tool that keeps files, the folder is still in C:\Users; once you’ve copied what you need, delete it as an administrator.
- Online: account.microsoft.com/devices no longer lists the PC, and OneDrive shows a sign-in prompt.
Account removal questions
Will the person’s email, OneDrive files or Microsoft account be deleted?
No. Only the local copy of their profile goes; their Microsoft account, Outlook.com mailbox and synced OneDrive files stay online.
Can I unlink my Microsoft account if it is the only administrator?
Yes. Converting to local keeps the same profile, so it stays an administrator. You need a second administrator only to delete that profile itself.
Why does the PC still show in my Microsoft account after I went local?
Converting the sign-in doesn’t touch the online device list; remove the PC there (step 4).
Will removing a user uninstall the apps they installed?
Microsoft’s pages don’t spell this out. Check Settings > Apps > Installed apps afterwards and uninstall anything nobody needs.
Once the old account is gone, review who still has administrator rights and keep everyday accounts as Standard users, which Microsoft recommends for day-to-day activities.

Kermit Matthews runs Live2Tech from just outside Philadelphia. He is an IT specialist with over 20 years of experience, from a university help desk to small-business IT, IT management and his own consulting practice, and has written tech guides full time since 2020. Steps are checked against the current software on a real device or the maker’s official documentation. More about Kermit.