If your PC is asking for a BitLocker recovery key, you need the 48-digit key to get back in. There’s no backdoor or safe workaround, and Microsoft can’t look it up or make a new one for you. The good news: the key is usually saved in the Microsoft account that set up the PC. You can check it from your phone at aka.ms/myrecoverykey.
This guide walks through every place the key can be, how to enter it, why BitLocker asked for it, and what your options are if the key is really gone.
Before you start: note the Key ID
Look at the blue recovery screen and write down the Recovery key ID. The first 8 characters are enough. If you have more than one saved key, this is how you pick the right one.
On Windows 11 version 24H2 and later, the recovery screen may also show a hint of the Microsoft account the key is saved to. That tells you exactly which account to check.
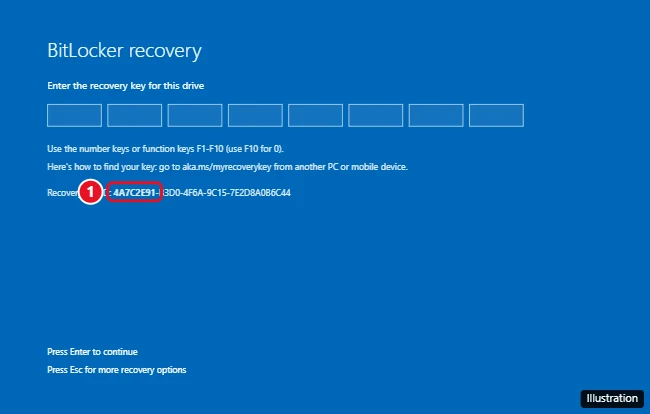
Where to find your BitLocker recovery key
Check these places in order. Use another device, such as a phone, tablet, or second computer, since the locked PC can’t get online.
1. Your Microsoft account
This is where most keys end up. Windows saves the key automatically when you set up the PC with a Microsoft account and device encryption turns on.
- On another device, go to aka.ms/myrecoverykey.
- Sign in with the Microsoft account you use on the locked PC.
- Find the entry whose Key ID matches the one on your screen.
- Type the 48-digit Recovery key into the locked PC.
If you see “no BitLocker recovery keys,” try any other Microsoft accounts you’ve used, including old Outlook, Hotmail, or Xbox accounts.

2. The account of whoever set up the PC
If a family member, the store, or a friend set up the computer or turned on BitLocker, the key may be in their Microsoft account. Ask them to sign in at aka.ms/myrecoverykey and look for your Key ID.
3. A work or school account
If the PC has ever been signed in to a work or school account, even a personal PC used for remote work or school, your organization may hold the key.
- On another device, go to aka.ms/aadrecoverykey and sign in with your work or school email.
- Select Devices, then expand the PC’s entry.
- Select View BitLocker Keys and match the Key ID.
If you don’t see the option, contact your IT help desk. They can look the key up for managed devices.
4. A USB flash drive
If you saved the key to a USB drive when you turned BitLocker on, plug that drive into the locked PC and follow the prompts. If the key was saved as a text file, open it on a different computer and type the number in by hand.
5. A printout or a saved text file
Check where you keep important papers for your computer. Search your other devices and cloud storage (OneDrive, Google Drive, Dropbox, email) for “BitLocker Recovery Key.” When you save the key to a file, Windows names it with that phrase and the Key ID.
How to enter the recovery key
- Type the 48 digits exactly as shown. They come in 8 groups of 6. You don’t need to type the dashes.
- If the number keys don’t respond, try the function keys: F1–F9 type 1–9 and F10 types 0.
- Press Enter. Windows should continue to the sign-in screen.
If Windows says the key is wrong, double-check the Key ID. You’re probably using a key from a different device or an older drive.
Why BitLocker asked for the key
BitLocker asks for the recovery key when something changes that makes it unsure the PC is safe to unlock. Common triggers include:
- A BIOS or UEFI firmware update.
- Changes to Secure Boot, the boot order, or booting from a USB drive or network.
- Clearing, turning off, or resetting the TPM security chip, or replacing the motherboard.
- Moving the drive to another computer.
- Too many wrong PIN or password attempts.
- Docking or undocking some laptops, or big hardware changes.
If you just did one of these things, undoing it (for example, restoring the old boot order) sometimes lets the PC start normally. You still need the key if that doesn’t work.
Stuck in a BitLocker recovery loop?
If Windows asks for the key every time you restart, even after you enter it correctly, reset BitLocker’s check once you’re signed in:
- Enter the recovery key and sign in to Windows.
- Search for Manage BitLocker in the Start menu and open it.
- Select Suspend protection next to your system drive, then confirm.
- Restart the PC. It should start without asking for the key.
- Go back to Manage BitLocker and select Resume protection.

If the loop continues, check for a pending BIOS update, confirm Secure Boot is on in your BIOS settings, and install the latest Windows updates.
What if you can’t find the key anywhere?
This is the hard truth: without the key, the data on the encrypted drive can’t be unlocked. That’s how BitLocker protects your files if your laptop is stolen. Tools and services that promise to “bypass” BitLocker without the key either erase the drive or can’t do what they claim.
Your remaining option is to erase the drive and start over:
- On the recovery screen, look for Press Esc for more recovery options or Skip this drive. These open the Windows recovery menu.
- Choose Troubleshoot > Reset this PC > Remove everything.
- If the reset also asks for the key, do a clean install instead. Use another computer to create a Windows 11 bootable USB drive, boot from it, and delete the old partitions during setup.
Both methods erase everything on the drive. If your files were synced to OneDrive or backed up elsewhere, you can restore them afterward.
For a locked secondary or external drive, the choice is the same: find the key, or format the drive in File Explorer or Disk Management. Formatting erases it.
If the PC belongs to your work or school, don’t reset it yourself. Contact IT first.
How to avoid this next time
Back up your recovery key now
- Search for Manage BitLocker in the Start menu and open it.
- Select Back up your recovery key next to your drive.
- Choose Save to your Microsoft account. Also save a second copy with Save to a USB flash drive, Save to a file, or Print the recovery key.
- Select Finish. Then check aka.ms/myrecoverykey to confirm the key is listed.

Keep the USB drive or printout somewhere other than with the computer.
On Windows 11 Home, BitLocker Drive Encryption isn’t available, but Device encryption works the same way. Check it in Settings > Privacy & security > Device encryption. When you sign in with a Microsoft account, the key is saved to that account. If Device encryption isn’t listed under Privacy & security, your PC doesn’t support it and your drive isn’t encrypted by it. Here’s how to tell if BitLocker is turned on.
See your key while you’re signed in
If you can still sign in, open Terminal (Admin) and run:
manage-bde -protectors -get C:
The 48-digit number listed under Numerical Password is your recovery key. Write it down and store it safely.

Suspend BitLocker before firmware or hardware changes
Before you update the BIOS, change Secure Boot settings, or clear the TPM, suspend BitLocker so it doesn’t lock you out. Use Suspend protection in Manage BitLocker, or run this in Terminal (Admin):
manage-bde -protectors -disable C: -rc 1
That suspends protection for one restart. It turns back on by itself after that.
Frequently asked questions
Can Microsoft give me my BitLocker recovery key?
No. Microsoft Support can’t retrieve, provide, or recreate a lost key. It can only be in a place where it was saved: an account, a USB drive, a file, or a printout.
Can I bypass BitLocker with Command Prompt?
No. Commands like manage-bde -off only work on a drive that’s already unlocked. Commands that “remove” BitLocker from a locked drive do it by erasing the drive.
Will resetting my PC remove BitLocker?
Resetting with “Remove everything,” or doing a clean install, erases the drive and the encryption with it. When you set Windows up again with a Microsoft account, device encryption may turn back on. Make sure the new key is saved to your account.
Why don’t I remember turning BitLocker on?
Many new PCs turn on device encryption automatically the first time you sign in with a Microsoft account. The key was saved to that account at that moment.

Kermit Matthews is a freelance writer based in Philadelphia, Pennsylvania with more than a decade of experience writing technology guides. He has a Bachelor’s and Master’s degree in Computer Science and has spent much of his professional career in IT management.
He specializes in writing content about iPhones, Android devices, Microsoft Office, and many other popular applications and devices.