When someone new needs their own sign-in on your PC, the first decision is which kind of account to give them. To add the person, go to Settings > Accounts > Other users and choose Add account. Then either type the email address of their Microsoft account or pick the path for a person without a Microsoft account, which creates a local account that works offline and needs no email. You need to be signed in as an administrator.
Which kind of account should you add?
Every account you add gets its own desktop, Documents and Downloads folders, browser data and app settings, so one person’s changes do not land on another’s screen. What differs is where the sign-in lives and what comes with it. A Microsoft account is stored online and brings its settings and OneDrive files to any PC. A local account is stored on this computer alone and has no online copy.
| Situation | Account to add | Where to start |
|---|---|---|
| An adult who already uses Outlook, Hotmail, Xbox or OneDrive | Microsoft account | Other users > Add account, then their email |
| An adult who wants an account but has no Microsoft email yet | New Microsoft account | Other users > Add account > I don’t have this person’s sign-in information |
| Someone who wants no online account, or a PC that is rarely online | Local account | Other users > Add account > Add a user without a Microsoft account |
| A child who needs screen-time limits or content filters | Family member (Microsoft account) | Settings > Accounts > Family |
| A visitor who needs the PC for an afternoon | Limited standard account you delete later | See below |
| Your employer or school issued the sign-in | Work or school account | Settings > Accounts > Access work or school |
The built-in Guest account is disabled by default, and Microsoft treats it as a security risk, so a short-term visitor is better off with a regular standard account that you remove afterward. The steps for setting one up and cleaning it away are in this walkthrough for a guest account on Windows 11.
Microsoft’s guide to managing user accounts in Windows recommends a Microsoft account over a local one, mainly because password recovery and backup happen online. A local account is still a fully supported choice, and the comparison table further down shows what you give up.
Add a person with a Microsoft account
You do not need the other person’s password for this. You only register their email address on the PC, and they type their own password the first time they sign in.
- Sign in with an administrator account.
- Press Windows + I to open Settings, then select Accounts > Other users. (You can also type
ms-settings:otherusersinto the Run box, opened with Windows + R.) - Next to Add other user, select Add account.
- Enter the email address or phone number linked to the person’s Microsoft account and select Next.
- Select Finish. The account now appears under Other users.
The PC needs an internet connection the first time that person signs in, because Windows checks the password against Microsoft’s servers and downloads their synced settings. After that first sign-in, they can usually sign in offline as well.
If the person has no Microsoft account yet, select I don’t have this person’s sign-in information in step 4. Windows then offers to create a Microsoft account for them, including the choice of a new Outlook.com email address. Let the person type their own password and recovery details if they are sitting with you, since those protect their account, not yours.
The same steps help when your own Microsoft account is locked or you are moving to a different one: add the new account as a second user, make it an administrator, sign in to it, and copy your files across. The full process for changing the Microsoft account on Windows 11 covers the sign-in side in more detail.
Add a local account without a Microsoft account
This route works on Windows 11 Home and Pro alike.
- Sign in as an administrator and open Settings > Accounts > Other users.
- Next to Add other user, select Add account. A Microsoft account sign-in window opens.
- Do not type an email. Select I don’t have this person’s sign-in information instead.
- On the next screen, which offers to create a Microsoft account, select Add a user without a Microsoft account.
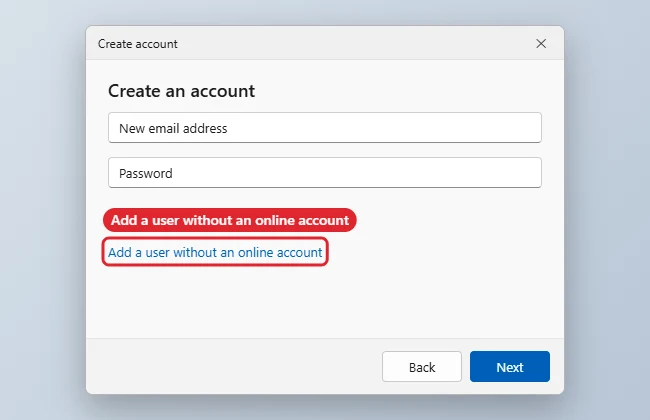
Choose the option to add a user without a Microsoft account to create a local account. - Type a user name. This is the name shown on the sign-in screen and, usually, the name of the person’s folder under C:\Users.
- Type a password and type it again to confirm, or leave both boxes empty for an account with no password.
- If you entered a password, Windows asks for three security questions and answers. Pick questions whose answers the person will still know in a year and that a family member cannot guess.
- Select Next. The account is created right away and appears under Other users.
Choosing a user name that Windows accepts
Windows applies the same naming rules no matter which tool you use. A local user name can be up to 20 characters long, cannot be made only of periods or spaces, and must not match another user or group name on the PC. These characters are not allowed: ” / \ [ ] : ; | = , + * ? < > @. A short first name or a first name plus initial is the easiest choice, and it keeps the profile folder name readable. If you make a typo, you can change the user name in Windows 11 later, although the folder under C:\Users keeps its original name.
If the new account is yours and you need it promoted later, see how to make yourself an administrator on Windows 11.
Password and security question rules
A blank password is allowed, and then Windows does not ask for security questions because there is nothing to recover. That suits a shared kitchen PC with no private data, but anyone who can reach the keyboard can then sign in to that account. When you set a password, the security questions become the person’s way back in if they forget it, since a local account has no online reset. Passwords can be up to 127 characters, and on PCs with a minimum length policy, Windows rejects anything shorter. You can add a password later from that account’s Sign-in options.
Standard user or administrator
Every account added through Settings starts as a Standard User. Standard users can run installed apps, change their own wallpaper, sign-in options and app settings, and save files in their own folders. Installing most desktop software or changing settings that affect everyone on the PC triggers a User Account Control prompt that needs an administrator’s password.
To change the type:
- Go to Settings > Accounts > Other users.
- Select the account to open its flyout.
- Next to Account options, select Change account type.
- Choose Administrator or Standard User from the dropdown and select OK.
Microsoft advises keeping the number of administrators small. A practical rule for a home PC: one or two administrator accounts whose passwords you know, and standard accounts for everyone else, including children and visitors. Before you demote or remove any administrator, confirm that at least one other administrator account signs in correctly, or you can lock yourself out of system settings. More ways to manage admin rights are covered in getting administrator privileges in Windows 11.
Child, family and work or school accounts
Family members and children
Family controls such as screen-time limits, content filters and spending limits only work with Microsoft accounts that belong to a Microsoft family group. To start from the PC, go to Settings > Accounts > Family (shortcut ms-settings:family-group) and use the option there to add a family member. Windows hands off to Microsoft’s family flow, where you enter the person’s email or phone number, or create a new account for a child.
Each person in the group has a role. An Organizer can change family settings and invite others; a Member follows the rules an organizer sets. The invited person receives an email and must accept it while signed in to their Microsoft account. Microsoft’s page on how to add people to your family group shows the same steps from the Family Safety app and website.
A child added this way is then listed under Family in Settings. Their limits are then managed from the Family Safety app or the family website rather than from Windows Settings.
If the child controls later turn out to be stricter than you want, you can turn off Microsoft Family Safety on Windows 11 without deleting anyone’s account.
Work or school accounts
There are two different things people mean here. Selecting Settings > Accounts > Access work or school > Connect adds your work email to your existing Windows account so you can reach company apps and files, which only works if your organization allows personal devices. Joining the PC to your organization’s directory instead lets colleagues sign in with their work credentials and puts the PC under company management. That second route is explained in joining a Windows 11 PC to Microsoft Entra ID. Neither replaces adding a personal user through Other users.
Other tools for adding users, by Windows edition
Settings is the simplest route, but there are four more. They create the same kind of local account, and the edition of Windows decides which ones you can use.
| Tool | Windows 11 Home | Windows 11 Pro, Enterprise, Education | Good for |
|---|---|---|---|
| Settings > Other users | Yes | Yes | Most people; also adds Microsoft accounts |
| User Accounts window (netplwiz) | Yes | Yes | The classic User Accounts window |
| net user in Terminal | Yes | Yes | Quick creation, scripts, remote help |
| PowerShell New-LocalUser | Yes | Yes | Full name, description, no-password accounts |
| Local Users and Groups (lusrmgr.msc) | Usually not available | Yes | Password expiry and disabled-account options |
The command-line tools need an elevated window. Right-click the Start button and choose Terminal (Admin), or see other ways to run as administrator in Windows 11.
User Accounts window (netplwiz)
- Press Windows + R, type netplwiz and press Enter.
- Select Add.
- To create a local account, select Sign in without a Microsoft account (not recommended), then Local account. (Exact wording can vary slightly between builds.)
- Enter a user name, a password twice and a password hint, then select Next and Finish.
This route usually asks for a password hint rather than security questions, so a forgotten password here depends on the hint or on another administrator. To make the account an administrator from the same window, select it, choose Properties, open the Group Membership tab, pick Administrator and select Apply. If the box labeled “Users must enter a user name and password to use this computer” is missing, a setting that requires Windows Hello sign-in for Microsoft accounts may be turned on in Sign-in options.
Command line: net user
In Terminal (Admin), run:
net user <name> * /add
The asterisk makes Windows ask for the password twice without showing it on screen, which keeps it out of your command history. To add a display name, append /fullname:"First Last". To give the account administrator rights, run:
net localgroup Administrators <name> /add
Microsoft’s net user command reference lists every switch, including /delete and /active:no.
PowerShell: New-LocalUser
In an elevated PowerShell or Terminal tab, store the password as a secure string, then create the account:
$Password = Read-Host -AsSecureString
New-LocalUser -Name "<name>" -Password $Password -FullName "First Last" -Description "Shared laptop"
The description can be up to 48 characters. For an account with no password, use -NoPassword instead of -Password. If you leave out both, PowerShell prompts for one. To give the account administrator rights, run Add-LocalGroupMember -Group "Administrators" -Member "<name>". The cmdlet options are documented on Microsoft’s New-LocalUser reference page. The LocalAccounts module runs in Windows PowerShell; it is not available in 32-bit PowerShell on 64-bit Windows.
Local Users and Groups (lusrmgr.msc)
- Press Windows + R, type lusrmgr.msc and press Enter. (It is also in Computer Management under Local Users and Groups.)
- Open the Users folder, right-click an empty area and select New User.
- Fill in the user name, full name, description and password.
- Choose from User must change password at next logon, Password never expires and Account is disabled, then select Create and Close.
Microsoft’s documentation does not list edition limits for this console. On Windows 11 Home it is usually missing, so lusrmgr.msc may show an error instead of opening. On Home, use Settings, netplwiz or one of the commands above, which manage the same local accounts.
Local vs Microsoft account at a glance
| Feature | Local account | Microsoft account |
|---|---|---|
| Internet needed to sign in | Never | For the first sign-in on this PC |
| Forgotten password | Security questions, a hint, or another administrator | Reset online from any device |
| Settings and OneDrive sync | No (OneDrive can be signed in to separately) | Yes |
| Microsoft Store purchases | Sign in inside the Store app | Built in |
| Family Safety controls | Not available | Available through a family group |
| Device encryption recovery key | You must save it yourself | Can be backed up to the account online |
| Account data stored online | None; the account exists only on this PC | Account details, synced settings and OneDrive files |
| Email address required | No | Yes (or a phone number) |
Two related jobs come up often. To turn your own Microsoft account sign-in into a local one rather than adding a second user, follow switching to a local account in Windows 11. And once a new local administrator account works, you can remove the old Microsoft account from Windows 11 and clear its sign-ins.
Everything here applies after Windows is installed. The first account is created during setup, where the local-account options have changed between builds and depend on edition. For that stage, see creating a local account on Windows 11 during setup and skipping the Microsoft account in Windows 11 setup. If a setup workaround does not work on your build, finishing setup and then adding a local account from Settings is always available.
Check that the new account works
- Confirm it is listed under Settings > Accounts > Other users with the type you expect (Administrator or Standard User). From a command line,
net userlists every local account, andGet-LocalUserin PowerShell shows each one with an Enabled column. - Switch to it: open Start, select your profile picture and pick the new account, or press Ctrl + Alt + Delete and choose Switch user. Pressing Windows + L locks the PC and shows the account list.
- Sign in once. The first sign-in builds the person’s profile, which takes a minute or two and ends with a few privacy setting prompts. The folder C:\Users\<name> is created at this point, not when you add the account.
- Sign back in to your own account. Apps you left open in the first account keep running in the background, so save your work before switching on a PC that is short on memory.
Letting the new person do the first sign-in themselves means they make their own privacy choices. Afterward they can add a PIN or face sign-in under Sign-in options; the same screen is where they change the Windows login PIN later.
When Add account is missing or the new user cannot sign in
- The Add account button is gray or missing. You are probably signed in as a standard user. Sign in with an administrator account, or ask whoever manages the PC. On a work or school PC, the organization’s policies can hide or block adding accounts.
- The Microsoft account email is rejected. Check for a typo, then confirm the address actually belongs to a Microsoft account by signing in at a Microsoft website on another device. Use the sign-up option if it does not.
- A command says access is denied. The Terminal window is not elevated. Close it and open Terminal (Admin).
- The person forgot a local account password. At the sign-in screen, select the reset link after a wrong attempt and answer the security questions. If no questions were set, an administrator can set a new password from another account; more routes are in resetting a Windows password.
Remove a user or undo the change
Before removing an account, copy anything the person wants to keep from their Desktop, Documents, Pictures and Downloads folders, because removal deletes their files on this PC.
- Sign in as an administrator and go to Settings > Accounts > Other users.
- Select the account to open its flyout.
- Next to Account and data, select Remove, then confirm the deletion in the prompt that follows.
Removing an account takes its sign-in and data off this device only. It does not delete the person’s Microsoft account, which they can keep using everywhere else. From a command line, net user <name> /delete removes a local account, and net user <name> /active:no turns it off without deleting it. Other routes and what each one leaves behind are covered in removing a user account from Windows 11.
Adding users: questions
Will the new user be able to see my files?
A standard user cannot open another person’s profile folders. An administrator can, after approving a prompt, so give administrator rights only to people you would trust with your files. To share files on purpose, put them in the Public folder under C:\Users or share them through OneDrive.
How many accounts can one Windows 11 PC hold?
Windows does not set a practical limit for a home PC. Each account’s profile takes disk space as the person adds files and apps, and only accounts that are signed in at the same moment use memory.
Does a local account still get Windows updates and Microsoft Store apps?
Yes. Windows Update works the same on every account. Store apps need a Microsoft account sign-in inside the Store app. If Windows then offers to use that Microsoft account for the whole PC, choose the option that limits it to apps if you want the Windows sign-in to stay local.
Once the account is in place and signed in once, the person is ready to use the PC.

Kermit Matthews runs Live2Tech from just outside Philadelphia. He is an IT specialist with over 20 years of experience, from a university help desk to small-business IT, IT management and his own consulting practice, and has written tech guides full time since 2020. Steps are checked against the current software on a real device or the maker’s official documentation. More about Kermit.