The header in a Word document is a great place to put information that you want on every page. This could be the page number and maybe your last name, but it’s also a good choice when you need to know how to make title appear on every page in Word.
How to Put a Document Title at the Top of Every Page in Word 2013
- Open the document.
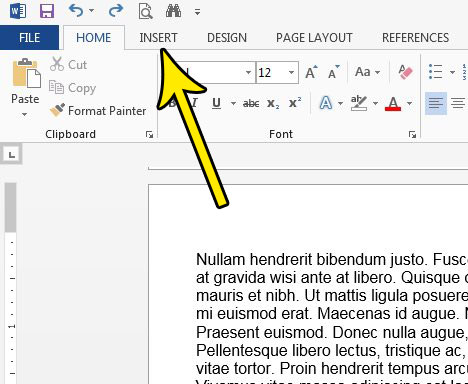
- Click Insert.
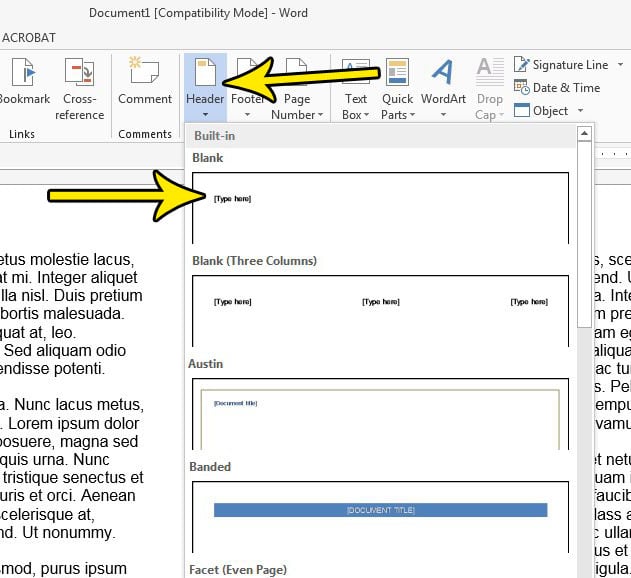
- Select Header, then one of the options.
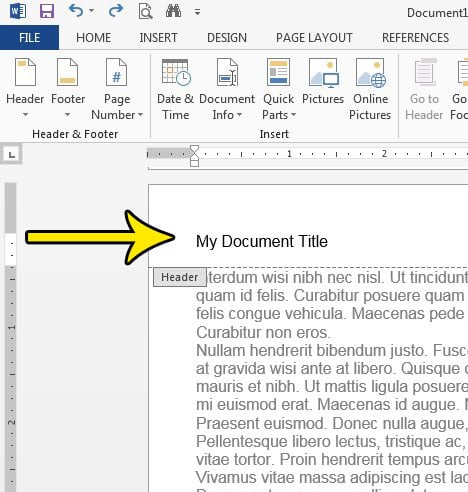
- Delete placeholder text, then enter the title.
Putting information in the header of a document in Word 2013 can be a little confusing the first few times you do it. The header is actually a separate part of the document, and has different rules than the body of the document where you type the majority of your content.
But the header in Word 2013 is actually very useful, particularly when dealing with information, such as a page title, that you would like to automatically include on each page. Our guide below will show you how to accomplish this in Word 2013.
How to Put Your Document Title in the Header in Word 2013 (Guide with Pictures)
The steps in this article are going to show you how to put information in the header of your document. The information that you put here will be included on each page of your document. This article will focus primarily on making that information your document title, but it can also be something like your last name, or anything else that might be required when submitting a document to someone.
Step 1: Open your document in Word 2013.
Step 2: Select the Insert tab at the top of the window.

Step 3: Click the Header button, then choose one of the listed options, based on the preferred style that you would like to use for your document title.

Step 4: Delete the placeholder text, then type the document title.

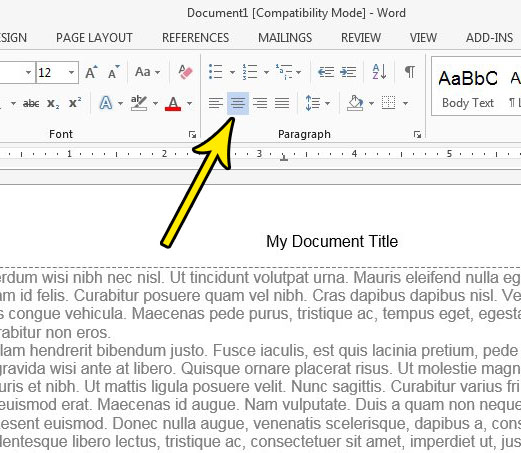
If you would like to modify the appearance of the document title in the header, then you can do so by using the formatting options on the Home tab. For example, in the image below, I have elected to center the document title.

Once you have finished editing the title you can double-click inside the body of the document and continue editing as normal.
If you need to include a page title in your header, but don’t want to put it on the first page, then find out more about customizing the appearance of the header in Word 2013. You have some options as far as which pages the header appears on, which can also be handy if you are using page numbers.
Note that you can also use another method if you want the title of the document to appear at the top of every page.
- Open the document.
- Double-click inside the header.
- Select Document Info in the Insert group of the ribbon.
- Choose Document Title.
This is going to add a variable to the header that looks like [Title]. You might prefer this option if you haven’t settled on a title yet and don’t want to remember to update this information each time you make an adjustment to the document title.
Hopefully one of the methods we outlined above provides you with a good solution for how to make title appear on every page in Word.
Plus, as you become familiar with the header and the footer you can take advantage of them as tools that can more effectively display all of the information you need for your document.

Kermit Matthews is a freelance writer based in Philadelphia, Pennsylvania with more than a decade of experience writing technology guides. He has a Bachelor’s and Master’s degree in Computer Science and has spent much of his professional career in IT management.
He specializes in writing content about iPhones, Android devices, Microsoft Office, and many other popular applications and devices.