While the formatting requirements for different schools and organizations can vary, there are certain settings that are somewhat common. For example, it’s very common to have to double-space documents so that readers can add notes between the lines.
Another formatting requirement that you might encounter involves centering your document title on a title page, but figuring out how to vertically center text in Word 2013 can be a little tricky.
Fortunately, it is a formatting requirement that you can accomplish through the Page Setup menu. Our guide below will point you to that setting and show you how to vertically align your text at the center of the page.
How to Center Text in the Middle of the Page in Word
- Open the document.
- Select the text.
- Click the Page Layout tab.
- Click the Page Setup button.
- Choose the Layout tab.
- Select the Vertical alignment menu and choose Center.
- Click Apply to and choose Selected text.
- Click OK.
Our guide continues below with additional information on centering text in Word 2013, including pictures of these steps.
How to Vertically Align Text in Microsoft Word (Guide with Pictures)
The steps in this guide are going to show you the setting to change in Microsoft Word 2013 so that the text in your document becomes vertically aligned to the center of the page. This is most commonly used when you need to vertically center a title, but is applicable to other situations as well.
Step 1: Open your document in Word 2013.
Step 2: Select the text that you want to center.
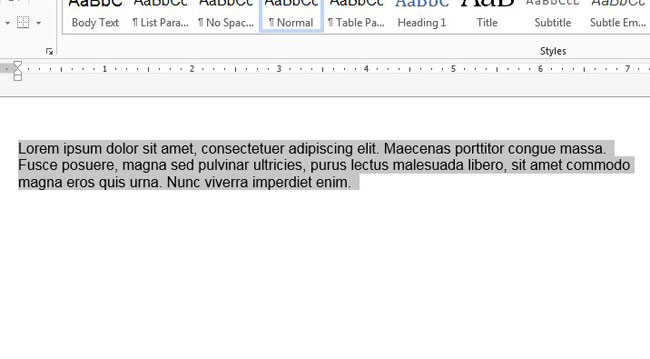
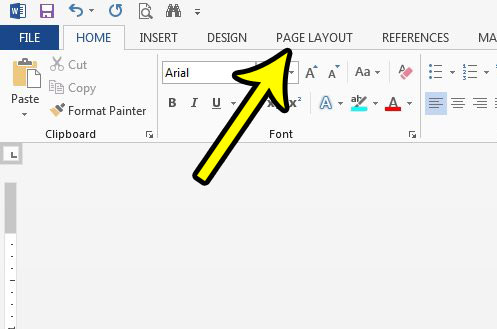
Step 3: Click the Page Layout tab at the top of the window.
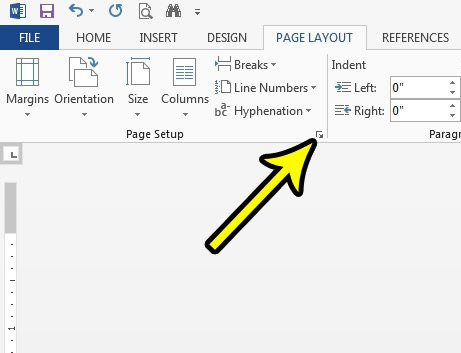
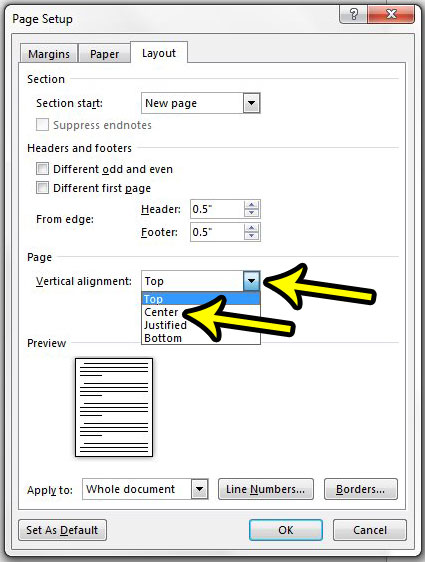
Step 4: Click the Page Setup button at the bottom-right corner of the Page Setup group in the ribbon. This opens the Page Setup dialog box.
The button is very small and looks like a diagonal arrow inside a square.
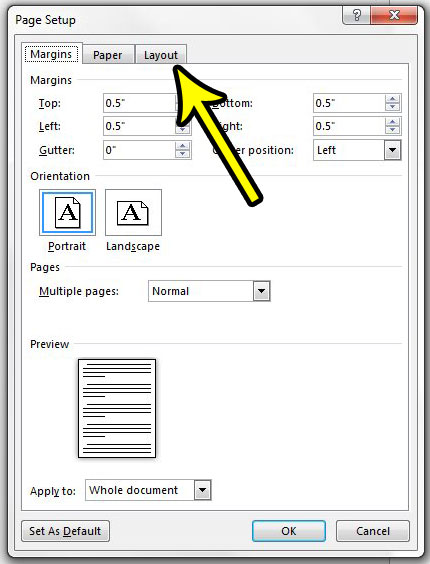
Step 5: Click the Layout tab at the top of the window.
Step 6: Click the Vertical alignment dropdown menu, then select the Center option.
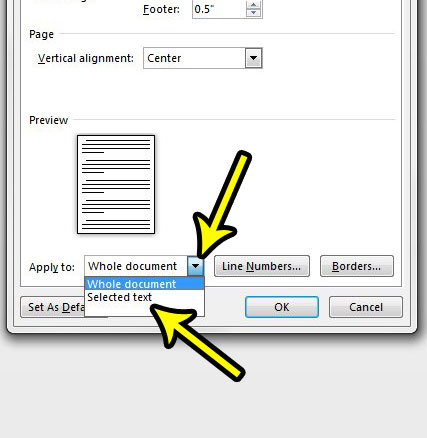
Step 6: Click the Apply to dropdown menu and click the Selected text option. If you would prefer to vertically center the text in the entire document, then click the Whole document option instead. Once you are finished, click the OK button.
Continue reading our tutorial below for additional discussion on centering text in a Word document.
How to Center Text Vertically in Word Table
If you have text inside of cells in a table, rather than directly in the document body, then you are going to need to use a different method to center that text.
- Select the text in the table cell.
- Right-click on the selected text and choose Table Properties.
- Choose the Cell tab at the top of the window.
- Click the Center option under Vertical alignment.
- Click the OK button.
Note that it may not change if you have a lot of blank lines in the document, as Word considers those to be characters. For the vertical centering to work for your table cells you need to have made the table rows larger by dragging the borders of the cells to be larger.
More Information on How to Vertically Align Text in Microsoft Word
The menu that you open when you click the Page Setup dialog launcher in the Page Setup section of the ribbon opens the Page Setup dialog box, which is one of the more useful menus that you can use in Microsoft Word.
Aside from giving you the option of adjusting the vertical alignment of your document text, whether you want to align that text to the top, middle, or bottom of the document, you can also change settings like header and footer size (by adjusting the top and bottom margins via the “Frome edge” section on the Layout tab), page margins, paper size, and more.
If you can’t achieve the type of text positioning that you require by using the option described above, then you may need to use text boxes instead. You can find the text box option on the Insert tab. you can then add the text box to your document, where you will be able to resize, reposition, and freely move it around to the desired location in your document.
For more freedom over text positioning, you might want to consider working in Microsoft Powerpoint instead. You will lose a lot of the editing and document creation norms that you gain with Microsoft Word, but Powerpoint can give you a lot more freedom if the Word editing tools feel too restrictive for your needs.
Conclusion
Once you familiarize yourself with the techniques above you should be able to position text however you need in your documents. You can also experiment with different types of text selections when you are using the selected text option for centering your content, or you can simply use the “Whole document” option if you need every page of your document to have that centering.
This method is most commonly used when you are working with a title page and your organization’s formatting requirements ask for the title to be at the center of the page, but it can be useful if you are creating more non-traditional document types like newsletters or even t-shirts.
Check out the section below for some additional Word, Excel, and Google Apps guides that can help you to perform tasks in those applications as well.
Do you need to add vertical text to your document, like you do in Microsoft Excel, but are unable to figure out how to do it in Word? Find out more about writing vertically in Word to see how you can accomplish this.
Additional Reading

Kermit Matthews is a freelance writer based in Philadelphia, Pennsylvania with more than a decade of experience writing technology guides. He has a Bachelor’s and Master’s degree in Computer Science and has spent much of his professional career in IT management.
He specializes in writing content about iPhones, Android devices, Microsoft Office, and many other popular applications and devices.