When you are sharing a spreadsheet with another person, it’s useful to both parties to be able to give that document a name.
Naming the file with the title is a good start, but you can include it on each page of the printed worksheet as well.
Our tutorial continues below with more information on how to add a title in Excel so that it is shown on the top of every page.
How to Include a Title at the Top of the Page in Excel 2013
- Open your Excel file.
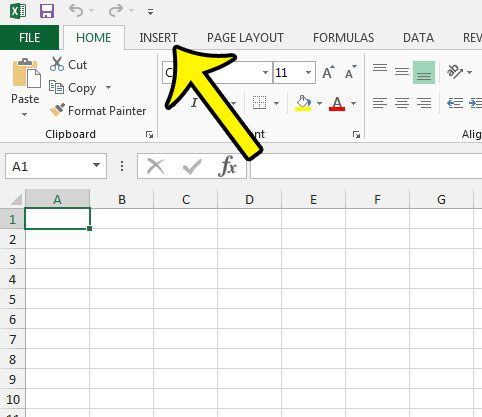
- Select the Insert tab.
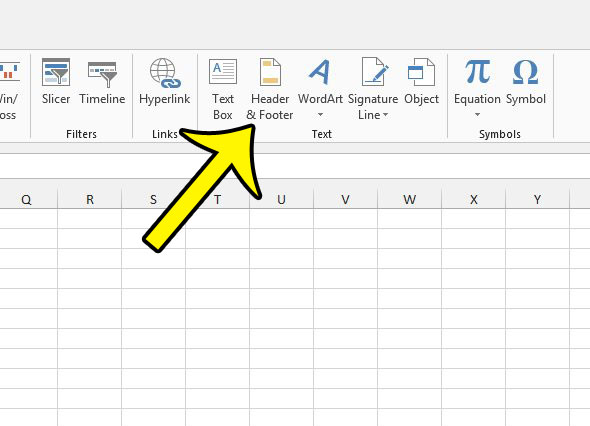
- Click the Header & Footer button.
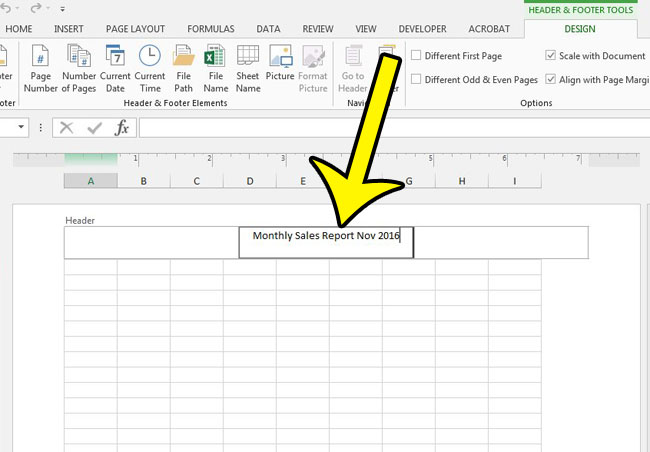
- Choose where to display the title, then type it.
Our article continues below with more information on how to put a title on an Excel spreadsheet, including pictures of these steps.
When you are creating and editing documents in Microsoft Word, it’s common to include a title page or cover page that has the document and author’s name on it.
But an Excel cover page or Excel cover sheet isn’t something that’s easy to create in the Microsoft spreadsheet application, so you may be wondering how to add that information to your document in an unobtrusive and easily manageable way.
Printed spreadsheets have a tendency to look very similar to one another, particularly when you are dealing with something that you produce on a regular basis.
The confusion that can arise if someone is looking at the wrong spreadsheet can potentially be problematic, so it’s a good idea to identify your spreadsheets. One way that you can do this is to add a title to the header.
One of the benefits of using the header for your title in Excel 2013 is that that part of the spreadsheet will repeat on every page.
So if your spreadsheet spans multiple pages, you won’t need to worry about manually adding that title into the correct row of the spreadsheet, which can be a frustrating thing to do.
Our guide below will show you how to use the header to include the title at the top of every page in Excel 2013.
How to Add a Header in Excel 2013 (Guide with Pictures)
These steps are going to allow you to enter information that appears at the top of every printed page of your Excel spreadsheet. Click here if you would like to learn how to repeat the top row of your spreadsheet on every page as well.
Step 1: Open your spreadsheet in Excel 2013.
Step 2: Click the Insert tab at the top of the window.

Step 3: Click the Header & Footer button in the Text section of the ribbon.

Step 4: Click inside of the section in the header where you would like the header to appear, then enter the information for the header.

Once you are done, click on any of the cells to exit the Header & Footer view. You can return to the Normal Excel view by clicking View at the top of the window, then clicking the Normal option in the Workbook Views section of the ribbon.
How to Format Chart Title Box in Microsoft Excel
One other type of title that you may need to use when working in Microsoft Excel involves the title that appears on the top of a chart.
Microsoft Excel makes it easy for you to select a range of cells in your spreadsheet and create a chart in Excel. But you often need to format parts of that chart, such as an axis title or other chart elements that are either non-existent at first, or which are not displaying the correct information.
Fortunately you can format axis title and chart title information using the chart tools tab and the layout tab that appear when you select the chart.
If you want to adjust the titles of your charts then you can double-click on them and edit them in the same way that you would edit information in a text box. You can even right-click on the selected title and see some chart options and format options that you can use to change the way the title looks.
In some newer versions of Microsoft Excel you are going to find a lot of title options. If you right-click on the title chart area and choose the Format Chart Title option you will see a new column at the right side of the window. You can explore that area and find more title options and different formatting settings that will let you create a title that is most appropriate for your chart type.
More Information on How to Add a Title in Excel 2013
By using the method that we have outlined in this article you are able to create a custom title for your worksheet and include it in the header. This means that it will appear on every printed page of this particular worksheet.
There are some other items that you can choose to add to the footer or header of the sheet as well. These are shown in the Header & Footer Elements group of the ribbon. The options there include:
- Page Number
- Number of Pages
- Current Date
- Current Time
- File Path
- File Name
- Sheet Name
- Picture
While you can manually type your spreadsheet title, if you use file names or sheet names that are descriptive, then you can elect to use those instead. Using those options has the added benefit of updating in case you rename the worksheet or file in the future, as it will update the corresponding information in the header of the worksheet.
When you customize the header or footer of a worksheet it will only apply to that single worksheet. If you would like to make the same change to multiple worksheets within your Excel workbook then you can hold down the Ctrl key on your keyboard and click each worksheet tab at the bottom of the window. Or you could right-click one of the worksheet tabs and choose the Select All Sheets option.
If you are having trouble with your printed spreadsheet, then learn how to make it fit one page. This is very useful when you have a sheet with a couple of rows or columns that keep trying to print on their own page.

Kermit Matthews is a freelance writer based in Philadelphia, Pennsylvania with more than a decade of experience writing technology guides. He has a Bachelor’s and Master’s degree in Computer Science and has spent much of his professional career in IT management.
He specializes in writing content about iPhones, Android devices, Microsoft Office, and many other popular applications and devices.