Learning Windows 11 starts with five places you will use every day: Start, the taskbar, File Explorer, Settings and the Get Help app. Nearly every everyday job begins in one of them, so the table below starts from the job you want to do and points you to the place, the shortcut and the section that explains it. Everything here applies to current versions of Windows 11 on Home and Pro PCs.
What do you want to do first?
Find your task in the left column. The middle column is the fastest way in, and the right column is where this article explains it in more detail.
| You want to | Fastest way in | Covered under |
|---|---|---|
| Open an app or find a file by name | Press the Windows logo key and start typing | Open apps and find anything with Start and search |
| Change the volume, Wi-Fi or brightness | Select the network, volume and battery icons on the taskbar | Read the taskbar, Quick Settings and notifications |
| Find a document, photo or download | Windows logo key + E | Find your files in File Explorer |
| Change how the PC looks or works | Windows logo key + I, then use the search box | Change a setting without hunting for it |
| See two windows side by side | Windows logo key + Z | Work with several windows and desktops |
| Lock the PC when you walk away | Windows logo key + L | Shortcuts Microsoft lists for everyday tasks |
| Add or remove a program | Microsoft Store, or Settings > Apps > Installed apps | Install and remove apps |
| Keep the PC safe and current | Settings > Windows Update | Keep the PC updated, protected and backed up |
| Fix something that stopped working | The Get Help app and its troubleshooters | Get help when something goes wrong |
You do not need to work through the sections in order. If you only use the PC for email and documents, the Start, File Explorer and Settings sections cover most of what you will touch in a normal week.
Open apps and find anything with Start and search
The Start button is the Windows logo on the taskbar. Select it, or press the Windows logo key on your keyboard, which Microsoft describes as the key that will “Open or close the Start menu.” You do not have to click into a search box first: as soon as Start is open, type a few letters of what you want, such as “word”, “calc” or the name of a file, and the results appear right away.
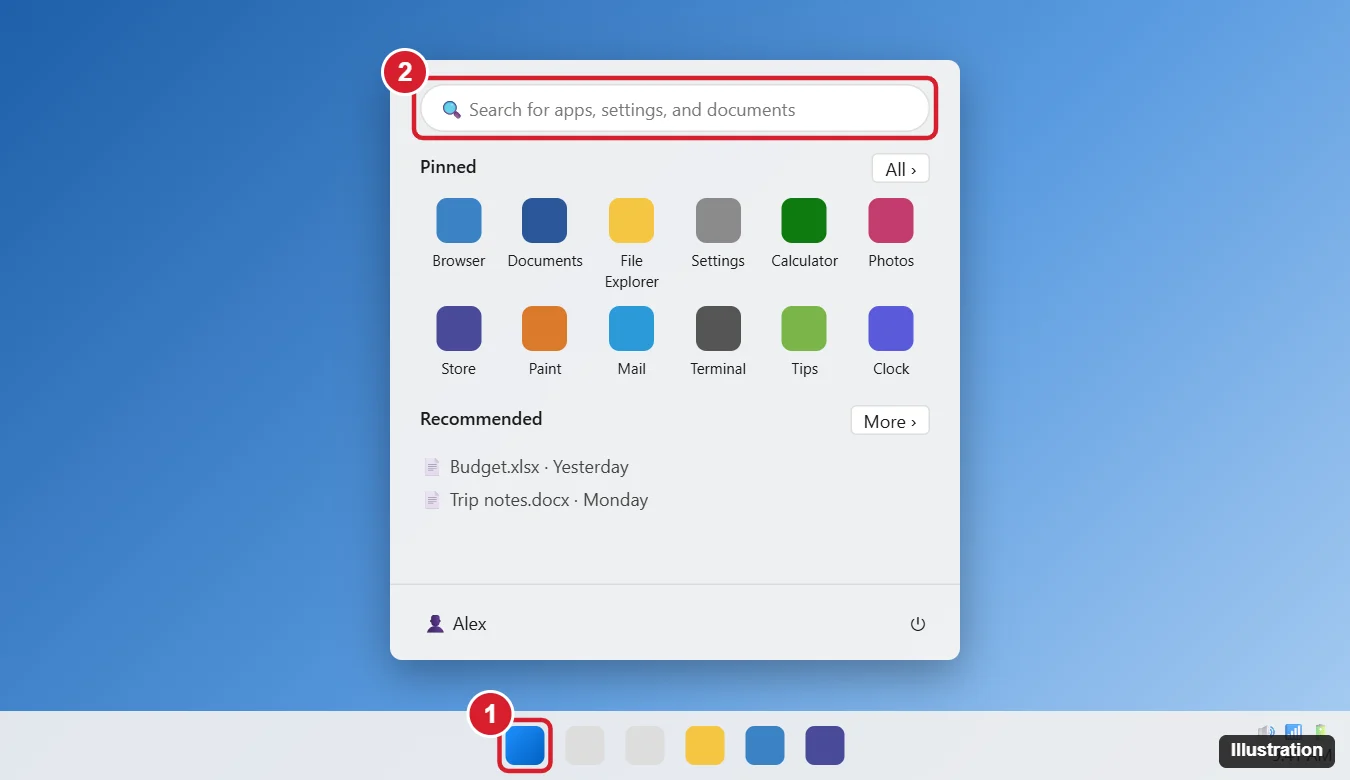
Microsoft’s Start menu page names six areas, and knowing their names makes Microsoft’s help articles easier to follow:
- Search: the box at the top. Typing finds apps, files and settings.
- Pins: the apps you keep handy. Right-click any app and choose Pin to Start to add it, or Unpin from Start to remove it.
- All: every installed app in a list, useful when you know an app is there but it is not pinned.
- Recommendations: recently added and frequently used apps, plus files you opened recently.
- Account: your name and picture, plus the power button for lock, sleep, shut down or restart.
- Mobile device companion: a link to Phone Link if you want to connect an Android phone or iPhone.
Two habits save the most time. First, pin the four or five apps you open every day, so they sit one click away. Second, use search instead of scrolling: typing “printer” or “display” takes you straight to the matching setting. If you want to rearrange pins, add folders or change what Start shows, the walkthrough on customizing the Windows 11 Start menu goes further than this beginner overview.
When you are done for the day, the power button in the Account area offers sleep, shut down and restart. Sleep is best for short breaks, shut down when you will not use the PC for a while, and restart when an update or a stuck app asks for it. If several people share the computer, signing out is better than shutting down; see how to sign out of Windows for the menu and keyboard routes.
Read the taskbar, Quick Settings and notifications
The taskbar is the strip along the bottom of the screen. Microsoft’s taskbar page lists its parts from left to right: Widgets, Start, Search, Task view, your applications and the system tray. By default, the taskbar is centered in Windows 11, which is the biggest visual change for anyone used to an older PC. If you prefer the Start button in the corner, right-click an empty part of the taskbar, choose Taskbar settings, expand Taskbar behaviors and set Taskbar alignment to Left.
Here is what each part does in practice:
- Widgets: weather, news and other cards. Hover over or select the Widgets button, or press Windows logo key + W.
- Search: the same search as Start. Press Windows logo key + S to jump to it. Taskbar settings let you show it as a full box, an icon with a label or just an icon.
- Task view: shows every open window and your virtual desktops (covered below).
- Applications: pinned apps and anything currently open. Select an icon to switch to that app; hover to see a preview of its windows.
- System tray: the clock and the small status icons on the right.
The right end of the taskbar holds two separate panels, and mixing them up is a common beginner frustration:
- Quick Settings opens when you select the network, volume and battery icons together. It holds Wi-Fi, Bluetooth, volume, brightness and similar quick toggles. The keyboard route is Windows logo key + A (Microsoft’s shortcut list still calls this the action center).
- Notification center opens when you select the clock or the notification bell. It shows alerts from apps and a calendar. The keyboard route is Windows logo key + N.
To hide a taskbar item you never use, such as Widgets, right-click the taskbar, choose Taskbar settings, and switch that item off under Taskbar items.
Find your files in File Explorer
File Explorer is where your documents, photos and downloads live. Microsoft gives three ways to open it: select it on the taskbar, select it in the Start menu, or press Windows logo key + E. If the folder icon is missing from your taskbar, the guide on starting File Explorer lists the other routes.
The left side of the window is the navigation pane. The first entry, Home, is the page File Explorer opens on. It shows Quick access folders and files you used recently.
What moved in recent versions
Older guides tell you to open This PC to find Documents or Pictures. According to Microsoft’s File Explorer page, since Windows 11 version 22H2 the Desktop, Documents, Downloads, Pictures, Music and Videos folders are pinned in Quick access on the Home page and are no longer displayed under This PC. This PC still shows your drives, such as the C: drive and any USB stick you plug in.
Two other changes catch people out:
- Tabs: File Explorer works like a web browser. Press Ctrl + T to open a new tab and switch to it, so you can keep Downloads and Documents open in one window and drag files between them.
- The shorter right-click menu: right-clicking a file shows a compact menu with the most common actions. Older or less common commands sit under Show more options, which opens the classic menu.
A simple exercise ties this together: open File Explorer, go to Downloads, right-click a file you no longer need and delete it, then open a new tab, go to Documents and create a folder for the files you want to keep.
Change a setting without hunting for it
The Settings app replaces most of the old Control Panel. Open it with Windows logo key + I, or right-click the Start button and choose Settings.
The left side lists categories. Microsoft’s guide to Windows Settings describes each as an icon and a name, such as System, Bluetooth & devices and Privacy & security. In current versions the list starts with a Home page, followed by:
- System: display, sound, notifications, power and storage.
- Bluetooth & devices: mice, keyboards, printers, headphones and phones.
- Network & internet: Wi-Fi, Ethernet and VPN.
- Personalization: background, colors, light or dark mode, lock screen, Start and taskbar.
- Apps: installed apps, default apps and startup apps.
- Accounts: your account, sign-in options and other people on the PC.
- Time & Language: date, time zone, region and keyboard language.
- Gaming, Accessibility, Privacy & security and Windows Update.
The fastest route to any setting is the search box at the top of Settings: type a keyword such as “mouse”, “text size” or “default apps” and select the matching result. That is more reliable than memorizing paths, because Microsoft moves pages between categories from time to time.
A few changes worth making early on:
- Night light: go to Settings > System > Display and turn on Night light to reduce blue light in the evening, as Microsoft’s night light page describes.
- Larger text: search Settings for “text size” if words on the screen are hard to read.
- Light or dark mode and wallpaper: open Personalization and pick a background and color mode.
- A PIN or Windows Hello: search Settings for “sign-in options” to set a PIN, face or fingerprint sign-in. To change an existing PIN later, see how to change your Windows PIN.
On a work or school PC
If the PC was given to you by an employer or a school, some settings may be grayed out or show a note that your organization manages them. That is expected: your IT team controls those options, and the right move is to ask them rather than look for a way around it.
Work with several windows and desktops
Once you have more than two apps open, these features keep the screen manageable.
Snap two or more windows
Microsoft’s Snap page gives three routes:
- Hover over a window’s maximize button (or press Windows logo key + Z) to see the snap layouts, then select the zone where the window should go.
- Drag a window to the top of the screen to show the Snap bar, and drop it on a layout.
- Press Windows logo key + Left arrow or Right arrow to snap the active window to one half of the screen.
After you snap the first window, Snap Assist offers your other open windows to fill the empty space. Microsoft notes that you might see different layouts depending on the size of your display, so a small laptop screen shows fewer choices than a wide monitor.
Switch between windows
Alt + Tab switches between open windows: hold Alt, tap Tab until the one you want is highlighted, then let go. The article on switching between open windows covers the variations. To clear everything off the screen at once, Windows logo key + D displays and hides the desktop; for more ways to do that, see how to minimize all windows at once.
Use more than one desktop
Virtual desktops let you keep, for example, schoolwork on one desktop and personal browsing on another. Microsoft’s multiple desktops page describes the steps:
- Hover over the Task view icon on the taskbar, or press Windows logo key + Tab.
- Select New desktop.
- Open the apps you want on that desktop. To rename a desktop, select its name in Task view.
The keyboard shortcuts for desktops are Windows logo key + Ctrl + D to create one, Windows logo key + Ctrl + Right arrow or Left arrow to move between them, and Windows logo key + Ctrl + F4 to close the one you are using. The guide to switching between virtual desktops has more detail.
Shortcuts Microsoft lists for everyday tasks
You do not need dozens of shortcuts. The ones below come from Microsoft’s keyboard shortcuts page, with Microsoft’s own description of what each does. “Windows” means the Windows logo key.
| Press | What Microsoft says it does | When it helps |
|---|---|---|
| Windows | Open or close the Start menu | Starting any app or search |
| Windows + S | Open search | Finding a file or setting by name |
| Windows + E | Open File Explorer | Getting to your documents |
| Windows + I | Open Settings | Changing anything about the PC |
| Windows + L | Lock the computer | Stepping away from your desk |
| Windows + D | Display and hide the desktop | Reaching a file saved on the desktop |
| Windows + Tab | Open Task View | Seeing every window and desktop |
| Windows + Z | Open the snap layouts | Putting windows side by side |
| Windows + V | Open the clipboard history | Pasting something you copied earlier |
| Windows + Shift + S | Select a region of the screen to capture a screenshot to the clipboard | Sharing part of the screen |
| Windows + . (period) | Open the emoji panel | Adding emoji or symbols to text |
| Windows + X | Open the Quick Link menu | Reaching Settings, Task Manager and more |
| Alt + Tab | Switch between open windows | Moving between apps |
| Ctrl + Z | Undo the previous action | Reversing a mistake |
Copy (Ctrl + C) and paste (Ctrl + V) work in nearly every app as well. A screenshot taken with Windows + Shift + S goes to the clipboard; the article on Windows 11 screenshots explains where each method saves the image. For more on the emoji panel, see using the emoji keyboard in Windows.
If you only learn three, start with Windows + E, Windows + I and Alt + Tab. Add Windows + L the first time you leave the PC in a shared space.
Install and remove apps
The safest places to get software are the Microsoft Store (open it from Start) and the official website of the company that makes the app. In the Store, search for the app and select the button to get or install it. Avoid download sites that bundle extra installers, and skip any “PC cleaner” or “driver updater” pop-up that promises to speed up the computer: Windows Update and Windows Security already handle updates and protection.
To remove an app, Microsoft’s uninstall page gives two routes:
- Go to Start > Settings > Apps > Installed apps, find the app, select More (the three dots) next to it, and choose Uninstall.
- Or open Start, go to All, right-click the app and choose Uninstall.
To pick which app opens a type of file, such as which browser opens web links or which app opens photos, search Settings for “default apps”.
Keep the PC updated, protected and backed up
Three built-in tools do most of the maintenance work for you. Checking them once a month is a good habit.
Windows Update
Microsoft’s Windows Update page gives the steps:
- Select Start > Settings > Windows Update.
- Select Check for Windows updates.
- If updates are available, select Download & install.
- If prompted, restart your device to apply the updates.
Save your work before restarting. Updates often install while the PC restarts, so a restart can take longer than usual.
Windows Security
Windows 11 includes antivirus and firewall protection in the Windows Security app. Microsoft’s Windows Security page says to open it by searching for it in the Start menu. To run a quick scan, open the app and go to Virus & threat protection, then start a quick scan. You can also scan one file or folder: right-click it in File Explorer, choose Show more options, and select Scan with Microsoft Defender.
Windows Backup
Open Start, type “backup” and select Windows Backup. Microsoft’s Windows Backup page says it backs up your folders, many of your apps, your preferences and saved credentials, and that the folders sync to your OneDrive account. Syncing keeps a copy of those files in the cloud, so you can reach them from another PC; if the files matter a lot to you, keep a second copy on an external drive as well.
Get help when something goes wrong
When a printer stops printing, sound disappears or Wi-Fi drops, start with the Get Help app before searching the web. Microsoft’s troubleshooters page describes the route:
- Open Start and type “Get Help”, then open the app.
- Type the name of the problem or the troubleshooter, such as “audio” or “network”.
- Select Start to run that troubleshooter, then follow the questions it asks.
Get Help also links to Microsoft support articles and contact options. Rather than repeating every option here, the article on getting help in Windows 11 walks through each built-in route and when to use it.
Two more things help when you ask anyone for support: the exact wording of any error message (a screenshot with Windows + Shift + S works well), and what you did just before the problem started.
Windows 11 beginner questions
Do I need a Microsoft account to use Windows 11?
For setup on Home edition, yes. Microsoft’s Windows 11 requirements page says Windows 11 Home edition requires an internet connection and a Microsoft account to complete device setup on first use. A Microsoft account also connects the PC to OneDrive and Windows Backup.
My old PC runs Windows 10. Does anything here apply to it?
Some steps look similar, but the menus differ. Microsoft’s Windows 10 end of support page says “Windows 10 has reached the end of support on October 14, 2025,” which means Microsoft no longer provides technical assistance, feature updates or security updates for it.
What does Windows key + X open?
Microsoft calls it the Quick Link menu. It is the same menu you get by right-clicking the Start button, and it has shortcuts to Settings, Task Manager, File Explorer, the power options and other tools.
How do I find out which version of Windows 11 I have?
Open Settings and search for “about”. The About page lists your edition (for example, Home or Pro) and version. Have it ready when you ask for help, because some steps differ between versions.
A good next step is to pin your most used apps to Start, set up Windows Backup, and practice Windows + E and Alt + Tab until they feel automatic.

Kermit Matthews runs Live2Tech from just outside Philadelphia. He is an IT specialist with over 20 years of experience, from a university help desk to small-business IT, IT management and his own consulting practice, and has written tech guides full time since 2020. Steps are checked against the current software on a real device or the maker’s official documentation. More about Kermit.