“Spacing between bullets” in PowerPoint can mean two things: the vertical space between bullet points, or the horizontal gap between each bullet symbol and its text. Both are easy to adjust once you know where the settings are. This guide covers both, plus how to apply your spacing to every slide and stop AutoFit from squeezing it.
Quick Answer
Space between bullet points: select the text box, open Home > Line Spacing > Line Spacing Options, and change Before (or After) under Spacing, for example to 6 or 12 pt.
Gap between bullet and text: in the same Paragraph dialog, set Indentation to Hanging and adjust the By value, or drag the hanging indent marker on the ruler.
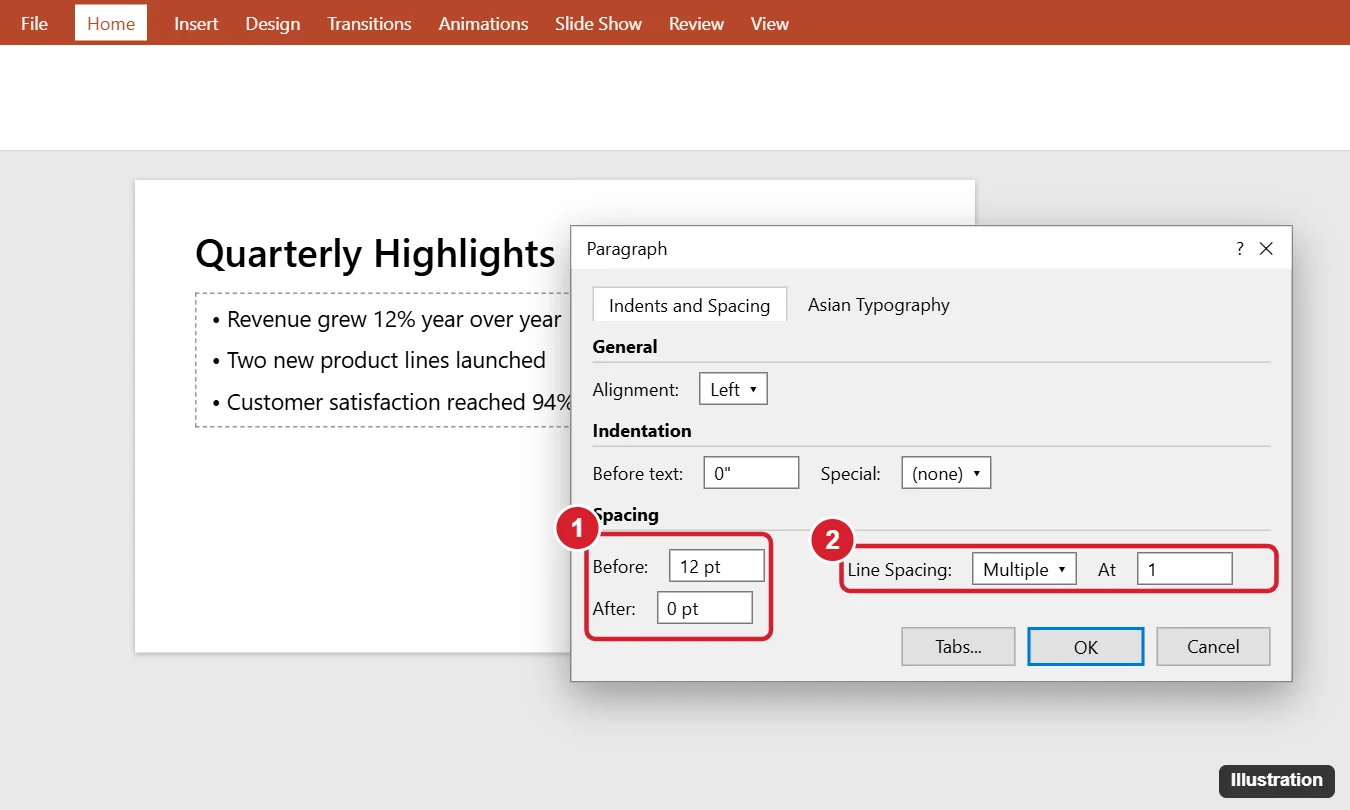
Change the Space Between Bullet Points
- Click the border of the text box to select all bullets, or select specific bullets.
- Go to Home > Line Spacing (the icon with lines and arrows) and choose Line Spacing Options.
- Under Spacing, set Before to add space above each bullet (6 to 12 pt is typical), and After to 0 pt to avoid doubling up.
- Click OK.
Using Before or After separates bullets without spreading out the wrapped lines of a single bullet, which is what the Line Spacing value does.
Paragraph Spacing vs. Line Spacing
| Setting | Affects | Use it to |
|---|---|---|
| Before / After | Space between separate bullets | Separate bullets clearly |
| Line Spacing (Single, 1.5, Multiple) | Space between lines inside a bullet | Make long, wrapping bullets easier to read |
For more on line spacing, see our guide to changing line spacing in a PowerPoint text box.
Change the Gap Between the Bullet and the Text
Paragraph dialog (exact values)
- Select the bullets and open Line Spacing Options (the Paragraph dialog).
- Under Indentation, set Before text (where the text starts) and Special: Hanging with a By value (the distance from the bullet to the text).
- For a tighter look, try Before text 0.25″ and Hanging 0.25″. For more room, use 0.4″ and 0.4″.
Ruler (visual)
- Turn on View > Ruler.
- Click in the bullet text. On the ruler, drag the bottom triangle (text position) left or right. The top triangle is the bullet position.
Apply Spacing to All Slides
- Go to View > Slide Master.
- Select the top master slide, click the border of the body placeholder, and set the spacing and indents for each bullet level.
- Click Close Master View. Slides using those layouts update automatically.
Text you formatted manually on individual slides may not update. Select it and click Home > Reset to reapply the layout’s formatting.
Stop AutoFit From Shrinking Your Spacing
If spacing looks smaller than you set, AutoFit is shrinking text to fit the placeholder. Right-click the text box, choose Format Shape > Text Options > Text Box, and select Do not Autofit. Then resize the box, or move some content to a new slide.
Troubleshooting
Only one bullet changed
Select the whole text box by clicking its border before changing the spacing.
There’s a big gap after the last bullet
Remove any empty paragraph at the end, and set After to 0 pt.
Sub-bullets are too far indented
Adjust each level separately in the Slide Master, or with the ruler while a sub-bullet is selected.
Frequently Asked Questions
Does this work on PowerPoint for Mac and the web?
Yes. On Mac, use Format > Paragraph. On the web, use Home > Line Spacing > Line Spacing Options.
What’s a good spacing for presentations?
Line spacing 1.0 to 1.2 with 6 to 12 pt Before is readable from a distance without wasting space.
Summary
- Use Before/After in Line Spacing Options to space bullets apart.
- Use Hanging indentation or the ruler to change the bullet-to-text gap.
- Set spacing in the Slide Master for consistency.
- Turn off AutoFit if PowerPoint keeps shrinking your spacing.

Kermit Matthews is a freelance writer based in Philadelphia, Pennsylvania with more than a decade of experience writing technology guides. He has a Bachelor’s and Master’s degree in Computer Science and has spent much of his professional career in IT management.
He specializes in writing content about iPhones, Android devices, Microsoft Office, and many other popular applications and devices.