PowerPoint slides are landscape (wide) by default, but portrait (tall) slides work better for posters, flyers, handouts, infographics, and presentations viewed on phones. In PowerPoint 2013 and later, you change orientation from the Slide Size dialog, and the change applies to every slide in the presentation. This guide shows the steps, how to keep your content from looking squashed, and workarounds for mixing orientations.
Quick Answer
Go to the Design tab, click Slide Size > Custom Slide Size, choose Portrait under Slides, and click OK. When asked, choose Ensure Fit to scale content down so it fits, or Maximize to keep it large (some content may extend off the slide).
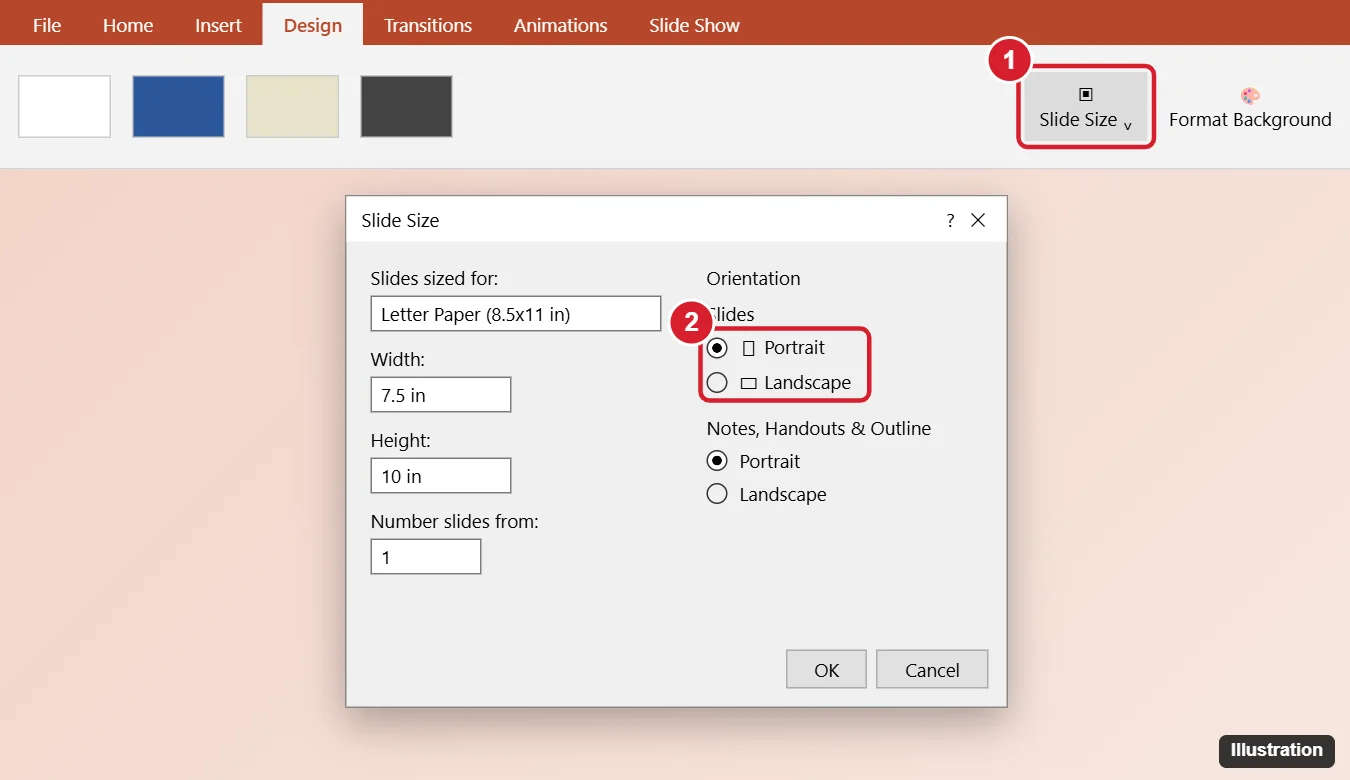
Step-by-Step (PowerPoint 2013 and Later)
- Open your presentation.
- Click the Design tab.
- In the Customize group, click Slide Size, then Custom Slide Size.
- Under Orientation > Slides, select Portrait.
- Optionally, choose a paper size in Slides sized for, such as Letter Paper or A4, or enter a custom width and height.
- Click OK.
- Choose Maximize or Ensure Fit.
Maximize vs. Ensure Fit
| Option | What happens | Best for |
|---|---|---|
| Maximize | Keeps content size; some may fall outside the slide | Slides with little content you will rearrange |
| Ensure Fit | Scales content down to fit the new shape | Keeping everything visible |
Either way, review every slide afterward and adjust images, text boxes, and charts, since they were designed for a wide layout.
Change Notes and Handout Orientation
In the same Slide Size dialog, under Notes, Handouts & Outline, choose Portrait or Landscape. This affects printed notes and handouts, not the slides.
Can You Mix Portrait and Landscape Slides?
Not within one presentation. PowerPoint applies one orientation to all slides. Workarounds:
- Link two presentations: create a separate portrait presentation and link to it from a slide using Insert > Action or a hyperlink.
- Simulate portrait content: on a landscape slide, place a tall image or shape in the center with a background around it.
Tips for Designing Portrait Slides
- Start with portrait orientation before adding content to avoid rework.
- Use a template designed for portrait layouts, such as flyers or posters (search File > New for poster or flyer).
- Stack content vertically and use larger text, since portrait slides are narrower when projected.
- Remember that most projectors and screens are wide, so portrait slides will show with bars on the sides during a slideshow.
Frequently Asked Questions
Where is Page Setup in PowerPoint 2013?
It was replaced by Design > Slide Size > Custom Slide Size.
How do I change orientation in PowerPoint for Mac?
Go to Design > Slide Size > Page Setup (or Custom Slide Size) and choose Portrait.
Can I print a landscape slide on portrait paper?
Yes. In File > Print, PowerPoint scales slides to the paper; choose the orientation in the print settings.
Summary
- Go to Design > Slide Size > Custom Slide Size.
- Choose Portrait under Slides and click OK.
- Pick Ensure Fit or Maximize, then review each slide.
- Use linked presentations if you need both orientations.

Kermit Matthews is a freelance writer based in Philadelphia, Pennsylvania with more than a decade of experience writing technology guides. He has a Bachelor’s and Master’s degree in Computer Science and has spent much of his professional career in IT management.
He specializes in writing content about iPhones, Android devices, Microsoft Office, and many other popular applications and devices.