Microsoft Office applications like Powerpoint 2013 feature a navigation system called the ribbon. This is a series of buttons and settings in a horizontal bar at the top of the window, which you can use to make changes to your slides. Some of these options are found on the Developer tab, which is not part of Powerpoint by default.
When you want to make changes to a program like Powerpoint 2013, then it is common to seek out tutorials like this article to help you find the setting for which you are looking. But occasionally you will encounter a guide that is telling you to navigate to a menu or screen that you are unable to find. One such menu that you may not be able to find in Powerpoint 2013 is the Developer tab. While that tab is included in the Powerpoint 2013 program, it is not enabled by default.
So if you need to make a change to a presentation that requires you to use a feature on the Developer tab, then our tutorial below will show you where to go so that you can activate that menu for your Powerpoint 2013 installation.
How to Add the Developer Tab in Powerpoint 2013
- Open your presentation.
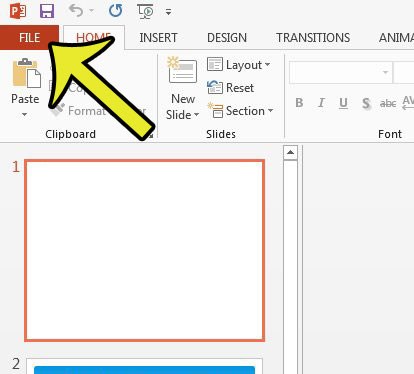
- Click File.
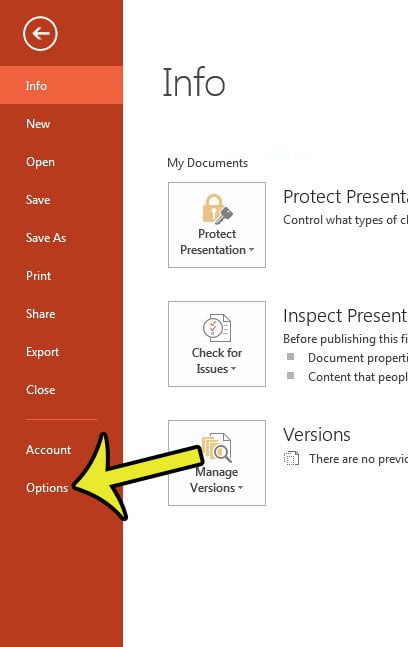
- Select Options.
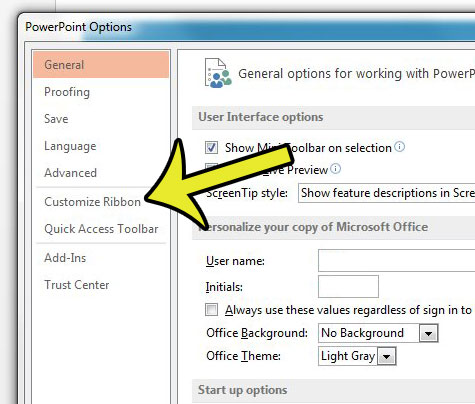
- Select Customize Ribbon.
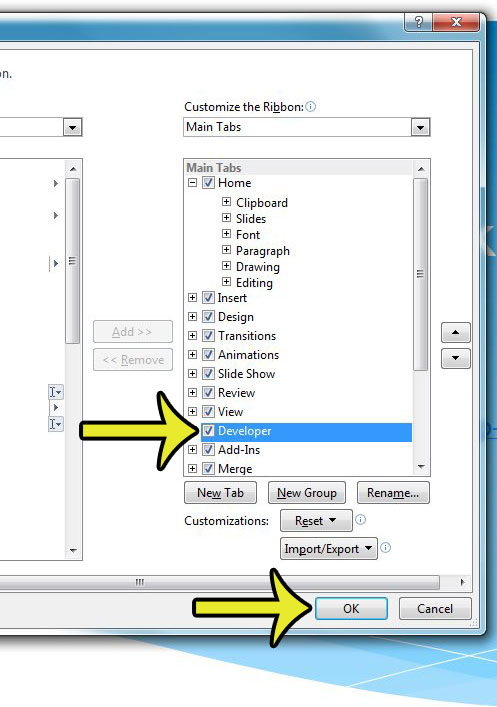
- Check the Developer option, then click OK.
Our guide continues below with additional information on adding the PPT Developer tab, including pictures of these steps.
How to Show the Developer Tab in Powerpoint 2013 (Guide with Pictures)
The steps in this article will add a Developer tab to the ribbon at the top of Powerpoint 2013. There are a number of additional tools and options that are available when you add the Developer tab, including macros, add-ins, and some additional controls. This is also a setting that is adjusted for the Powerpoint 2013 program itself, and not just on an individual presentation basis. Therefore you will not have to add the Developer tab every time you open the program. It will remain there until you go back in and turn off the option that we will be turning on in the steps below.
Step 1: Open Powerpoint 2013.
Step 2: Click the File tab at the top-left corner of the window.

Step 3: Click the Options button in the column at the left side of the window.

Step 4: Click the Customize Ribbon button at the left side of the Powerpoint Options window.

Step 5: Check the box to the left of Developer in the column at the right side of this window. Click the OK button at the bottom of the window to apply your changes.

Our tutorial continues below with additional information on adding the Powerpoint Developer tab.
More Information on How to Add the PPT Developer Tab in Powerpoint 2013
Once you complete the steps in this guide you will have added a new Developer tab to the ribbon at the top of the window. This tab will remain visible in the application whenever you open another slideshow on your computer. If you no longer wish to have access to this tab then you will need to return to the Powerpoint Options menu and remove the tab from the location where we added it earlier.
Once you have added the Developer tool to the Powerpoint ribbon you will be able to use the options on that menu to affect your Powerpoint presentations.
If you don’t see the Developer option in the column at the right side of the Powerpoint Options menu then you may need to find it in the left column first, select it, then click the arrow between the columns to add it.
Other navigational ribbon options or tabs can be added or removed from this menu as well. If you have ever had cause to customize the ribbon in Powerpoint so that you can more easily customize a text box or new shapes that you have added to a slide, then this is a great way to accomplish that.
You can also use the Quick Access Toolbar tab on the Powerpoint Options menu if you would like to add some more commands to the bar at the very top of the window, above the ribbon.
Other Microsoft Office programs may also have a missing Developer tab that you would like to add like you added the develop tab in Microsoft Powerpoint. For example, Microsoft Excel does not have the Developer tab included as one of its main tabs, so you will need to go through the Excel Options menu and select the Developer check box if you would like to be able to write macros or run macros within your spreadsheets.
Do you also work with Microsoft Excel 2013? If so, then you may have found that spreadsheets you print from Excel are often difficult to read when only the default settings have been applied. One thing you can do to improve them is to include the gridlines when you print a worksheet. This will make it much easier to distinguish the data in individual cells from the data in surrounding cells.
Additional Reading

Kermit Matthews is a freelance writer based in Philadelphia, Pennsylvania with more than a decade of experience writing technology guides. He has a Bachelor’s and Master’s degree in Computer Science and has spent much of his professional career in IT management.
He specializes in writing content about iPhones, Android devices, Microsoft Office, and many other popular applications and devices.