To crop a picture into a circle in PowerPoint 2013, select the picture, open the Picture Tools Format tab, click the arrow under Crop, and choose Aspect Ratio > 1:1 to make it square. Then click the Crop arrow again, choose Crop to Shape, and pick the Oval. Because the picture is square, the oval becomes a perfect circle. Click outside the picture to finish.
The same steps work in PowerPoint 2016, 2019, 2021, and Microsoft 365, where the tab is called Picture Format. Below you’ll also learn how to reposition the photo inside the circle, add a border, and fix a circle that looks stretched.
How to crop a picture into a perfect circle
- Click the picture on your slide to select it.
- Click the Picture Tools Format tab (Picture Format in newer versions).
- Click the arrow under Crop and choose Aspect Ratio > 1:1. Drag the picture inside the crop box to choose what stays in view, then click outside it.
- With the picture still selected, click the arrow under Crop again and choose Crop to Shape.
- Under Basic Shapes, click the Oval.
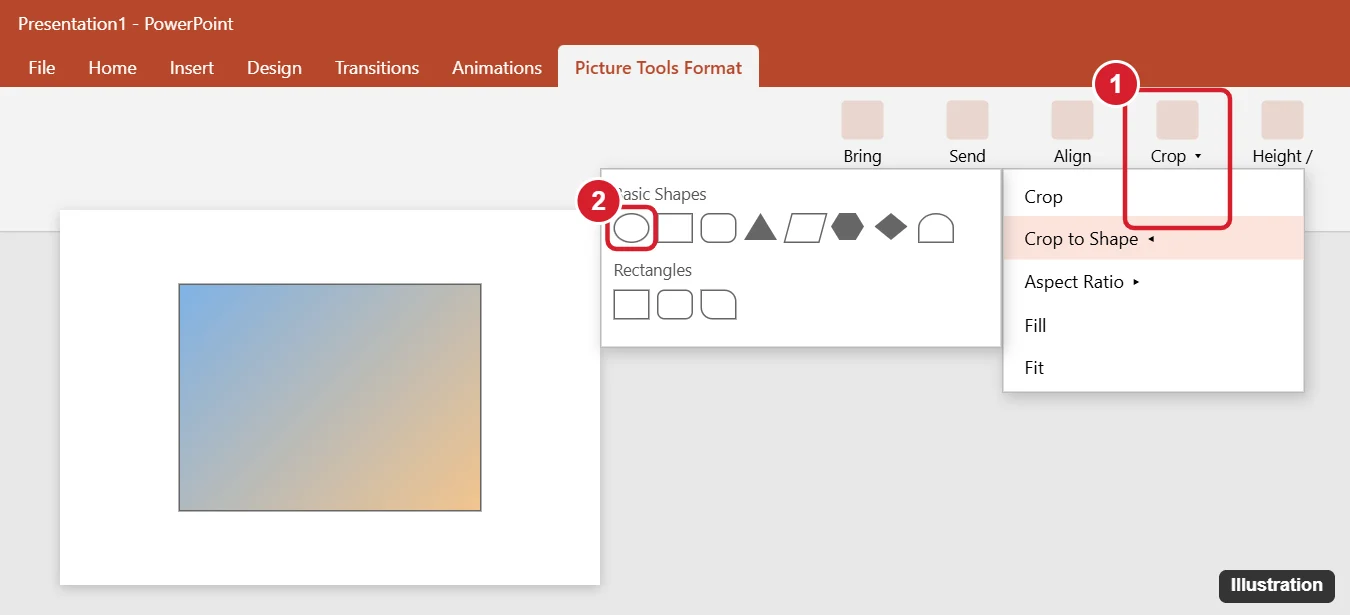
If you skip the 1:1 step, you’ll get an oval instead of a circle unless the picture is already square.
How to move or resize the photo inside the circle
- Select the circle picture and click Crop (the top half of the button).
- Drag the picture to move it inside the circle. Drag a corner of the picture (not the black crop handles) to zoom it in or out.
- Click Crop again or click outside the picture to finish.
Use Crop > Fill to make the picture fill the whole circle, or Fit to show the entire picture inside it.
How to add a border or effect
- Border: On the Format tab, click Picture Border and pick a color, weight, and style.
- Shadow or glow: Click Picture Effects and choose Shadow, Glow, or Soft Edges.
- Ready-made styles: The Picture Styles gallery includes circular frames, but they may change the crop. Apply the style first, then crop.
Alternative: Fill a circle shape with a picture
- Click Insert > Shapes > Oval.
- Hold Shift and drag on the slide to draw a perfect circle.
- Right-click the circle and choose Format Shape.
- Under Fill, choose Picture or texture fill, click File (or Insert), and select your picture.
- Check Tile picture as texture off, and adjust the offsets if the picture looks stretched.
This method is handy when you want several circles the exact same size, such as team headshots.
Troubleshooting
- The circle looks like an oval: Undo the shape crop, set Aspect Ratio to 1:1, then apply the oval again. Or check Lock aspect ratio in Size and Position and make the height and width equal.
- Crop is grayed out: You selected a shape, icon, or group instead of a picture. Ungroup it or select the picture itself.
- The picture looks distorted: Don’t drag the side handles to resize. Drag the corners, or type a size on the Format tab.
Frequently asked questions
Can I crop a picture into other shapes?
Yes. Crop to Shape works with any shape in the gallery, including stars, hearts, and arrows.
Is the cropped part deleted?
No, it’s only hidden. To remove it and reduce the file size, click Compress Pictures on the Format tab and check Delete cropped areas of pictures.
How do I undo a circle crop?
Select the picture and click Reset Picture > Reset Picture & Size on the Format tab.

Kermit Matthews is a freelance writer based in Philadelphia, Pennsylvania with more than a decade of experience writing technology guides. He has a Bachelor’s and Master’s degree in Computer Science and has spent much of his professional career in IT management.
He specializes in writing content about iPhones, Android devices, Microsoft Office, and many other popular applications and devices.