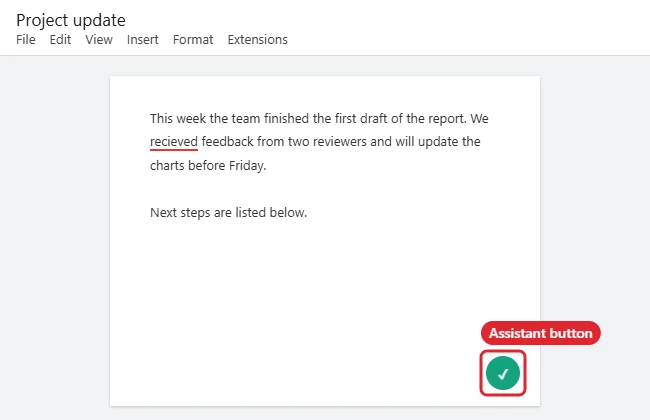
To add Grammarly to Google Docs, install the free Grammarly browser extension in Chrome, Edge, Firefox or Safari, sign in to your Grammarly account, and then open (or refresh) any document at docs.google.com. There is nothing to install inside Google Docs itself. Once the extension is running, a round Grammarly button appears in the lower-right corner of the document, and underlined suggestions show up as you type.
This guide walks through the setup for each supported browser, explains how to read and accept suggestions, and covers the settings, mobile options and fixes you are most likely to need.
Quick Answer
- Open your browser and go to the Grammarly browser extension page, or your browser’s extension store.
- Click the button to add the extension, then confirm.
- Sign in to Grammarly or create a free account.
- Open a Google Docs document, or refresh one that was already open.
- Look for the Grammarly button in the lower-right corner and click an underlined word to see a suggestion.
In This Guide
- What you need before you start
- Add Grammarly in Chrome or Microsoft Edge
- Add Grammarly in Firefox
- Add Grammarly in Safari on a Mac
- How to use Grammarly suggestions in Google Docs
- Using Grammarly in Google Docs on a phone or tablet
- Turn Grammarly off in Google Docs
- Troubleshooting
- Frequently asked questions
What You Need Before You Start
- A supported browser on a computer. Grammarly lists Google Chrome, Microsoft Edge, Mozilla Firefox and Safari (on a Mac) as supported for Google Docs. Browsers such as Opera and Brave can sometimes install Chrome extensions, but Grammarly does not support them, so expect problems there.
- A Grammarly account. The free plan is enough to check spelling, grammar and punctuation. Paid plans add features such as full-sentence rewrites and tone adjustments.
- Edit access to the document. Grammarly can only apply a fix if you can change the text. In a view-only or comment-only document, you’ll need to make a copy or ask the owner for edit access.
- An internet connection. Suggestions are generated online, so they won’t appear while you work offline.
Scope: these steps cover the Grammarly browser extension with Google Docs on the web, as described in Grammarly’s own help center in September 2026. Button names can change when either product is updated. If yours look slightly different, the order of the steps should still apply.
Add Grammarly in Chrome or Microsoft Edge
Chrome and Edge are built on the same engine, so the process is nearly identical. The Chrome version is installed from the Chrome Web Store, and Edge offers Grammarly through its own Edge Add-ons store.
- Open the extension page. In Chrome, search the Chrome Web Store for Grammarly, or go to grammarly.com and choose the browser extension. In Edge, open the Edge Add-ons store and search for Grammarly. Expected result: you see the Grammarly listing with an add button.
- Click Add to Chrome (or Get in Edge). Expected result: a small window asks you to confirm the permissions the extension needs.
- Click Add extension to confirm. Expected result: a Grammarly tab opens and asks you to sign in or sign up.
- Sign in or create an account. You can use an email address or sign in with Google, Apple or another listed option. Follow the short setup questions, or skip them.
- Pin the extension (optional but helpful). Click the puzzle-piece Extensions icon to the right of the address bar, then click the pin next to Grammarly. Expected result: the green Grammarly icon stays visible in your toolbar, which makes the settings easier to reach.
- Open Google Docs. Go to docs.google.com and open a document. If the document was already open before you installed the extension, refresh the tab. Expected result: the round Grammarly button appears in the lower-right corner of the document page after a few seconds.
Add Grammarly in Firefox
- Open Firefox Browser Add-ons. Go to addons.mozilla.org and search for Grammarly, or follow the Firefox link from Grammarly’s website.
- Click Add to Firefox. Expected result: Firefox shows a prompt listing the permissions the add-on requests.
- Click Add. Expected result: Firefox confirms the add-on was added and a Grammarly page opens.
- Sign in to Grammarly or create a free account.
- Open or refresh your Google Docs document. Expected result: the Grammarly button appears in the lower-right corner and misspellings start getting underlined.
If Firefox asks whether to allow the add-on in private windows, you can leave that off unless you edit documents in private browsing.
Add Grammarly in Safari on a Mac
Safari works differently from the other browsers, and this is where most setup problems happen. The Safari extension comes from the Mac App Store, and it starts out turned off on every website until you allow it.
- Install Grammarly for Safari from the Mac App Store. Search for Grammarly in the App Store and click Get, then Install.
- Open the Grammarly app once and follow its prompts to sign in.
- Turn on the extension in Safari. Open Safari, choose Safari > Settings (called Preferences in older versions), click Extensions, and check the box next to Grammarly. Expected result: the Grammarly icon appears in the Safari toolbar.
- Allow Grammarly on websites. Click the Grammarly icon in the toolbar and choose Allow on every website (or allow it just for docs.google.com). Expected result: Safari stops blocking the extension from reading page text.
- Open or refresh your Google Docs document. Expected result: the Grammarly button appears in the lower-right corner of the document.
If you skip step 4, the extension is installed but silently does nothing in Google Docs, which is easy to mistake for a compatibility problem.
How to Use Grammarly Suggestions in Google Docs
Once Grammarly is active, it checks your writing as you type. You don’t need to start a scan.
- Red underlines mark correctness issues such as spelling, grammar and punctuation.
- Gray underlines mark suggestions based on a style guide, which appears mainly on business accounts that have one set up.
- Paid plans can show additional suggestion types for clarity, engagement and delivery.
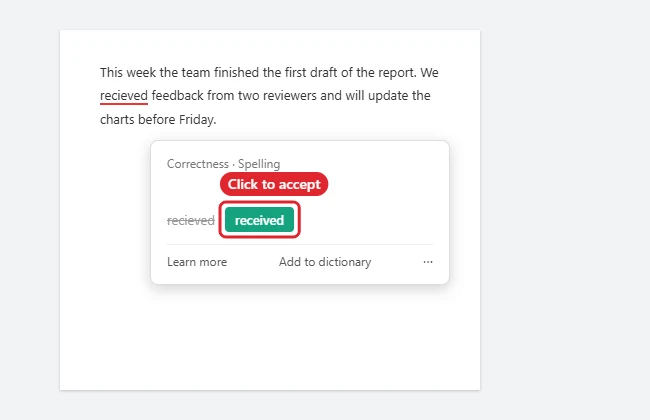
To act on a suggestion, hover over or click the underlined text. A suggestion card opens with the proposed change.
- Click the suggested wording to accept it. Expected result: the text in your document changes and the underline disappears.
- Click Learn more if you want an explanation of the rule behind the suggestion.
- Open the three-dot menu on the card to dismiss the suggestion or report it as incorrect.
- Choose Add to dictionary for names, product terms and jargon that Grammarly flags but that are spelled the way you want.
You can also click the round Grammarly button in the lower-right corner to see all of the document’s suggestions in one place and work through them in order. On Grammarly business accounts, suggestions may open in a sidebar instead of separate cards.
Grammarly and the Google Docs checker at the same time
Google Docs has its own spelling and grammar checker, and it keeps running after you add Grammarly. That can mean two sets of underlines on the same word. If that’s distracting, open Tools > Spelling and grammar in Docs and uncheck Show spelling suggestions and Show grammar suggestions. You can turn them back on at any time. Our guide to the Google Docs grammar check explains what the built-in tool covers if you’d rather rely on it instead.
If you also use the Grammarly desktop app
Grammarly for Windows and Grammarly for Mac work in many desktop apps. According to Grammarly, if you have the desktop app and the browser extension installed, the browser extension stays in charge in Google Docs, so you get the same experience described above. If you mainly write in Microsoft Word, see how to enable Grammarly in Word.
A note on Superhuman Go
Grammarly now also offers an AI assistant called Superhuman Go. It is a separate extension, available for Chrome and Edge, and it shows the Superhuman logo rather than the Grammarly logo. You don’t need it to check writing in Google Docs. If you see an unfamiliar logo in your document, check which extensions are installed before assuming Grammarly is broken.
Using Grammarly in Google Docs on a Phone or Tablet
Browser extensions don’t run in the Google Docs apps for iPhone, iPad or Android, so the steps above only apply on a computer. Grammarly offers two mobile options that work across many apps:
- iPhone and iPad: install the Grammarly keyboard from the App Store, then turn it on under Settings > General > Keyboard > Keyboards and give it Full Access when asked. Switch to the Grammarly keyboard while typing to see suggestions.
- Android: Grammarly offers a floating widget that appears beside text fields in supported apps, as well as its keyboard. Set it up from the Grammarly app.
Grammarly’s help pages don’t specifically confirm how well these tools work inside the Google Docs mobile app, so results can vary. For longer documents, editing on a computer with the browser extension is the most reliable route.
Turn Grammarly Off in Google Docs
You may want Grammarly off for a document with lots of code, names or another language. You have three levels of control.
Turn it off for Google Docs only
- Open a Google Docs document.
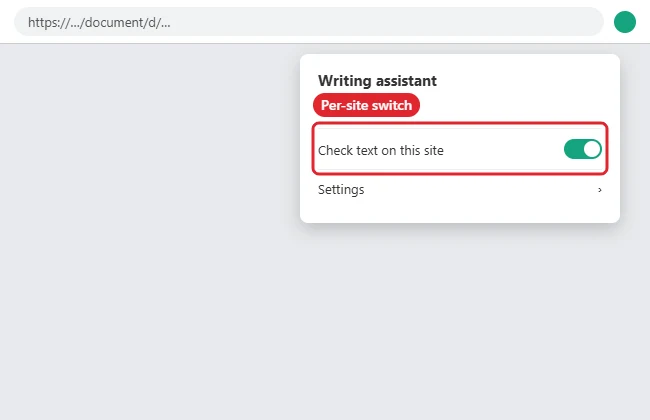
- Click the Grammarly icon in your browser toolbar (pin it first if you can’t see it).
- Turn off the switch labeled Allow extension to check text on followed by the site name. Expected result: the Grammarly button disappears from Google Docs, but Grammarly keeps working on other websites.
Turn it off everywhere
In the extension’s settings, turn off Check text with browser extension. The extension stays installed, so you can turn it back on later without signing in again. Grammarly’s guide to turning off the browser extension shows the current layout.
Remove it completely
- Chrome: right-click the Grammarly icon and choose Remove from Chrome, or open the Extensions menu and choose Manage extensions.
- Edge: open Extensions > Manage extensions and click Remove under Grammarly.
- Firefox: open the Add-ons and themes page, click the three dots next to Grammarly and choose Remove.
- Safari: uncheck Grammarly in Safari > Settings > Extensions, then delete the Grammarly for Safari app from your Applications folder. If macOS says the Grammarly desktop app can’t be moved to the Trash, see why Grammarly Desktop can’t be moved to the Trash.
Troubleshooting
The Grammarly button doesn’t appear
- Refresh the Google Docs tab. Documents opened before the extension was installed won’t load it until they are reloaded.
- Click the Grammarly toolbar icon and confirm you are signed in and that checking is allowed on docs.google.com.
- Make sure the extension is turned on in your browser’s extension manager.
- In Safari, confirm you chose Allow on every website or allowed docs.google.com.
- If you use Opera, Brave or another unsupported browser, switch to Chrome, Edge, Firefox or Safari.
Suggestions appear but can’t be applied
You probably have view-only or comment-only access. Check the button at the top right of the document. If it says View only, choose File > Make a copy or request edit access from the owner.
It works in normal windows but not in incognito or private windows
Browsers disable extensions in private windows by default. In Chrome, open the extension’s details and turn on Allow in Incognito. In Edge, turn on Allow in InPrivate. In Firefox, allow the add-on to run in private windows.
Grammarly is blocked on a work or school computer
Many organizations control which extensions can be installed or which sites they can run on. If the install button is grayed out or the extension is removed automatically, contact your IT administrator. Changing those policies isn’t something you can do from your own account.
Suggestions are slow or missing in a very long document
Close other heavy tabs, make sure you are online, and refresh the document. You can also check a long document in sections by working on one part at a time.
For anything not covered here, Grammarly’s Google Docs support page and the browser extension user guide are the most up-to-date references.
Frequently Asked Questions
Is Grammarly free to use in Google Docs?
Yes. The free plan checks spelling, grammar and punctuation in Google Docs. A paid plan unlocks extra suggestion types and rewriting features.
Is there a Grammarly add-on inside Google Docs?
No add-on is required. Grammarly works through the browser extension, which runs on top of Google Docs when you open a document in a supported browser.
Does Grammarly work on a Chromebook?
Chromebooks use Chrome, so you can install the Chrome extension and use it with Google Docs the same way you would on a Windows PC or Mac.
Will Grammarly change my document without asking?
No. Grammarly only suggests edits. Nothing changes until you click a suggestion.
Can I stop Grammarly from checking just one site?
Yes. Use the switch in the extension’s toolbar menu to block it on a specific site. Grammarly also has a guide to turning Grammarly off on specific websites.
Why do I see two sets of underlines?
Both Google Docs and Grammarly are checking your text. Turn off one of them. Most people turn off the Docs suggestions under Tools > Spelling and grammar.
Summary
- Install the Grammarly extension in Chrome, Edge, Firefox or Safari (from the Mac App Store).
- Sign in to Grammarly, and in Safari allow it on every website.
- Open or refresh a Google Docs document and look for the button in the lower-right corner.
- Click underlined text to accept, dismiss or learn about a suggestion.
- Use the toolbar menu to turn Grammarly off for Google Docs, or remove the extension when you no longer need it.
Next step: open a document you’re working on now, refresh the tab, and fix the first few red underlines to confirm everything is working. For more detail, see Grammarly’s installation guide.

Kermit Matthews is a freelance writer based in Philadelphia, Pennsylvania with more than a decade of experience writing technology guides. He has a Bachelor’s and Master’s degree in Computer Science and has spent much of his professional career in IT management.
He specializes in writing content about iPhones, Android devices, Microsoft Office, and many other popular applications and devices.