One burst can leave twenty or thirty almost identical shots in your iPhone library, and every one of them takes up space on the phone (and in iCloud, if iCloud Photos is on). The fix is quick: open the burst in Photos, tap Burst (or Select on older iOS versions), tick the frames worth keeping, confirm, and let Photos clear out the rest. This covers current versions of iOS, plus what happened to the old Upload Burst Photos switch.
Why a burst fills your library so fast
Burst mode takes photos in rapid succession for as long as you hold the gesture. Photos then groups the whole sequence into a single stack, so your library shows one thumbnail with a small Burst label. That tidy thumbnail hides the real cost: every frame in the stack is saved as its own photo until you decide which ones to keep.
Two things make this matter more than it seems:
- Storage on the phone. A few seconds of burst shooting at a sports game or a birthday can add dozens of full-size photos. Several of those stacks and the Photos category in iPhone Storage starts to climb.
- iCloud storage. If iCloud Photos is turned on, the burst is part of your library like any other picture, so its frames also count against your iCloud storage plan.
The good news is that Photos already helps you choose. When you review a burst, gray dots under some thumbnails mark the frames Photos suggests keeping, which gives you a starting point when the shots look almost the same.
Keep the best frames and remove the rest
This is the main clean-up method. It turns the frames you pick into normal individual photos and gives you the option to delete the others in one go.
- Open the Photos app and tap a burst stack (it shows a Burst label on the thumbnail). You can also tap the thumbnail in the corner of the Camera app right after shooting.
- Tap Burst (number) in the top-left corner of the screen. On older iOS versions this button is labeled Select.
- Swipe through the frames. Gray dots below the small thumbnails show the frames Photos suggests.
- Tap the circle in the lower-right corner of each photo you want to keep. A check mark appears in the circle.
- Tap the check mark button (or Done on older iOS versions) to confirm.
- When Photos asks what to do with the other frames, choose the option to keep only your favorites to delete the rest, or keep everything if you want the full burst to stay as well. The exact wording of this prompt varies by iOS version.
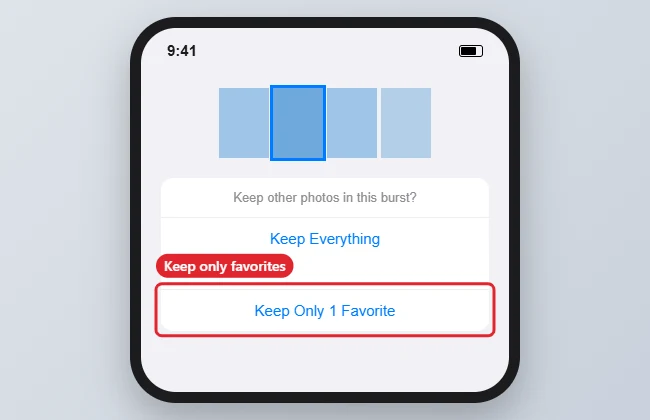
After this, the frames you ticked show up in your library as separate photos with their own thumbnails, ready to edit, share or favorite. If you chose to keep only your favorites, the leftover frames move to Recently Deleted rather than vanishing straight away, which gives you a safety net if you picked the wrong one.
Delete a whole burst at once
Sometimes none of the frames are worth keeping, such as a burst you started by accident while the phone was in a pocket. You don’t need to open and review it.
- Tap the burst image in your Photos library, or tap the thumbnail in the Camera app right after taking it.
- Tap the trash button.
- Confirm the deletion. The entire stack goes to Recently Deleted.
If you want more general help removing pictures, including selecting many at once in the library, see how to delete photos on an iPhone.
Find every burst in Photos
Bursts are easy to miss when they are mixed in with thousands of other pictures. Photos can filter your library by media type, which makes it simpler to review all of them in one sitting.
- Open Photos and tap Collections.
- Scroll down and tap Media Types.
- Tap the bursts entry to see only burst stacks. If you have never taken a burst, the entry may not appear.
On older iOS versions, look under Albums for a Media Types section; bursts may be listed there as their own album. Work through the list from the oldest stack to the newest, using the keep-favorites steps above on each one.
Get the space back after a clean-up
Deleting frames does not free space right away. Photos keeps deleted items in the Recently Deleted collection for 30 days before removing them permanently from all your devices. If you need the space now, empty that collection:
- In Photos, tap Collections.
- Tap Recently Deleted (below Utilities), tap View Album, then confirm with Face ID, Touch ID or your passcode.
- Select the frames you are sure about and delete them, or delete everything in the collection.
Be sure before you do this, because items removed from Recently Deleted can’t be recovered from the phone. There is a separate walkthrough on permanently deleting pictures from Recently Deleted if you want more detail.
Then check the result in Settings. Look at the Photos entry and compare it with what you saw before, using how to check your iPhone storage as a guide. If photos still take up most of the phone, Optimize iPhone Storage stores full-resolution photos and videos in iCloud and keeps space-saving copies on the device. Apple’s steps: go to Settings > [your name] > iCloud > Photos, turn on Sync this iPhone, then make sure Optimize iPhone Storage is on (in iOS 27 or later, tap iPhone Storage first). Apple notes it is on by default when iCloud Photos is on. For a broader plan, read how to optimize iPhone storage for photos.
What happened to the Upload Burst Photos switch
Older iOS versions had an Upload Burst Photos switch in the Photos settings. It belonged to My Photo Stream, the service that sent recent photos to your other Apple devices, and controlled whether whole bursts or only your favorite frames were uploaded.
That setting is no longer something you can use. Apple says My Photo Stream shut down on July 26, 2023, and new uploads to it stopped on June 26, 2023. The switch belonged to that service, so it has no job today. If you still see it mentioned in older instructions, such as the steps to turn off Photo Stream on an iPhone, those apply only to iOS versions from before the shutdown.
Today the sync service is iCloud Photos, and Apple’s iCloud Photos settings include no burst-specific switch. Whatever is in your library is what syncs, so the way to keep unwanted frames out of iCloud is the clean-up above: keep your favorites and delete the rest.
Take fewer accidental bursts
Cleaning up is easier when fewer bursts appear in the first place. On current versions of iOS, Apple lists two ways to start a burst:
- The shutter gesture. In the Camera app, dragging the Shutter button to the left starts a burst, and lifting your finger stops it. A quick tap takes a single photo, so a light tap is all you need for normal shots.
- The volume button. Pressing and holding the volume up button can also take a burst, but only when Use Volume Up for Burst is on in Settings > Camera. If you keep triggering bursts from a pocket or while gripping the phone, turn that switch off. There is more on this shortcut in how to use the volume button for multiple pictures.
Apple documents no setting that turns Burst mode off entirely. If you only want a bit of motion around a moment, a Live Photo may suit you better, since it captures what happens just before and after you take the picture and stays a single item in the library. See how to turn Live Photos on or off to check that it is enabled.
More about burst photos
Will the frames I removed come back?
Yes, if you restore them from Recently Deleted within 30 days. After that, or once you delete them there, they are gone from every device using that iCloud Photos library.
Does deleting a burst on my iPhone remove it from iCloud and my other devices?
Yes, when iCloud Photos is on. Deleting a photo removes it on every device signed in to the same Apple Account, so a burst you clear on the iPhone also disappears from an iPad or Mac using that library.
Why does Photos suggest frames I don’t like?
The gray dots are only suggestions. Tick whichever frames you prefer; you don’t have to keep the suggested ones.
A good next step is to open Collections, then Media Types, and work through your oldest bursts first. Those are the ones most likely to hold dozens of frames you no longer need.

Kermit Matthews runs Live2Tech from just outside Philadelphia. He is an IT specialist with over 20 years of experience, from a university help desk to small-business IT, IT management and his own consulting practice, and has written tech guides full time since 2020. Steps are checked against the current software on a real device or the maker’s official documentation. More about Kermit.