To create a Contact Poster on iPhone, open the Contacts app, tap My Card at the top, tap Edit, then tap your contact photo and choose a style (a photo, a Memoji, or your initials). Tap Customize to adjust the poster, tap Done, and then turn on Name & Photo Sharing so people in your contacts actually see it. On iOS 17 and iOS 18 the route is slightly different: Contacts > My Card > Contact Photo & Poster > Edit.
A Contact Poster is the full-screen picture and name that appears on someone else’s iPhone when you call them. This guide covers the exact steps for each iOS version, how to make posters for other people, how sharing works, and what to check when your poster doesn’t show up.
What you need and which versions this covers
Apple added Contact Posters in iOS 17. A poster is part of your contact card, which Apple calls My Card: the entry for you at the top of the Contacts list, built from your Apple Account. Along with the poster, you set a smaller round image that Apple calls your contact photo (the iOS 27 guide calls it your avatar). The round image shows in Messages and contact lists; the poster fills the screen during calls.
- Software: iOS 17 or later. These steps are written for iOS 27, the current release, and they also match iOS 26. iOS 17 and iOS 18 use the older Contact Photo & Poster route described in its own section below.
- A supported iPhone: iOS 27 runs on iPhone 11 and later, including the iPhone 16e, iPhone 17 family, iPhone Air and iPhone 18 Pro models, plus iPhone SE (2nd and 3rd generation). Apple keeps the full list on its iPhone models compatible with iOS 27 page. Older phones that stopped at iOS 17 or iOS 18 can still make posters with the iOS 17/18 steps.
- Your Apple Account signed in, with your own phone number or email on My Card. Your poster is matched to the number or Apple Account address other people have saved for you.
- The other person on an iPhone with iOS 17 or later, with you saved in their contacts, if you want them to see your poster. Android phones and older iOS versions show the usual caller ID instead.
To check your version, go to Settings > General > About and look at iOS Version.
How to create your Contact Poster (iOS 27 and iOS 26)
You can start from the Contacts app or from the Phone app, because both open the same My Card. The steps below use the Contacts app because its layout is the same for everyone. In the Phone app, tap Contacts and then your card at the top of the list; the rest of the steps are identical.
Step 1: Open My Card
Open the Contacts app and tap My Card at the top of the list. Your name may appear there instead, with “My Card” written underneath. If you don’t see a My Card entry at all, jump to the troubleshooting section to set one up first, because the poster has to be attached to your own card.
Step 2: Tap Edit, then tap your contact photo
Tap Edit in the top-right corner. Your card switches to editing mode. Tap the round contact photo (or the circle with your initials) at the top of the card. This opens the screen where you pick and customize both your poster and your round contact photo.

Step 3: Check the name people will see
Before you design anything, look at the first and last name fields on this screen. Whatever you enter here is the name that appears in large type across your poster. You can use a nickname or a shortened first name if you prefer; it doesn’t change the name on your Apple Account. If you see a Name field or button, that is where you change it.
Step 4: Choose a poster style
Pick what the poster is built from. The common choices are a new photo from the camera, a picture from your photo library, a Memoji (Apple’s cartoon avatar), or a Monogram (your initials on a colored background). Your iPhone may suggest a few photos of you near the top. Tap one of the suggestions or browse your library. On recent versions the screen may separate the full-screen design and the round image into two tabs, often labeled Poster and Avatar; make sure you’re on the poster side for this step. If you aren’t sure which style suits you, see which style to pick.
Step 5: Customize the poster
If you landed on a preview instead of the editor, tap Customize to open the full editor. The editor works much like customizing an iPhone Lock Screen:
- Move and resize the picture: pinch with two fingers to zoom, and drag to reposition. Keep your face below the name so the text doesn’t cover it.
- Change the filter: swipe left or right across the picture to cycle through looks such as natural color, black and white, duotone, and color wash.
- Change the background color: for filters and Memoji posters that use a background color, tap the small color circle near the bottom and pick a shade.
- Change the font: tap your name at the top to pick a typeface, weight, and text color.
- Depth effect: with a suitable photo, your head can overlap the name, like a magazine cover. If the option is available it sits behind the more (three dots) button in the corner. Photos with a clear subject, such as Portrait mode shots, work best.
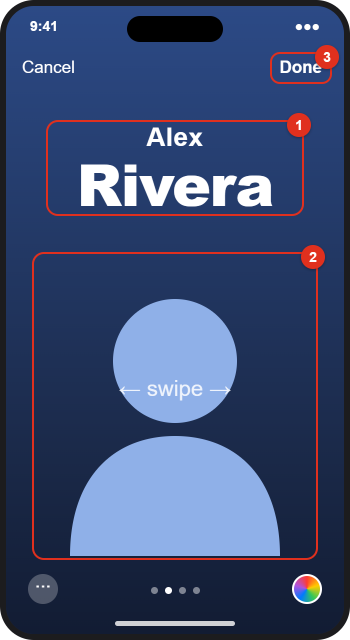
Step 6: Tap Done and review the preview
Tap Done in the top-right corner. Your iPhone shows a preview of how the poster looks on an incoming call screen. If something is off, go back and adjust it. If you’re happy, tap Continue (or the confirmation button your screen shows).
Step 7: Set your round contact photo
Next you’re asked to set the small round image. You can crop the same picture used for the poster, choose a different photo, or skip this step and keep your current contact photo. The round image is what most people see in Messages and in their contacts list, so pick something that is still recognizable when it’s tiny.
Step 8: Save your card
Tap Done on your card to save the changes. Your new poster now appears at the top of My Card. The last thing to check is whether it is being shared, covered in the next section.
Photo, Memoji, or Monogram: which style to pick
| Style | Best for | Things to know |
|---|---|---|
| Photo (camera or library) | Friends, family, and work contacts who should recognize your face | A vertical photo fits the tall screen best. Portrait mode photos separate you from the background, which helps filters and the depth effect look clean. |
| Memoji | People who want personality without sharing a real photo | You can use a Memoji you already made or one of Apple’s preset characters, pick a pose or expression, and set a background color. To build your own Memoji first, use the Memoji stickers in Messages. |
| Monogram | The most private, minimal option | Shows your initials (you can edit them) on a color you choose. Good for work phones or if you’re cautious about who might see your picture. |
A useful rule: if you set sharing to everyone in your contacts, assume a landlord, a coworker, and an old classmate may all see the poster. Choose something you’d be comfortable showing all of them, or use Always Ask as explained next.
Turn on Name & Photo Sharing
Creating a poster doesn’t send it to anyone by itself. Name & Photo Sharing is the switch that lets your iPhone pass your name, contact photo, and poster to other people when you call or message them.
Step 1: Open your contact photo settings
In the Contacts app, tap My Card, tap Edit, then tap your contact photo, the same screen you used to design the poster.
Step 2: Turn on Name & Photo Sharing
Scroll down if needed and turn on Name & Photo Sharing. The switch turns green.
Step 3: Choose who gets it automatically
Tap Share Automatically and choose one option:
- Contacts Only: anyone saved in your contacts receives your name, photo, and poster automatically when you communicate with them.
- Always Ask: your iPhone asks you before sharing with each person, so you decide one contact at a time.
Tap Done to save.

On the other person’s iPhone, your update may arrive as a suggestion they accept, or it may update automatically, depending on how they’ve set your contact card. You can’t force a poster onto someone else’s phone, which is by design.
How to create a Contact Poster on iOS 17 and iOS 18
On iOS 17 and iOS 18 the poster has its own button on your card, so you don’t go through Edit first. Use these steps only if your iPhone is on one of those versions.
Step 1: Open My Card
Open the Contacts app (or the Contacts tab in the Phone app) and tap My Card at the top.
Step 2: Tap Contact Photo & Poster
Tap Contact Photo & Poster just under your name. If this is your first poster, you may see a short welcome screen; tap Continue.
Step 3: Set your name and open the poster gallery
Optionally tap Name and type the first and last name you want others to see. Then tap Edit to see your saved posters.
Step 4: Create a new poster or customize the current one
Swipe to the end of the gallery and tap Create New (or the plus button) to start a new poster, or tap Customize under the current one and choose Poster. Pick Camera, Photos, Memoji, or Monogram, then customize the filter, colors, and font as described in Step 5 above.
Step 5: Finish and set the contact photo
Tap Done, review the preview, tap Continue, then crop or choose your round contact photo (or tap Skip).
Step 6: Turn on sharing
Back on the Contact Photo & Poster screen, scroll to the bottom, turn on Name & Photo Sharing, and choose Contacts Only or Always Ask.
Set it up from the Messages app instead
Messages has its own entry point to the same name and photo settings, which is handy if a prompt there is what reminded you. Open the Messages app and either tap Edit at the top of the conversation list and choose Set Up Name & Photo, or swipe down to the very top of the list and tap Share Your Name & Photo. Choose how you want to look, turn on Name and Photo Sharing, and choose Contacts Only or Always Ask. To change it later, tap Edit and then Name & Photo. Apple notes that your name and photo may not appear as expected for people on non-Apple devices.
There is only one set of name and photo settings. Whether you change it in Contacts, Phone, or Messages, the same choice applies everywhere.
Edit, switch, or replace your poster
You can keep several posters and change which one is active, similar to keeping multiple Lock Screens.
- Edit the current poster: go to My Card > Edit, tap your contact photo, and tap Customize (on iOS 17 and iOS 18: My Card > Contact Photo & Poster > Edit > Customize). Make changes and tap Done.
- Switch to an older poster: on the same screen, browse your previous posters (they may be listed as recents or in a swipeable gallery), select the one you want, and confirm.
- Remove a poster you don’t want: in the gallery of saved posters, swipe up on a poster to reveal a trash button, then tap it. Only remove posters you’re sure you won’t need, because a removed design has to be rebuilt from scratch.
- Stop sharing without deleting anything: turn off Name & Photo Sharing. Your poster stays on your own card, but new sharing stops. People who already accepted it may keep the version they saved.
Create a Contact Poster for someone else
You can also design a poster for any person in your contacts, including friends who use Android or never made one. This poster is private: it only appears on your iPhone, and the other person never sees it or knows about it.
Step 1: Open the contact
In the Contacts app, tap the person’s name.
Step 2: Open the poster options
On iOS 27 and iOS 26, tap Edit and then tap the person’s contact photo or initials. On iOS 17 and iOS 18, tap Contact Photo & Poster under their name.
Step 3: Choose a style and customize it
Pick a photo, Memoji, or Monogram and customize it exactly as you would your own poster. Tap Done, set the round photo if asked, then tap Done on their card to save.
If the person already shares their own poster with you, their card may show it and let you choose between their shared version and a custom one you set. Choosing your own custom image keeps it from being replaced by their future updates. For simple contact pictures without a full poster, our guide on how to set a contact picture on iPhone walks through the basic photo method.
Example: a work-friendly poster in five minutes
Here is how a fictional user, Alex Rivera, sets up a poster that works for both clients and family:
| Choice | What Alex picks | Why |
|---|---|---|
| Name on poster | First name “Alex”, last name “Rivera” | Clients recognize the full name; no nickname that might look unprofessional. |
| Style | Portrait mode photo from the library | Clean separation from the background makes the filter look sharp. |
| Filter and color | Duotone with a dark blue background | Calm and readable; the white name stands out. |
| Font | A bold, simple typeface in white | Stays readable on a small incoming call banner. |
| Round contact photo | Same photo, cropped tight to the face | Recognizable even as a tiny circle in Messages. |
| Sharing | Name & Photo Sharing on, Always Ask | Alex has old landlords and one-time contractors saved, so approving each person is safer than Contacts Only. |
Alex also keeps a second Memoji poster for weekends and switches to it from the poster gallery when a fun look fits better.
Where your poster appears (and where it doesn’t)
- Phone calls: the full-screen poster appears on the other person’s iPhone when you call, if they have your number saved and have accepted your shared poster.
- FaceTime and some third-party calling apps: Apple lets calling apps support Contact Posters, so you may see posters in apps that have added it.
- Your contact card: the poster sits at the top of your card in Contacts and Phone, for anyone viewing it on a recent iPhone.
- NameDrop: when you exchange contact details by holding two iPhones together, the other person sees your poster as part of your card.
- Messages: Messages mainly uses the round contact photo, not the full poster.
- Not on Android or older iPhones: they see a regular caller ID or whatever photo they saved for you.
Apple’s Communication Safety feature also covers Contact Posters, so a poster with sensitive content may be blurred for children’s accounts where that protection is on.
Troubleshooting: poster not showing or not updating
- There’s no My Card: in Contacts, tap the plus button, enter your own details, save, then go back to the list, touch and hold your entry, and tap Make this My Card.
- No poster options appear: confirm you’re on iOS 17 or later in Settings > General > About. On iOS 27 and iOS 26, remember to tap Edit first; there’s no separate Contact Photo & Poster button on your card anymore.
- Friends don’t see your poster: check that Name & Photo Sharing is on. If you chose Always Ask, you need to approve sharing with each person when prompted. Also make sure they’re saved in your contacts with the right number, and that they have your number saved too.
- They see an old poster: the update may be waiting for them to accept it, or they may have set a custom photo for you on their phone. Ask them to open your contact card and check its photo and poster setting to accept your latest version.
- Duplicate contacts: if someone saved your number on two different cards, the poster may land on the wrong one. Merging duplicates on their side fixes it.
- Your poster doesn’t show on their Android phone: that’s expected. Posters only work between iPhones on iOS 17 or later.
- Changes don’t stick: make sure you tapped Done on the card itself, not only in the poster editor. Closing the app mid-edit can discard changes. A restart of the iPhone clears most display glitches.
- Your contacts disappear or don’t sync: if My Card or your contacts are missing on another device, check iCloud contact sync. Our guide on syncing iPhone contacts to iCloud covers the settings to check.
Apple’s own steps for My Card and sharing are in its iPhone User Guide article Add or edit your contact info and photo on iPhone, which has a version picker for iOS 17 through iOS 27.
Frequently Asked Questions
Is a Contact Poster the same as a contact photo?
No. The contact photo (called an avatar in the iOS 27 guide) is the small round image used in Messages and contact lists. The Contact Poster is the full-screen design that appears during calls. You set both from the same screen, and you can use the same picture for both or different ones.
Can I create a Contact Poster from the Phone app?
Yes. Open the Phone app, tap Contacts, and tap your card at the top. It opens the same My Card as the Contacts app, so the steps are identical from there.
Who can see my Contact Poster?
Only people you share it with. With Name & Photo Sharing set to Contacts Only, people saved in your contacts who use an iPhone with iOS 17 or later can receive it. With Always Ask, you approve each person. If sharing is off, no one receives it.
Can I use a nickname on my poster?
Yes. The name on the poster comes from the name fields on the poster settings screen, and you can change them to a nickname or a short first name. This doesn’t change the name on your Apple Account.
Will the other person know if I make a poster for them?
No. A poster you create for someone else stays on your iPhone and in your synced contacts. It isn’t sent to them.
Can I have more than one Contact Poster?
You can save several posters and switch between them, but only one is active at a time. The active one is what people receive.
How do I turn off my Contact Poster?
Turn off Name & Photo Sharing on your contact photo screen, or in Messages under Edit > Name & Photo. That stops sharing your name, photo, and poster with others. Your poster stays saved on your own card so you can turn sharing back on later.
Do Contact Posters work with NameDrop?
Yes. When you swap contact details by holding two iPhones close together, your contact card, including your poster, is what the other person receives.
Next step
Once your poster is set, call a friend with an iPhone and ask what they see, so you can confirm sharing works.

Kermit Matthews runs Live2Tech from just outside Philadelphia. He started on a university help desk, spent years as the IT person for small businesses, and has been writing tech guides full time since 2020. Each guide is checked on a device he owns, and re-checked when a menu moves. More about Kermit.