When an image has to come out at an exact printed size, such as a 2-inch logo on an invoice or a 1.5-inch product photo on a price sheet, type the size instead of dragging. Select the picture, open the Picture Format tab, and type the measurement into the Height or Width box in the Size group. This covers Excel for Microsoft 365 on Windows and Mac, Excel for the web, and why the printout can still differ.
Before you start: aspect ratio and units
Two things decide what happens when you type a number into those boxes.
Aspect ratio. Pictures in Excel normally have Lock aspect ratio turned on. While it is on, changing the height changes the width in proportion (and the other way round), so the picture never looks stretched. That is why you usually set only one dimension. If you need both numbers exactly, for example a 2 by 2 inch square from a photo that is not square, you have to turn the lock off first, which will distort the image, or crop it to the right shape instead.
Units. The boxes show a unit after the number. On many US setups that is inches, shown with a “ mark, such as 2.5″. On a PC set up for metric measurements you may see centimeters instead. Microsoft’s ruler documentation says Excel’s rulers use the measurement units set in the operating system by default; it does not spell out how the Height and Width boxes pick their unit. If your boxes show centimeters, the conversion is simple: 1 inch is 2.54 cm.
| Inches | Centimeters |
|---|---|
| 0.5″ | 1.27 cm |
| 1″ | 2.54 cm |
| 1.5″ | 3.81 cm |
| 2″ | 5.08 cm |
| 3″ | 7.62 cm |
| 4″ | 10.16 cm |
Set an exact height or width in Excel for Windows
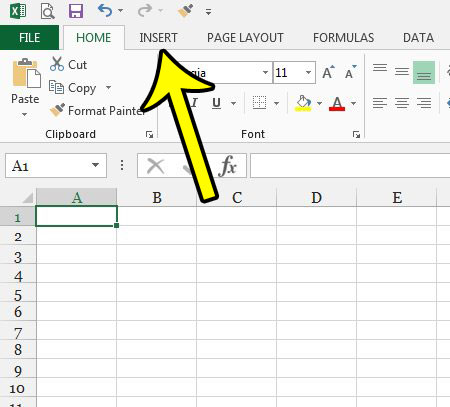
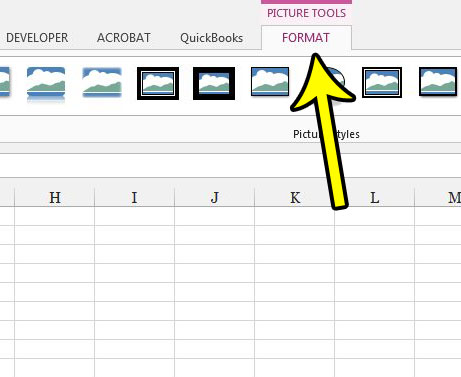
The screenshots in this section are from Excel 2013, so the ribbon looks a little different from current Microsoft 365, but the controls are in the same places. In some versions, including the one shown and the version Microsoft’s instructions describe, the tab is called Picture Tools Format instead of Picture Format.
- If the picture is not in the workbook yet, select the Insert tab.
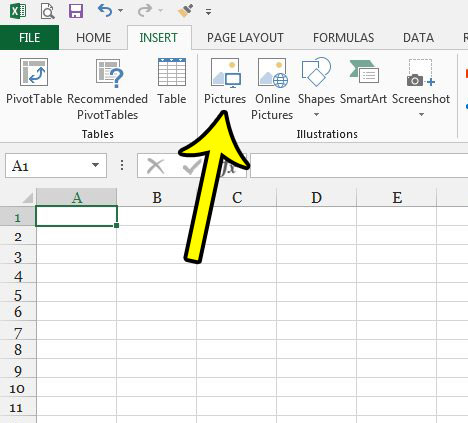
- Select Pictures, choose where the image is stored (such as this device), then pick the file and insert it.
- Click the picture once to select it. Sizing handles appear around it, and the Picture Format tab appears on the ribbon. Select that tab.
- At the right end of the ribbon, find the Size group. Click in the Height or Width box, type the measurement, for example 2, and press Enter. If the Excel window is narrow, the Size group may be collapsed: select the down arrow on the Size group to open the boxes.
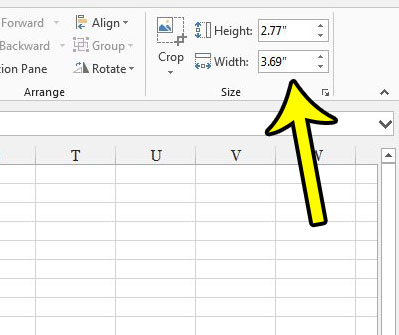
With the aspect ratio locked, the other box updates on its own. Check both numbers before you move on. If the picture is 2″ wide but now 3.4″ tall and that does not fit your layout, you will need to crop it or turn off the lock as described next.
Set height and width independently
- Select the picture and open the Picture Format tab.
- Select the small dialog box launcher (the arrow) in the bottom-right corner of the Size group. A Format Picture pane or a Size dialog opens, depending on your version.
- Clear the Lock aspect ratio check box.
- Type the height and width you want, pressing Enter after each.
Expect the image to stretch or squash if the new shape does not match the original. For photos, cropping to the right proportions first and then resizing usually looks better. Excel’s crop tools are covered in how to crop a picture in Excel, including cropping to an exact aspect ratio.
Scale by percentage instead
The same pane or dialog has Scale boxes for height and width. With Lock aspect ratio on, enter one percentage, such as 50%, and the picture shrinks evenly. With the lock off, you can enter different percentages for each. Scaling is handy when a set of images should all be reduced by the same amount rather than set to the same size.
Go back to the original size
Microsoft’s Size dialog documentation describes a Relative to original picture size option, an Original size readout and a Reset button. Reset removes your size, rotation and scale changes and returns the picture to the size it had when you inserted it, which for a large photo can be much bigger than the page. If you only want to undo the last change, Ctrl+Z is quicker.
Resize several pictures to the same size
For a product list where every photo should be 1.5″ wide:
- Click the first picture, then hold Ctrl and click each of the others.
- On the Picture Format tab, type the measurement in the Width box and press Enter.
Every selected picture gets that width. With Lock aspect ratio on, their heights still differ if the originals had different shapes, so crop them to the same proportions first if they must match exactly.
Drag to resize (when exact numbers do not matter)
Dragging a sizing handle is fine for rough layout. Microsoft lists three modifier keys on Windows:
- Hold Shift while dragging a corner handle to keep the proportions.
- Hold Ctrl while dragging to keep the center of the picture in place.
- Hold Ctrl+Shift to do both.
Watch the Height and Width boxes while you drag if you want to land near a particular size, then type the exact value to finish.
Check the size before you print
The number in the box is the size Excel uses for the picture, but the printed result can still differ. The most common reasons:
- Print scaling. If the sheet is set to fit on one page or to print at a percentage other than 100%, everything on it, pictures included, shrinks or grows by that amount. Check Scale to Fit on the Page Layout tab and the scaling choice under File > Print (No Scaling), and use 100% when the size matters.
- Printer settings. Some printer drivers have their own fit-to-page or borderless options that rescale the page.
- Viewing zoom. On screen, the zoom level makes the picture look bigger or smaller. It does not change the printed size.
To see the picture against a real measuring scale, switch to View > Page Layout (in the Workbook Views group). Page Layout view shows horizontal and vertical rulers. To change those rulers between inches, centimeters and millimeters, go to File > Options > Advanced and, under Display, change Ruler units. More detail is in how to change the Excel ruler from inches to centimeters. Excel’s normal column widths are not measured in inches, which matters if you are sizing a picture to fit a column; see how to set Excel column width in inches.
Excel for Mac
- Click the picture to select it, then open the Picture Format tab.
- Type the measurement in the Height or Width box.
- To change both dimensions independently, clear Lock aspect ratio first. To scale by percentage, select Position > More Layout Options, open the Size tab, and enter values under Scale.
Excel for the web
Excel for the web lets you resize a picture by dragging its sizing handles, but Microsoft says setting an exact height and width needs the desktop app. Use the option that opens the workbook in the desktop app (Microsoft’s instructions call it Edit in Excel; the exact wording can vary), set the size in Excel for Windows or Mac, and save. The changes appear when you reopen the file on the web.
Picture size questions
Can I type “cm” or “in” after the number?
Microsoft does not document unit suffixes for these boxes, so the reliable approach is to type the number in the unit the box already shows and convert if needed (1 inch is 2.54 cm).
Will the picture stay the same size if I resize rows or columns?
That depends on its placement setting. A picture set to move and size with cells stretches when the rows or columns under it change, which can undo your exact size. Learn how to control this in how to lock an image to a cell in Excel, and choose an option that moves the picture without resizing it if the size must stay fixed.
Is setting the size the same as cropping?
No. Resizing makes the whole image larger or smaller. Cropping trims away part of the image and keeps the rest at the same scale. Use cropping to change the shape and resizing to change the size.
If the sized picture should appear on screen but not on paper, see how to stop a picture from printing in Excel. Microsoft’s full reference for the Size controls is Change the size of a picture, shape, text box, or WordArt.

Kermit Matthews runs Live2Tech from just outside Philadelphia. He is an IT specialist with over 20 years of experience, from a university help desk to small-business IT, IT management and his own consulting practice, and has written tech guides full time since 2020. Steps are checked against the current software on a real device or the maker’s official documentation. More about Kermit.