A business card layout in Google Docs is a table in disguise: each cell is sized to one card in Table options, you design the first cell, and you paste that design into the others. When the sheet looks right, keep it in Drive as a master file and use File > Make a copy for each new print run, so you never rebuild the grid.
Everything below works in Google Docs in a web browser on a computer.
What do you need?
Start with the row that matches what you are trying to get done today, then follow the sections in order the first time through.
| You want | Where to start | What you end up with |
|---|---|---|
| A card design you can reuse every time you reorder | Build the grid once, then save it as a master file | A template document in Drive that you copy for every batch |
| A printable sheet for this week | Measure your card sheet, set up the page and the table, then print a test | One finished sheet of identical cards |
| Cards with a back side | Finish the front sheet first, then add a second page for the back | A two-page file printed on both sides |
One thing to know before you start: Google’s help page for templates explains how to open the Template Gallery (File > New > From a template), but it does not name a business card template among them. Building your own grid gives you control over the size and the number of cards on each sheet, and once it exists it works just like a template. See Google’s template instructions if you want to browse the gallery anyway.
Decide the card size and sheet layout first
Google Docs does not set a business card size for you. The size, the number of cards per sheet and the page margins all come from the paper you plan to print on, so measure before you open Docs.
- Card size: perforated card sheets list the card dimensions on the package. If you plan to cut plain card stock yourself, pick the size you want and write it down.
- Cards per sheet: the package also shows how many cards fit across and down. That gives you the number of table columns and rows.
- Margins: the package or the maker’s layout sheet gives the top and side margins. If it doesn’t, measure from the paper edge to the first card.
- Paper size: match the sheet itself, such as Letter or A4.
Keep these numbers handy. You will type them into Page setup and Table options in the next two sections.
Set up the page for a sheet of cards
Page setup only works when the document uses pages. Google notes that page settings aren’t available in documents that are in pageless format, so switch the document to pages if the options look missing.
- Create a blank document and give it a clear name, such as “Business card master.”
- Click File > Page setup.
- At the top of the dialog, select Pages.
- Choose the Orientation and Paper size that match your card sheet.
- Type the top, bottom, left and right Margins from your measurements.
- Click OK.
Leave Set as default alone here. Google explains that it applies these settings to any new documents you create, and card margins are usually too small for everyday letters. The full list of paper options is covered in changing the page size in Google Docs, and setting margins in Google Docs shows the ruler method if you prefer to drag. Google’s own steps are on its page settings help page.
Build the card grid in a table
- Click Insert > Table and choose the number of columns and rows from your card sheet. Google allows tables up to 20 x 20 cells, far more than any card sheet needs.
- Select the whole table, then go to Format > Table > Table options. You can also right-click the table and select Table options.
- Under Column, enter the card width. Under Row, enter the card height. Click OK.
- In the same dialog, the Cell section lets you set the vertical alignment and the cell padding. A little padding keeps text away from the cut edge.
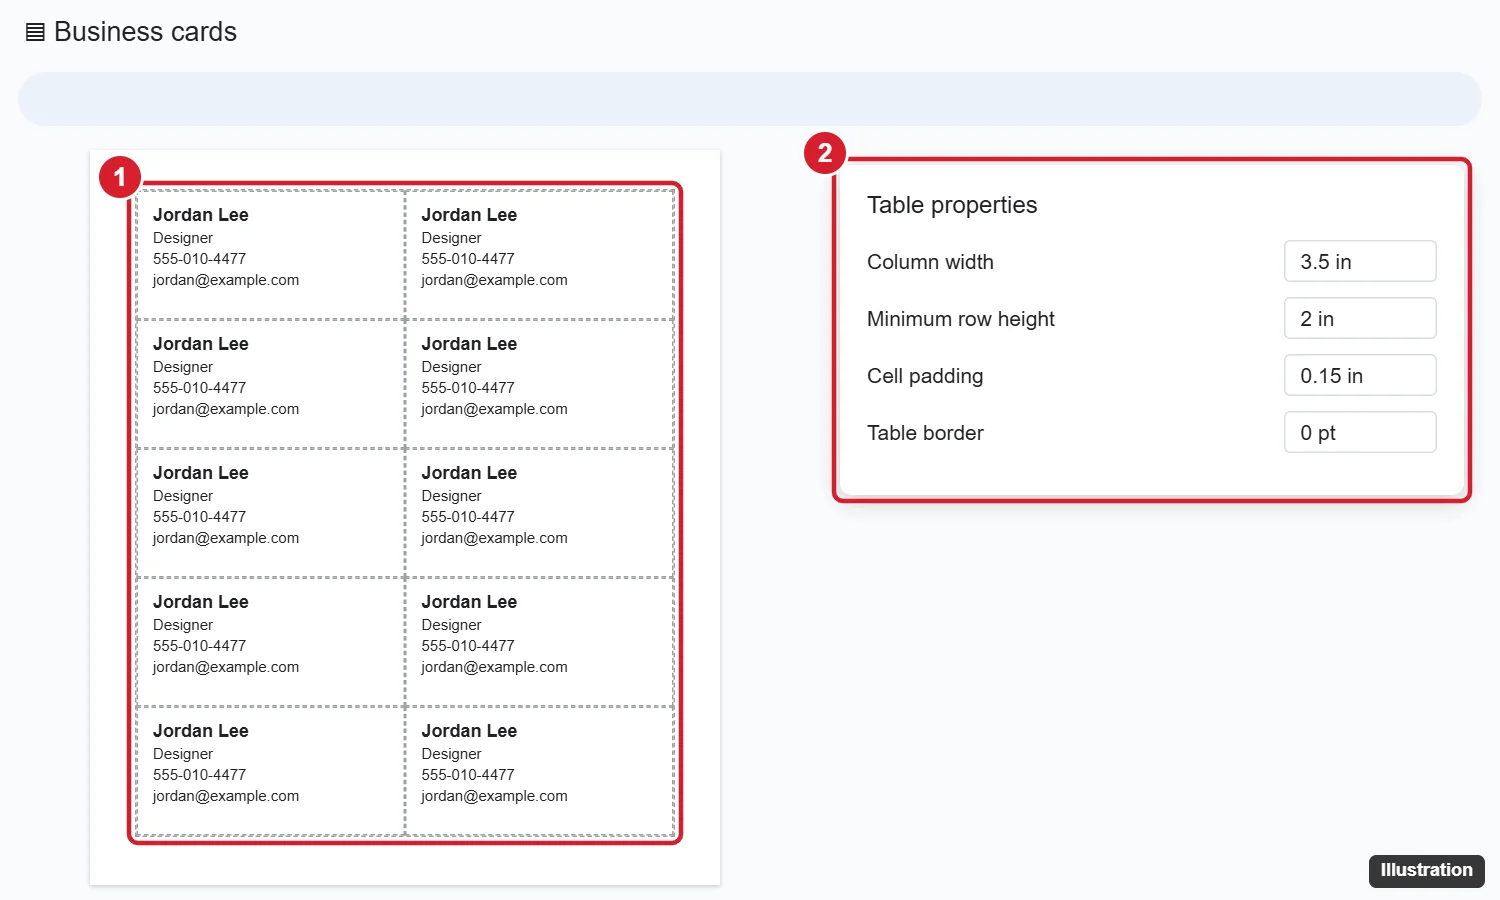
This illustration shows an older version of Docs, where the dialog was called Table properties; current screens may look different, and the sizes shown are one example, not a Google default. Today the item is named Table options.
A few settings keep the grid tidy:
- Even sizes without typing: right-click the table and choose Distribute columns or Distribute rows to make them match.
- Cut lines: select the table and use the Border color and Border width buttons in the toolbar. Thin, light borders make cutting easier on plain card stock; on perforated sheets you can hide them. Removing a table border in Google Docs walks through hiding them.
- Cards splitting across pages: in Table options, under Row, Google offers Allow row to overflow across pages for documents in pages format. Turn it off so a card stays in one piece, and check that the rows plus margins fit on one page.
If the table ends up larger than the page, making a table smaller in Google Docs covers padding and sizing fixes. Google lists all of these table settings on its tables help page.
Design one card and fill the sheet
- Click in the first cell and type the details you want on the card, such as a name, job title, phone number, email address and website. Use placeholder text like “Your Name” and [email protected] while you build the master file.
- Format the text with the font, size and color you want. Keep the smallest line large enough to read once printed.
- To add a logo, click Insert > Image and pick the file. Resize it so it fits inside the cell without stretching the row.
- Select everything in the first cell, copy it (Ctrl + C on Windows or Chromebook, Command + C on a Mac), click in the next cell and paste (Ctrl + V or Command + V). Repeat for every cell.
Print one test page now, while every cell still holds placeholder text. That page tells you whether the grid lines up before you put real details in.
Save the sheet as your reusable template
This is the step that turns a one-time layout into a template. The master file never gets real details; every batch starts as a copy.
- Open your master file.
- In the menu, click File > Make a copy.
- Type a name for the copy, such as “Cards, front desk, spring order,” and choose the folder where it should be saved.
- Confirm the copy, then open it from that folder and edit the real details there.
Google’s copy dialog also offers Copy comments and suggestions, which you can leave off for a clean print file. Because the copy keeps the page setup, the table sizes and the formatting, a new staff member’s cards take a few minutes instead of a full rebuild. A sensible routine is one folder for the master and one folder for the printed batches, so nobody edits the master by accident. Google explains Make a copy on its file creation and download page.
The same grid idea works for other sheets of small items; making address labels in Google Docs uses a similar table.
Print a test sheet, then your cards
- Click File > Print.
- In the window that opens, choose your print settings: the printer, the paper size and the number of copies.
- Print one copy on plain paper and hold it against a card sheet in front of a window or light. The printed boxes should sit over the cards.
- If the boxes are off, adjust the page margins or the table sizes in the master, make a fresh copy and test again.
- Load the card stock and click Print.
Printing options such as scaling and paper type come from your browser and printer, not from Docs. Look for a setting that prints at actual size rather than shrinking the page, and choose a heavy paper or card stock type if your printer offers one. Google’s print steps are on its print help page.
To use a print shop instead, click File > Download and choose the PDF file type, then send the PDF. A PDF keeps the layout the same on any computer.
For two-sided cards, add a second page with a table of the same size and put the back design in each cell. Depending on how your printer flips the paper, the left and right columns can swap, so place each back in the cell that lands behind its front, then test on plain paper first. Printing double-sided from Google Docs explains the printer settings for both sides.
Business card template questions
Why is Page setup missing the paper and margin options?
The document is most likely in pageless format. Google says page settings aren’t available there. In Page setup, select Pages at the top, and the paper size and margin options return.
Why does one card jump to the next page?
The rows plus the top and bottom margins are taller than the page. Lower the row height or the margins in Table options and Page setup, and turn off Allow row to overflow across pages so a card can’t break in half.
How do I make every card the same width without typing sizes?
Select the table, right-click and choose Distribute columns, then Distribute rows. Docs evens out the cells inside the current table width. For exact control, see adjusting column width in Google Docs.
Once the master file prints cleanly, the hard part is done. Each new order is a copy, a few edits and one test page.

Kermit Matthews runs Live2Tech from just outside Philadelphia. He is an IT specialist with over 20 years of experience, from a university help desk to small-business IT, IT management and his own consulting practice, and has written tech guides full time since 2020. Steps are checked against the current software on a real device or the maker’s official documentation. More about Kermit.