Your iPhone’s Mail app allows you to perform a lot of email-related tasks that you can also do in a Web browser or in a dedicated email application like Outlook. You can do almost anything with it, from writing emails, deleting messages, setting up a signature, to storing them on iCloud.
But there is a bit of a learning curve if you are new to the iOS ecosystem, and some of the standard email actions with which you have become familiar may not seem immediately obvious on the iPhone.
You can forward an email on your iPhone by opening the Mail app, selecting the message, tapping the arrow icon then the Forward button, then entering the address of the recipient and tapping “Send.”
But when you are not an experienced user, you may have difficulty forwarding messages, as this method is a bit different than replying to an email message. Well, if you’re facing this issue, don’t worry; we’re here with the solution.
In this article, we will discuss how to forward an email on iPhone. By the time you finish reading it, you should be able to comfortably forward email messages that you receive in the inbox of your iPhone’s Mail app.
So, without wasting any more time, let’s get started.
How to Start Forwarding iPhone Emails
- Open the Mail app.
- Select the message to forward.
- Tap the arrow icon at the bottom of the screen.
- Choose the Forward button.
- Enter the address of the contact.
- Touch the Send button.
Our guide continues below with additional information on forwarding emails in the Mail app on an iPhone, including pictures of these steps.
If you’ve been struggling to put text around a picture or a shape in Microsoft Word, then our curved text in Word article can help you out.
How to Forward Emails on iPhone – Step by Step (Guide with Pictures)
The steps in this article were performed on an iPhone 13 in iOS 15. However, these same steps will work on most other iPhone models in most of the recent versions of the iOS operating system.
When it comes to using Apple devices, some people always get confused. But once you learn to use the iPhone’s mail app, you’ll see how effortless it is.
Moreover, you can use different mailboxes such as Google or Yahoo in one place. This way, you can spare the pain of installing separate apps on your phone.
And once you add your mail addresses on the app and need to forward an email message to a third party, you need to utilize the forward mail option. Now, let’s take a look at how to do it without making any fuss.
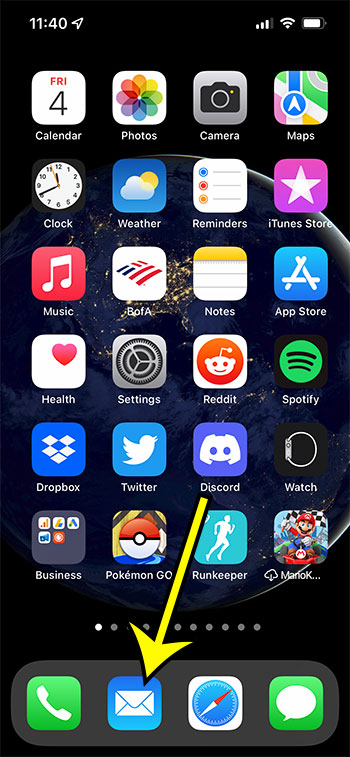
Step 1: Open Your Mail app.
As you might expect, you will need to open the Mail app to complete this task. There’ll be a Mail icon on your iPhone’s home screen unless you’ve moved or deleted it. Once you see that app, tap on it, and your email account’s inbox will show up in front of you.
Step 2: Pick an email message that you want to forward to someone.
Now, when your email account shows up on the screen, go to your inbox and locate the message you want to forward.
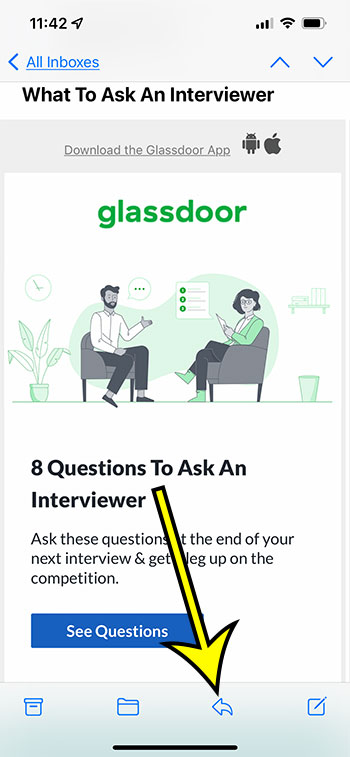
Step 3: Tap the arrow icon at the bottom of the screen.
Once you see that email message you want to forward, select it and hit the left-facing arrow icon at the bottom of the screen.
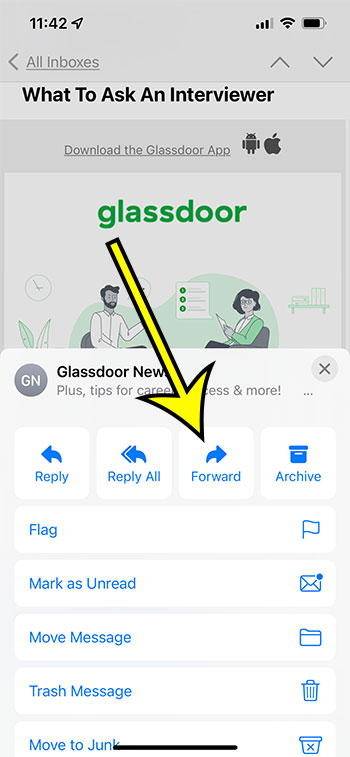
Step 4: Touch the Forward button in the row at the top of the menu.
After tapping it, you’ll see a draft of your selected mail message.
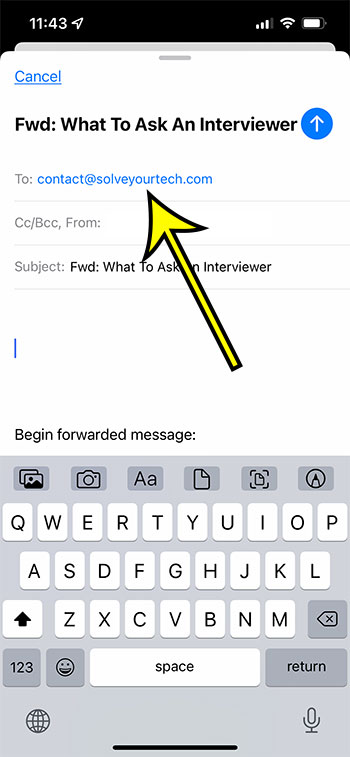
Step 5: Enter the forwarding address of the contact into the “To” field, then add any additional message information into the body field.
On the forwarding emails section, you’ll see a bar with “To” written on it. You have to add the forwarding address of the desired message recipient in that field.
Step 6: Tap the Send button at the top-right of the screen once the message is completed.
When you’re done typing the address, look at the top right corner of the screen, you’ll see the Send option. Then, all you have to do is tap Send, and the recipient will get the forwarded message in no time.
Alrighty, so this is how you forward email messages from your iPhone. And now, it’s time to share some additional tips so you can use them to help solve any issues regarding your email accounts or texts.
How to Automatically Forward Email in Mail on iCloud.com
Sometimes we receive valuable email messages that need to be saved for future usage. And so, if you have kept your messages on iCloud and want to forward those emails to your email accounts, this is how you do it.
Step One – Access iCloud.
To forward your mails from iCloud, you have to access your iCloud. You can do this by going to https://icloud.com and signing in with your Apple ID.
Apple inc allows us to keep a ton of things in this cloud storage. Among all the icons that you will see in iCloud, you need to select the ‘Mail’ option. There you will see a Mailboxes List in the left column and can make your selection.
Step Two – Set up the automatic forwarding.
After choosing your desired email account, you need to click the gear icon at the top of the left column, then choose “Preferences.”
Now select the General tab. You will see a list of options appear at the right side of the Preferences window.
Check the box to the left of Forward my email to. Following that, you’ll see the field where you must enter the forwarding address. This is where any of the emails that you receive in your iCloud inbox will be forwarded to.
If you don’t want to save a copy of your forwarded email, select Delete Messages after Forwarding. This way, there’ll be no copy of the forwarded email on iCloud.
When the process is finished, just hit Done, and you’re good to go!
You can automatically command your Apple devices to forward Mail from your iCloud email account by following this method. And if you want to stop that, follow the steps below:
- Go to iCloud.
- Access the Mailbox preferences.
- After entering the General tab, unselect the Forward my Email to option.
- Tap Done to finish the task.
How to Troubleshoot “Cannot Get Mail” Errors on iPhone and iPad
One of the best things about the Mail app on Apple devices is that it works pretty well with a large variety of email account types and rarely gives you any trouble that are directly related to the Mail app itself.
However, if you ever have trouble receiving email messages and see the Cannot Get Mail notification, you can solve that issue by following a couple of different steps. Take a look at the tips below for a successful troubleshoot experience.
Check Your Internet Connection
Let’s start with the simple one, shall we?
If you can’t get connected with your mailbox, maybe you have a weak or interrupted internet connection. To check the connection, launch different apps on the device. Open apps such as Facebook or YouTube to see if you have an active internet connection or not.
If you’re offline, you don’t have to worry about this problem because once you’re back online, you should start receiving your emails right away.
Confirm Mail Settings in iOS
If your mail settings are incorrect, you may have trouble receiving messages. And this is how you check and confirm the settings.
- First, access the Settings app on your iPhone.
- Second, tap on the Accounts and Password option.
- Third, select the email account that has been showing the Cannot Gel Mail notification.
- Finally, log in to that account and authenticate that address.
Note that you will need to know the password for the account. If you don’t see an option to enter the email account password then that is an indication that Apple is able to log in to the account, so it could be something with the email server. If so, then you may want to sign into the account on a web browser and see if there is anything wrong there.
Reboot Your Device
It is another simple step you can follow to eliminate this problem. If your Mail app isn’t loading any messages, reboot your iPhone or iPad. This simple trick often resolves many issues without making any mess.
You can reboot your device by pressing and holding the Power button (on older iPhone models) then dragging the slider at the top of the screen to power it off. If you have a newer iPhone model then you may need to hold down the “Volume down” and the Power button at the same time to make the slider appear.
Delete and Re-Add Your Email Accounts
If you confirm that you have an active internet connection and there’s nothing wrong with your email server, delete your added email accounts and add them again.
However, you may lose some synced contacts when you follow this procedure. So, keep this in mind before trying this method.
The Bottom Line
Hopefully, the guide above has provided you with information about how to forward an email on iPhone, and how to resolve issues that might arise during that process.
After reading this, you can forward mail to any person from your contact or transfer the texts from the iCloud on your account, whichever you prefer. Even if you’re not one of those experience Apple users, forwarding an email will never bother you again if you use this article as your guide!
Additional Reading

Kermit Matthews is a freelance writer based in Philadelphia, Pennsylvania with more than a decade of experience writing technology guides. He has a Bachelor’s and Master’s degree in Computer Science and has spent much of his professional career in IT management.
He specializes in writing content about iPhones, Android devices, Microsoft Office, and many other popular applications and devices.


