Your Android emulator, WSL or a new virtual machine refuses to start because “virtualization is disabled.” First check Task Manager > Performance > CPU. If Virtualization says Disabled, restart into your PC’s UEFI firmware from Settings > System > Recovery > Advanced startup (no BIOS key needed), turn on Intel Virtualization Technology (VT-x) or AMD SVM, then save and restart. If it already says Enabled, the missing piece is a Windows feature instead.
Two layers: the firmware switch and the Windows feature
Virtualization on a Windows 11 PC has two separate parts, and error messages rarely say which one is off.
- Firmware (hardware) virtualization. A processor setting stored in the PC’s UEFI firmware, often still called the BIOS. Intel calls it VT-x or Intel Virtualization Technology; AMD calls it SVM or AMD-V. Windows cannot switch this on by itself.
- Windows features. Components such as Virtual Machine Platform, Hyper-V and Windows Hypervisor Platform that apps build on. You turn these on inside Windows, and they only work if the firmware layer is already on.
Every app in the table needs the firmware setting. What differs is the Windows feature on top, and whether Windows 11 Home has it.
| What you want to run | Windows feature it uses | Works on Windows 11 Home? |
|---|---|---|
| WSL 2 (Linux on Windows) | Virtual Machine Platform (wsl –install adds it for you) | Yes |
| Hyper-V virtual machines | Hyper-V | No, Pro or Enterprise |
| Windows Sandbox | Windows Sandbox | No, Pro, Enterprise, Education or Pro Education/SE |
| VirtualBox or VMware Workstation | None required | Yes |
| Android emulators that use Hyper-V | Often Windows Hypervisor Platform | Yes |
| Memory integrity (Core isolation) | None; a Windows Security toggle | Yes |
Older guides often list Windows Subsystem for Android as a reason to do this. Microsoft’s notice says that starting March 5, 2025, Windows Subsystem for Android and the Amazon Appstore are no longer available in the Microsoft Store, so that reason no longer applies.
Check whether it is already on
Many PCs ship with the firmware setting enabled, so check before you go near the firmware screens.
- Press Ctrl + Shift + Esc to open Task Manager.
- Select Performance in the left column, then CPU.
- Read the Virtualization line under the graph: Enabled or Disabled.
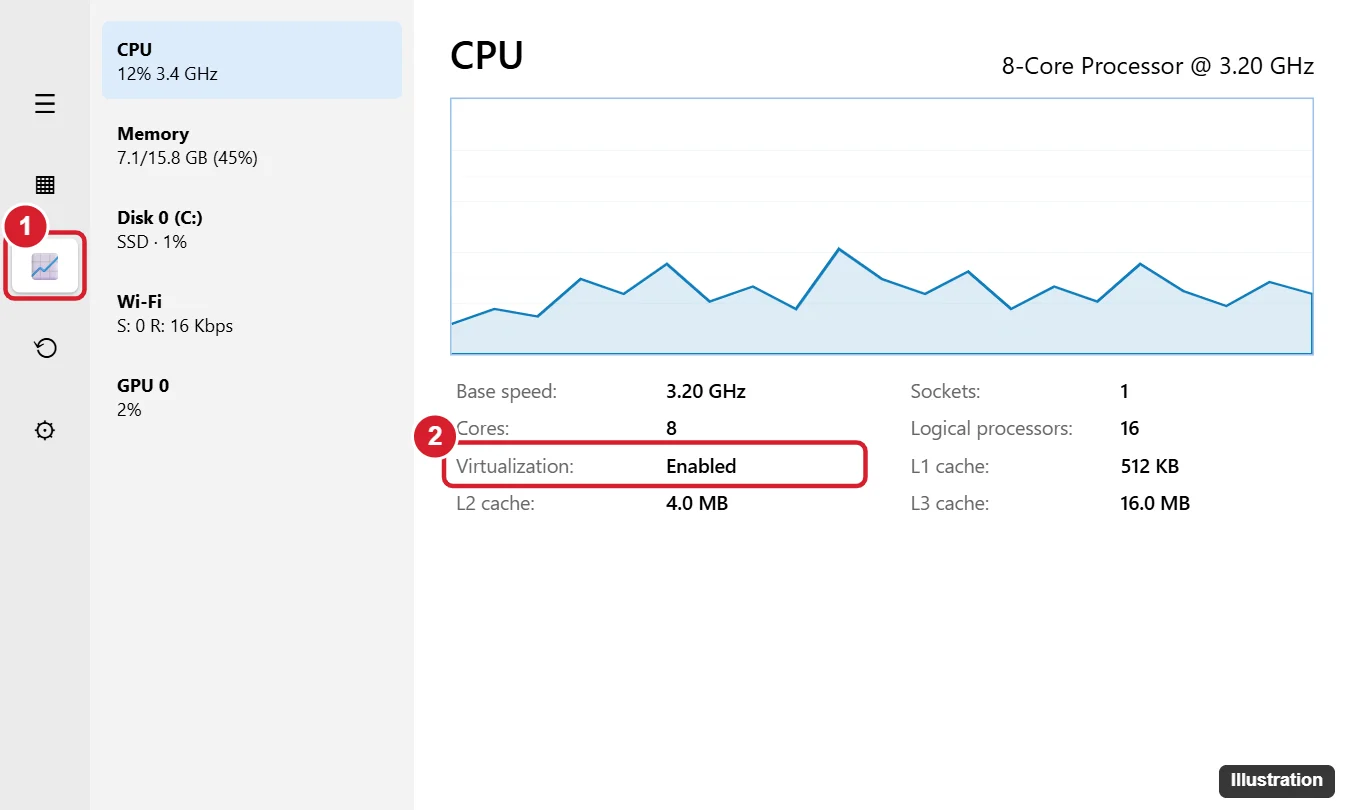
For a second opinion, open Command Prompt and run systeminfo. At the end, Windows either lists Hyper-V requirements (look for the firmware virtualization line and a Yes or No) or prints “A hypervisor has been detected. Features required for Hyper-V will not be displayed.” That message means virtualization is on and Windows is already using it. If the Virtualization line is missing from Task Manager while a hypervisor is running, this command is the clearer check.
What the result means:
- Disabled, or the firmware line says No: turn on the firmware setting (next section).
- Enabled, but the app still fails: skip to turning on the Windows feature.
- WSL error 0x80370102: Microsoft’s WSL troubleshooting page ties this to both layers, so enable Virtual Machine Platform and confirm virtualization is on in the firmware.
Open UEFI from Windows without pressing a BIOS key
Timing a key press at startup is unreliable on fast-booting PCs. Windows 11 can restart straight into the firmware instead. Before you begin, save your work, and if the drive uses BitLocker, have the recovery key handy in case Windows asks for it after a firmware change; finding a BitLocker recovery key lists where it is usually stored.
- Open Settings > System > Recovery.
- Under Recovery options, next to Advanced startup, select Restart now and confirm.
- On the blue Choose an option screen, select Troubleshoot > Advanced options.
- Select UEFI Firmware Settings (Microsoft’s page calls it UEFI Settings, and the exact wording varies by PC), then Restart.
- The PC opens its firmware setup screen directly.
If the UEFI tile is missing, the PC may be set up in legacy BIOS mode, which this route cannot reach. Press the maker’s setup key at power-on instead (often F2, Delete, F10 or Esc). Opening the BIOS in Windows 11 covers every route and the common keys, and ASUS owners can follow opening the BIOS on an ASUS computer. Other ways into the same blue recovery menu are listed in entering recovery mode in Windows 11.
Turn on the processor setting
Warning: Microsoft’s guidance is to change only what you need here, because other firmware changes can stop the PC from starting.
- Look through menus named Advanced, CPU Configuration, Processor, Chipset, System Configuration or Security. Some firmware hides these until you switch to an advanced view.
- Find the virtualization option using the names in the table below.
- Set it to Enabled.
- Choose Save and Exit (F10 on many PCs) and confirm. The PC restarts into Windows.
- Repeat the Task Manager check to confirm it now says Enabled.
| Processor | Names you may see | Related setting to leave alone unless needed |
|---|---|---|
| Intel | Intel Virtualization Technology, Intel VT-x, VMX, or just Virtualization | Intel VT-d (device passthrough for advanced VM setups) |
| AMD | SVM Mode, AMD-V, or Virtualization | IOMMU (the AMD counterpart of VT-d) |
Names and menu locations vary by PC maker, firmware brand and version, so treat the table as a starting point. Microsoft’s enable virtualization page links to guides from Acer, ASUS, Dell, HP and Lenovo, and says Surface devices ship with it on. If nothing matches, search your model’s manual for “virtualization.”
Turn on the Windows feature your app needs
Add only the feature your app uses. Extra hypervisor features can slow down other VM apps.
- Search the Start menu for Windows features and open Turn Windows features on or off. Typing optionalfeatures in the Run box (Windows + R) opens the same window.
- Check the feature from the first table: Virtual Machine Platform, Hyper-V, Windows Hypervisor Platform or Windows Sandbox.
- Select OK and restart when Windows asks.
Microsoft notes the Virtual Machine Platform step may be needed on PCs upgraded from Windows 10. Hyper-V and Windows Sandbox are not offered on Windows 11 Home; Home users can still run VirtualBox, VMware Workstation and WSL 2. Hyper-V needs at least 4 GB of RAM, and Windows Sandbox needs 4 GB (8 GB recommended), two processor cores and 1 GB of free disk space. Once the pieces are on, you can create a virtual machine in Windows 11 or open a disposable desktop with Windows Sandbox.
Command-line versions
Run these in Terminal opened as administrator, then restart:
- WSL:
wsl --installturns on the needed features and installs Ubuntu by default (see Microsoft’s WSL install page, or installing and using WSL on Windows 11 for setup after that). - Hyper-V (Pro or Enterprise):
DISM /Online /Enable-Feature /All /FeatureName:Microsoft-Hyper-V, or in PowerShellEnable-WindowsOptionalFeature -Online -FeatureName Microsoft-Hyper-V -All, per Microsoft’s Hyper-V setup page. - Windows Sandbox:
Enable-WindowsOptionalFeature -FeatureName "Containers-DisposableClientVM" -All -Onlinein PowerShell.
For example, a student setting up a laptop for a programming class could run wsl –install, restart, and have Linux ready without opening the Windows Features window at all, as long as the Task Manager check already showed Enabled.
Memory integrity depends on it too
Memory integrity, in Windows Security > Device security > Core isolation details, uses virtualization-based security to protect the core of Windows. Microsoft’s core isolation page says it requires hardware virtualization to be on in the UEFI or BIOS. If the toggle reports incompatible drivers, update or remove the listed driver, then try again and restart.
If it still says Disabled or the app still fails
- No virtualization option in the firmware: install the latest firmware update from your PC maker; some updates add or reveal the setting. Updating the BIOS on Windows 11 covers doing that safely. A few low-cost PCs do not expose it at all.
- The option is grayed out or locked: a firmware administrator password is usually set, which is common on work and school PCs. Ask the IT team.
- You changed it but Task Manager did not: make sure you chose Save and Exit rather than exiting without saving, then do a full shutdown and power the PC on again.
- Firmware is on but WSL or Hyper-V will not start: Microsoft’s WSL troubleshooting steps check the boot setting with
bcdedit /enum | findstr -i hypervisorlaunchtypein an elevated window. If it shows Off,bcdedit /set hypervisorlaunchtype Autoturns the hypervisor back on after a restart. - VirtualBox or VMware is slow after adding Hyper-V features: current versions can run alongside Hyper-V but may lose speed. Update them, or turn off the Hyper-V features you do not use.
- An app also asks for VT-d or IOMMU: only then turn on that second setting; most apps do not need it.
Turn it back off, or do this on Windows 10
To undo, repeat the firmware steps and set the option to Disabled, or uncheck the Windows feature and restart. Disabling virtualization in BIOS on Windows 11 explains when that actually helps.
On Windows 10 the firmware steps are the same, but Advanced startup lives under Settings > Update & Security > Recovery. Windows 10 reached end of support on October 14, 2025, with consumer Extended Security Updates available through October 12, 2027. See turning on hardware virtualization in Windows 10, or disabling virtualization in Windows 10 to reverse it.
Virtualization questions
Can any app turn on VT-x without the firmware?
No. The processor setting lives in the firmware, so tools or PowerShell scripts that claim to switch it on from Windows cannot do that. What Windows can do is restart you into the firmware screen (the Advanced startup route above) and turn on the features that use it.
Why is Hyper-V missing from my Windows features list?
Your PC is probably running Windows 11 Home, which does not include Hyper-V or Windows Sandbox. Check under Settings > System > About. VirtualBox, VMware Workstation and WSL 2 still work on Home.
Is it safe to leave on?
Yes. It is a standard processor feature, and Windows 11 security features such as memory integrity depend on it. Leaving it on does not expose the PC by itself; the apps that use it decide what runs.
Is virtualization the same as TPM or Secure Boot?
No. TPM stores security keys, and Secure Boot checks that startup software is trusted. Virtualization lets the processor run hypervisors. All three sit in the firmware settings with separate switches.
Will it slow down games?
The firmware setting on its own generally does not. Features built on it, such as memory integrity, may have a small effect in some games, and a few anti-cheat systems have their own requirements, so follow the game’s support page if it recommends a change.
Next step: run the Task Manager check now, then fix only the layer that is off.

Kermit Matthews runs Live2Tech from just outside Philadelphia. He is an IT specialist with over 20 years of experience, from a university help desk to small-business IT, IT management and his own consulting practice, and has written tech guides full time since 2020. Steps are checked against the current software on a real device or the maker’s official documentation. More about Kermit.