Overlay new words instead of trying to change the old ones: Word cannot edit letters that are part of an image, so the practical fix is a text box placed over the picture. If you need the words themselves, extract the text from the picture and paste or retype it. For a cleaner result, edit the image in Paint or Photos and swap it back in. These steps follow current Word for Microsoft 365 on Windows.
Pick the fix by what you want
Three different goals hide behind “edit the text in a picture.” Choose the route that matches yours before you start, because each one leaves the document in a different state.
| What you want | Best route | What you end up with |
|---|---|---|
| Change a few words on a flyer, chart image or screenshot so the page reads correctly | Text box over the picture | The original picture plus a box of real Word text on top |
| Add a label, date or caption on top of a photo | Text box with no fill and no outline | Editable text floating over the image |
| A picture with no trace of the old words | Edit the image in Paint or Photos, then replace it | A new picture file; the text in it still is not editable |
| The words as text you can edit, search or reuse | OneNote or Snipping Tool text recognition | Plain text you paste into Word and format yourself |
Why Word cannot edit text in a picture
When you insert a JPG, PNG or screenshot, Word stores it as a single picture object. The letters you see are just colored pixels, the same as the background around them, so there is nothing for the cursor to land on. Answers on Microsoft’s Q&A forum note that Word has no built-in OCR (optical character recognition, the process that turns pictures of letters into real characters) and point to OneNote instead.
That rules out a one-click edit. Every working method either covers the old words, replaces the picture, or pulls the words out into normal text.
Cover the old words with a text box
This is the quickest route and keeps everything inside Word. The picture first needs a wrapping setting that lets other objects sit on top of it.
- Click the picture, then click the Layout Options icon that appears beside it. Under With Text Wrapping, choose In Front of Text. Microsoft also suggests Fix position on page if you do not want the picture to move as you type above it. (See Microsoft’s page on wrapping text and moving pictures in Word.)
- Go to Insert > Text Box > Draw Text Box. The keyboard route is Alt, N, then X.
- Drag a box over the words you want to change, then type the replacement text.
- Select the text and set the font, size and color on the Home tab so it resembles the original lettering.
- With the box selected, open the Shape Format tab and click the arrow next to Shape Fill. Pick a color that matches the area behind the old words to hide them, or choose No Fill to let the picture show through (Microsoft’s page on how to make the background of a text box invisible shows the same setting in the Format Shape pane).
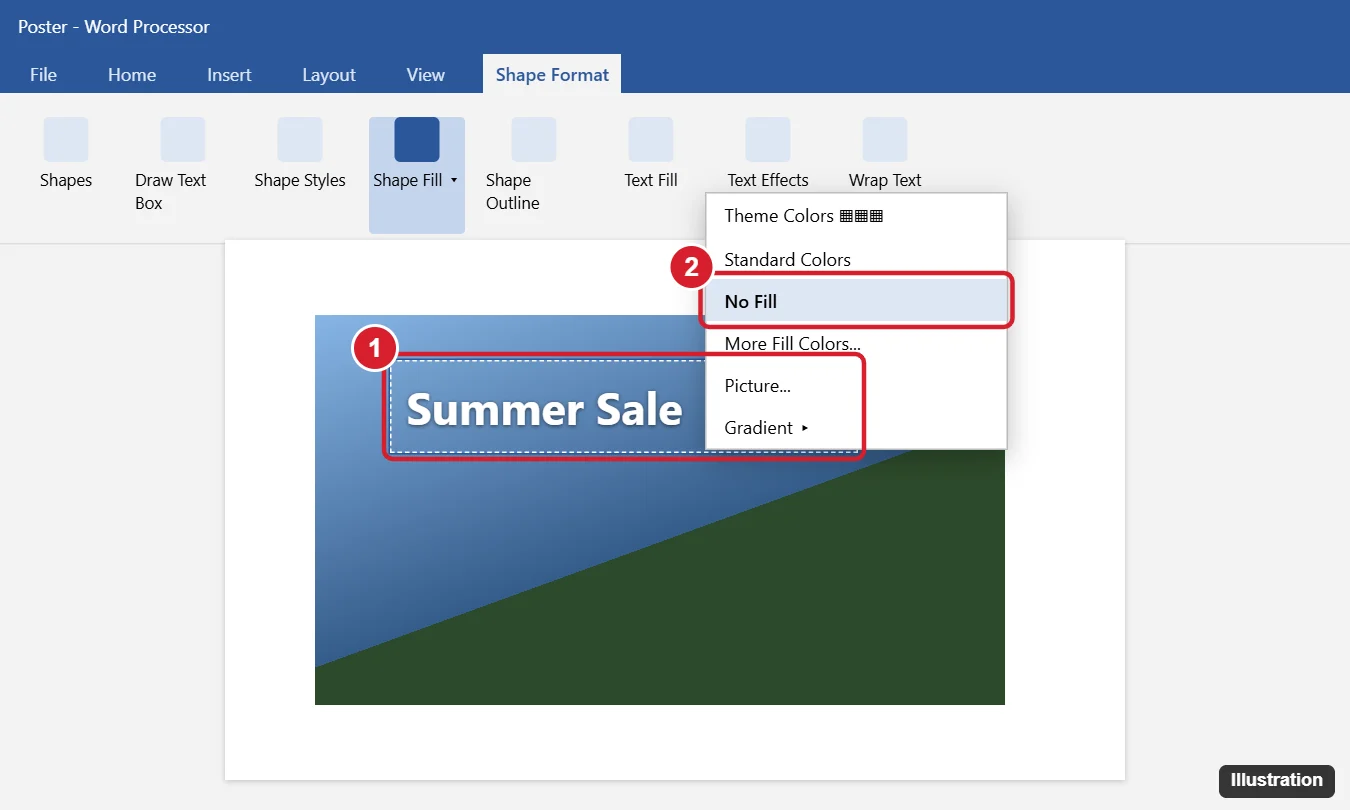
A text box placed over a picture lets you add or replace words. - Click the arrow next to Shape Outline and choose No Outline so the box border disappears.
- Optional: hold Ctrl, click the picture and the text box, and choose Group > Group on the format tab so the two move together. Microsoft notes the Group button only works when every selected object uses a wrapping setting other than In Line with Text.
Microsoft documents the text box steps on its page about how to add, copy or remove a text box in Word, and grouping on its group shapes and pictures page. To place the box exactly, the steps for how to center a text box in Word use the same Align tools. If a stray border remains, see how to remove the border from a text box.
Making the patch look natural
A solid fill works well on plain, single-color areas such as a white label or a flat banner. On photos, gradients or textured backgrounds, a flat rectangle stands out, so either pick No Fill and place the new words somewhere clear, or edit the picture itself (next section). Sideways labels are possible too: rotate the box or change its text direction, as shown in how to make text vertical in Word.
One limit matters more than looks: the box only covers the old words. The original picture, old text included, is still in the file. Anyone who moves the box, opens the document in another app or extracts the images can see it. If the old words are private, use the image-editing route instead, or read about how to redact text in Word safely.
Change the picture itself and swap it in
For a result with no hidden layer, change the image file and put the new version where the old one was.
- Keep a copy of the original image. If you no longer have the file, right-click the picture in Word and choose Save as Picture.
- Open the copy in Paint or the Photos app, paint over the old words with the background color, and type the new text with the app’s text tool. Save it under a new name.
- Back in Word, select the old picture, open the Picture Format tab and choose Change Picture. Pick where the new file is (for example, a file on your PC), select it and choose Insert. Microsoft covers this in replace or delete a picture in Microsoft Office.
Change Picture keeps the spot in the document, which saves you from repositioning a picture that sits inside a carefully wrapped layout. If the new image has extra margin around it, trim it with the steps to crop an image in Word.
Get the words out of the picture
Sometimes the real goal is the text: a scanned paragraph you want to revise, or a screenshot of instructions you want to quote. Microsoft’s tools for this live outside Word.
- OneNote: paste or insert the picture into a OneNote page, right-click it and choose Copy Text from Picture, then press Ctrl+V in Word. Microsoft lists this for OneNote for Microsoft 365, 2024, 2021 and 2016 and says the command can take a while to appear after you add a picture. See copy text from pictures using OCR in OneNote.
- Snipping Tool: capture the picture on screen, select Text actions, then copy the text you need or choose Copy all text, according to Microsoft’s Snipping Tool help. The full walkthrough is in how to extract text from a screenshot in Windows 11.
Proofread whatever comes out, since recognition can confuse similar characters on small or blurry text. Paste it into Word, delete or replace the picture, and format the new text. For whole scanned pages and the PDF conversion route, see how to convert a picture to text in Word.
Which pictures in Word are already editable text
Not every graphic in a document is a flat image. Before you reach for a text box, click the words and check whether a cursor appears. These objects hold real text:
- Text boxes and WordArt: click inside and type.
- Shapes with words: click the shape and type, or right-click it and look for the text option.
- SmartArt: click a shape, or open the Text pane beside the graphic and edit the lines there.
If a “picture” turns out to be several shapes and pictures stacked together, the layering tips in how to overlay images in Word help you pick out the piece you need.
When the text box looks wrong
- The box vanishes behind the picture: right-click the text box and bring it to the front, or set the picture to a behind-text style instead of In Front of Text.
- Group is grayed out: one object is still In Line with Text. Change its Layout Options, then select both again.
- You cannot select one item after grouping: click once to select the group, then click again on the item inside it.
- The text jumps when you type above it: turn on Fix position on page in Layout Options for both objects.
- The fill color is close but not exact: use No Fill and a new position for the text, or edit the image instead.
- You are exporting to PDF: check the exported PDF before you send it.
Text in pictures answers
Does the original text stay in the file under the box?
Yes. A text box sits on top of the picture without changing it, so the old words are still stored in the document.
Can I do this in Word for the web or on a Mac?
Microsoft’s text box page has separate Web and macOS instructions, and the menus are similar but not identical. For precise overlays, use the desktop app.
Is it fine to change text on a certificate or receipt?
Only when you have the right to modify the image and the result is not used to mislead anyone. Changing official documents to pass them off as genuine can have real consequences.

Kermit Matthews runs Live2Tech from just outside Philadelphia. He is an IT specialist with over 20 years of experience, from a university help desk to small-business IT, IT management and his own consulting practice, and has written tech guides full time since 2020. Steps are checked against the current software on a real device or the maker’s official documentation. More about Kermit.