Hide the outline from the Shape Format tab: select the text box, then choose Shape Outline > No Outline, and the border is gone in one click while your text stays put. To clear several text boxes at once, hold Ctrl (or Command on a Mac) as you click each one, then apply No Outline to the whole group.
These steps cover current Word for Microsoft 365 on Windows and Mac, plus the more limited options in Word for the web.
Remove the outline from one text box in Word for Windows
Microsoft describes Shape Outline as the control for the color, thickness and style of the outside border of a text box, shape or SmartArt graphic, and setting it to No Outline removes the border altogether.
- Click the edge of the text box, not the words inside it. The box is selected when sizing handles appear around it. If you click inside the text, Word puts a cursor there instead, and the Shape Format tab may not show up.
- Click the Shape Format tab on the ribbon. It only appears while a text box or shape is selected, so if you can’t find it, select the box again.
- Click the arrow next to Shape Outline.
- Choose No Outline.
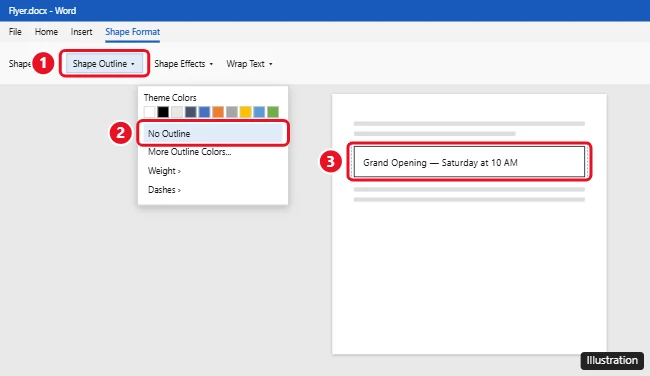
Click anywhere outside the box to check the result. You should see your text floating on the page with no line around it. While the box is selected, Word still draws its sizing handles, so judge the result only after you click away.
The full list of outline options is on Microsoft’s page about how to add or remove a border on a text box, shape or SmartArt graphic. The same Shape Outline menu also works on ordinary shapes, so a callout or rectangle that holds text loses its line the same way.
Clear the border from several text boxes at once
A flyer or a set of labels can hold a dozen text boxes, and fixing them one at a time is slow. Microsoft’s method is a multi-select:
- Click the edge of the first text box.
- Press and hold Ctrl (Windows) or Command (Mac), then click the edge of each other text box you want to change.
- On the Shape Format tab, choose Shape Outline > No Outline. Every selected box updates together.
If Word refuses to add a box to the selection, check its text wrapping. Microsoft notes that in Word, each object you multi-select must have a Wrap Text option other than In Line with Text. Right-click the stubborn box, point to Wrap Text, and pick another option such as Square or In Front of Text, then try the selection again. Changing the wrap can move the box slightly, so check its position afterward; if you need it back in the middle of the page, see how to center a text box in Word.
Word for Mac and Word for the web
Word for Mac
The Mac version uses the same tab and menu. Select the text box, click Shape Format, click the arrow next to Shape Outline, and then click No Outline. Microsoft covers the Mac steps in add or remove borders for text boxes, pictures and shapes.
That Mac page also carries an unusual note: if you didn’t add the border to the shape, text box or picture in Mac Office, you can’t change or remove it there. If a box keeps a border that your Mac won’t let you change, that note may explain it.
Word for the web
Word for the web handles text boxes differently. Microsoft’s page on how to add, copy or remove a text box in Word says a web text box lives inside a drawing (Insert > Drawing, then Text Box). To format the box itself, you open the Drawing pane, select the Shape tab, use the options on its ribbon, and then select Save and Close. Microsoft says you can change or remove a border there but doesn’t name the exact outline option for the web, so look on the Shape tab for the outline control. If you can’t reach the outline in the browser, open the document in the Word desktop app and use the steps above.
Remove the white fill too
Removing the outline doesn’t make the box see-through. If the box has a fill, it hides anything behind it, such as a picture, a colored page or a watermark. If you see a white rectangle where the border used to be, clear the fill as well:
- Select the text box by its edge.
- On the Shape Format tab, in the Shape Styles group, select the arrow next to Shape Fill.
- Select No Fill.
Microsoft documents these labels on add a fill or effect to a shape or text box. With both the outline and the fill gone, only the text shows, which is the look most people want when they lay text over a photo. If you’d rather keep a light tint behind the words, a partly transparent fill is the middle ground; see how to change opacity in Word for pictures, shapes and text.
Which kind of border do you have?
Many “text box borders” that refuse to disappear aren’t text box outlines at all. Match what you see to the row below, then use that fix.
| What you see | Likely cause | What to do |
|---|---|---|
| A line around a box you can drag anywhere on the page | Text box or shape outline | Shape Format > Shape Outline > No Outline |
| A line that hugs one or more paragraphs and moves with the text | Paragraph border | Click in the text, then on the Home tab select the arrow next to the Borders button and choose No Border |
| A frame around the edge of the whole page | Page border | Open the page border settings and, under Setting, choose None (Microsoft: remove a page border) |
| A box you can’t drag, with cell handles when you click in it | A one-cell table | Select the table and remove its borders from the table’s Borders menu |
| A soft gray edge with no hard line | Shadow or other shape effect | Shape Effects > Shadow > No Shadow (check the other effects too) |
| A faint line on screen that isn’t in the print preview | An on-screen editing guide, not a border | Nothing to remove; check the print preview to confirm |
| A blue line or underline | Hyperlink, grammar mark or paragraph border | See how to remove the blue line in Word |
Paragraph, page and table borders all have their own controls, explained step by step in how to add borders in Word, which also covers taking them off. A quick way to tell a text box from a table: click inside the box and look at the ribbon. A text box brings up Shape Format; a table brings up the table tabs.
Change the outline instead of removing it
Sometimes the border is fine, just too heavy. The same Shape Outline menu lets you restyle it rather than delete it:
- Color: pick a theme or standard color from the top of the menu.
- Weight: point to Weight and choose a thinner or thicker line.
- Dashes: point to Dashes for a dotted or dashed outline. More Lines at the bottom opens the Format Shape pane, where the Line section holds the full set of line style options.
- Sketched: current Microsoft 365 versions also offer a hand-drawn style under Sketched.
To bring a removed border back, select the box and choose any color from Shape Outline. Then set its weight and style from the same menu. If you only just removed it, Ctrl + Z (Command + Z on a Mac) undoes the change.
Text box border questions
Does removing the border delete the text or move the box?
No. No Outline only hides the line. The text, the box size and its position stay exactly where they were, and the box is still there to click, resize and move. When it has no outline and no fill, find it again by clicking on its text.
Can I make new text boxes borderless by default?
Microsoft’s Word help pages don’t describe a default setting for new text boxes. The practical route is to format one box without an outline, then copy and paste that box whenever you need another, rather than drawing new ones from scratch.
Can I get rid of the box but keep the words?
Yes. Select the text inside the box, cut it, delete the empty text box, and paste the text into a normal paragraph. You lose the free positioning the box gave you, but there’s no shape left to have a border.
A borderless box is the usual starting point for other layout tricks: you can rotate text in Word for a slanted title, make text vertical in Word for a narrow label, or flip text upside down for the far side of a folded tent card. Working in Google Docs instead? There, a text box lives in a drawing; see how to delete a Google Docs text box.

Kermit Matthews runs Live2Tech from just outside Philadelphia. He is an IT specialist with over 20 years of experience, from a university help desk to small-business IT, IT management and his own consulting practice, and has written tech guides full time since 2020. Steps are checked against the current software on a real device or the maker’s official documentation. More about Kermit.