Build from the WordArt box: Word bends text only when it sits inside WordArt or a text box, and the bend comes from Text Effects and then Transform. The effects in the Follow Path group decide the shape, with Arch giving a rainbow curve and Circle wrapping the words all the way around.
The steps below apply to desktop Word on Windows (Microsoft 365, 2024, 2021 and 2019), with separate notes for Word for Mac and Word for the web.
Pick the shape before you start
Most curved text in Word ends up as one of a handful of layouts. Deciding which one you want first saves you from rebuilding the object later, because a single piece of WordArt can follow only one path at a time.
| You want | Transform choice | Sizing rule |
|---|---|---|
| Words arching upward, like a rainbow over a title | Arch, in the Follow Path group | Wide and short box for a gentle bend, narrower for a steeper one |
| Words curving downward, like a smile under a logo | The downward arch in the Follow Path group (shown as Arch: Down in many builds) | Same as the upward arch |
| Words running around a full ring | Circle, in the Follow Path group | Make the box square so the ring is round |
| A round seal with one line on top and one on the bottom | Two WordArt objects: an upward arch and a downward arch | Match their widths and center them over a circle shape |
| Text running along the sides of a square or rectangle | No Transform; one straight WordArt object per edge, rotated | Group the pieces when they line up |
| Text that bulges, waves or stretches as the letters change shape | A Warp effect instead of Follow Path | Resize the box to exaggerate or soften the distortion |
The difference between the two groups matters: a Follow Path effect moves the line of text along a curve, while a Warp effect reshapes the letters themselves. For a readable arch or ring, stay in Follow Path. Microsoft’s own page names Circle under Follow Path; the other effect names in the gallery can differ slightly between Word builds, so match them by the small preview picture if the label you see is not the same.
Build an arch in Word for Windows
WordArt is the quickest container, because it arrives with the text already selected and no visible box border. A regular text box works too: Microsoft notes that you can use Text Effects with WordArt or a regular text box. Ordinary paragraph text cannot be curved, so if your words are already typed in the document, cut them and paste them into the WordArt or text box.
- On the Insert tab, select WordArt (the icon is in the Text group) and pick a style. The style only sets the starting look of the letters; you can change it later.
- Replace the placeholder text with your own words.
- Select the WordArt so its frame shows. The Shape Format tab appears on the ribbon only while a WordArt, text box or shape is selected. Some Word builds label it Drawing Tools Format.
- On Shape Format, select Text Effects, then point to Transform.
- Under Follow Path, choose Arch for an upward curve. The text bends as soon as you click.
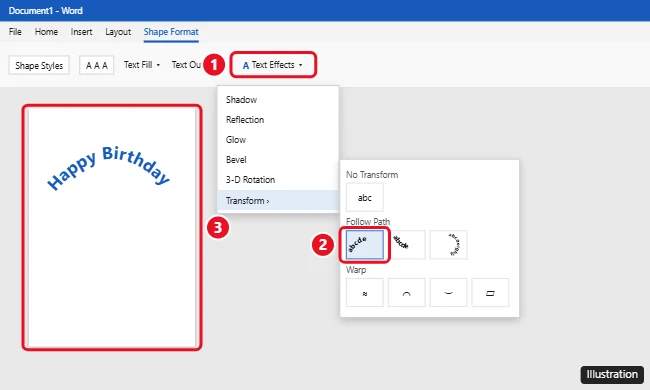
On a narrow window or a small screen, Word squeezes the ribbon groups into icons, so Text Effects may appear as a small icon with a letter A instead of a labeled button. Widen the window if you cannot find it.
If there is no Shape Format tab, nothing is selected or the cursor is in normal body text: click the WordArt or text box frame. If Transform is grayed out or missing, the selection is a picture, a chart or plain text instead of WordArt or a text box, so move the words into a text box first.
Tune the bend and the size
A fresh arch rarely has the exact curve you want. Three controls change it, and they behave differently:
- The box shape. Drag a side or corner sizing handle. A wide, short box flattens the curve into a gentle arch; a narrow, taller box pulls it into a steeper hump. This is the control Microsoft describes for the circle effect: drag any of the sizing handles until the WordArt is the size and shape you want.
- The adjustment handle. Many builds show a small, separate handle (often yellow or orange) on curved WordArt. Dragging it changes how far around the path the text runs. Its look varies by version, and not every build shows it.
- The font size. Select the words and change the size on the Home tab. Bigger letters take up more of the path, which matters most for a full circle.
To turn the whole arch, drag the circular rotation handle above the frame. For a set angle, such as exactly 90 degrees for a vertical label, use the rotate commands described in turning text to any angle in Word. Rotating keeps the curve but tilts it; it does not bend straight text.
If the text curves but looks squashed, the box is too narrow or too short for the font size: enlarge the box or reduce the size. If the WordArt has no Transform menu at all, the document may be an older Word format open in Compatibility Mode, where WordArt behaves like the legacy version. Saving the file as a current .docx document and converting it (File > Info > Convert, where offered) usually brings back the current effects.
Close the arch into a circle or a round badge
A ring of text needs a square box, or the ring turns into an oval. Follow these steps for a single line that runs all the way around:
- Create the WordArt and apply Transform > Circle under Follow Path.
- Make the box square: type the same value into the Height and Width boxes in the Size group at the right end of Shape Format. After that, drag a corner handle while holding Shift to resize it without losing the square.
- Check the ends of the text. If the first and last letters overlap, reduce the font size or make the box larger. If a gap remains where the ring should close, increase the font size or add a few words, such as a separator dot or a year.
A badge or seal usually has two lines: one reading across the top and one along the bottom, both upright. A single Circle effect cannot do that, because the bottom half of a ring reads upside down. Build it from two pieces instead:
- Insert a circle from Insert > Shapes (hold Shift while drawing to keep it round).
- Create one WordArt for the top line and apply the upward Arch.
- Create a second WordArt for the bottom line and apply the downward arch.
- Give both pieces the same width so the curves match, then drag them into place over the circle.
- Select all three objects and group them, as described in the next section, so the badge moves as one.
If the badge needs a cut-out or a combined outline, the shape tools in merging shapes in Word can join the circle with other shapes before you add the text.
Fit curved text around a picture or along the edges of a box
To set an arch over a photo or logo, the WordArt has to float above the picture rather than sit in a line of text:
- Insert the picture, then create and curve the WordArt.
- With the WordArt selected, open Wrap Text on Shape Format and choose In Front of Text, so you can drag it freely.
- Drag the WordArt over the picture and adjust its size until the curve follows the edge you want.
- Hold Shift, click the picture so both objects are selected, then choose Group > Group in the Arrange group.
Pictures that are set to sit in line with text may not group with a floating object; if Group stays gray, give the picture a wrap setting other than In Line with Text first.
Shapes with straight sides, such as a square stamp, are a different case. Microsoft’s method for a shape with straight edges, such as a rectangle, is to insert a separate WordArt for each edge (its example uses four, one per side), then group them so they move and copy together, using the Rotate tool to set an exact angle for each side. For very precise work, Microsoft points to a dedicated drawing program and pasting the result into the document.
Curving text over a picture is not the same as wrapping a paragraph around it. Paragraph wrapping is set with the picture’s own Wrap Text choices and keeps the text straight.
Restyle, straighten or remove the curve
The curve and the lettering are separate settings, so you can change one without losing the other.
- Color and outline of the letters: Use Text Fill and Text Outline on Shape Format. For hollow or bordered letters, the methods in adding an outline to text in Word work on curved WordArt as well.
- Edit the words: click inside the WordArt and type or delete as usual. The Transform effect stays applied and the curve recalculates for the new text, although you may need to resize the box afterward.
- Font, bold, italic: Select the words and use the Home tab. The Transform effect stays in place.
- Box border and background: A text box usually has a visible frame and a white fill. Choose Shape Outline > No Outline and Shape Fill > No Fill. More options are covered in removing the border from a text box.
- Straighten the text: Select the object, point to Transform under Text Effects, and choose No Transform. Microsoft uses this same command to remove any path or warp.
- Remove it entirely: Click the frame (not inside the text) and press Delete.
What Word for Mac and Word for the web can do
Word for Mac: Microsoft’s curved-text page applies to macOS as well as Windows, and the route is the same: insert WordArt or a text box, open Shape Format, then Text Effects > Transform. Microsoft does not list separate Mac labels, so if a name differs on your Mac, look for the same preview pictures.
Word for the web: this is where readers usually get stuck. Microsoft’s comparison of the browser and desktop versions says WordArt is preserved in the document, but in Word for the web it may appear as a placeholder and cannot be edited, moved or resized. Microsoft’s feature comparison for Word for the web lists WordArt as a desktop feature. In practice, that means curved text has to be made in desktop Word; the browser version can keep it in the file but not create or reshape it. Use Open in Desktop if you have the desktop app installed.
Related shape and text jobs
Drawing a ring or oval around a word is a separate task from bending the word itself; that is covered in circling text in Microsoft Word. For text that reads top to bottom rather than along a curve, see making text vertical in Word. Puffy display lettering for posters is in bubble letters in Word, and the same WordArt gallery in slides is explained in inserting WordArt in PowerPoint.
Microsoft’s reference pages for these steps are Curve text around a circle or other shape, Add or delete a fill, outline or effect for WordArt and Differences between using a document in the browser and in Word.

Kermit Matthews runs Live2Tech from just outside Philadelphia. He is an IT specialist with over 20 years of experience, from a university help desk to small-business IT, IT management and his own consulting practice, and has written tech guides full time since 2020. Steps are checked against the current software on a real device or the maker’s official documentation. More about Kermit.