A round headshot for a résumé or a circular logo in a newsletter takes two choices on Word’s Picture Format tab. Under the Crop arrow, pick Aspect Ratio and the square 1:1 option so the frame is equal on all sides, then pick Crop to Shape and the Oval. On a square frame the oval becomes a true circle. Skip the square step and you get an egg shape instead.
Why a shape crop comes out as an oval
Word doesn’t have a separate circle crop. The round shape in the Crop to Shape gallery is the Oval, and Microsoft’s guide to cropping a picture to fit in a shape explains that the picture keeps its proportions when the shape is applied. So the oval stretches to match the picture: a wide landscape photo turns into a wide oval, and a tall phone photo turns into a tall one.
The fix is to make the picture square before (or after) applying the Oval. Doing the square first is easier, because you choose which part of the photo stays while you can still see the full rectangle. Doing it after works too, but the Oval is already in place and the preview can be harder to judge.
These steps are for Word for Microsoft 365 and recent desktop versions on Windows. Microsoft lists the same crop-to-shape steps for Word 2024, 2021, 2019 and 2016, though the ribbon can look slightly different in older versions. Mac and web differences are covered further down.
Make the circle: square first, then Oval
- Click where the picture should go, then use Insert > Pictures to add it. Click the picture once to select it.
- Open the Picture Format tab that appears on the ribbon. If you don’t see it, the selected item isn’t a picture (see the troubleshooting section below).
- In the Size group, click the small arrow under Crop (not the top half of the button) and choose Aspect Ratio, then pick 1:1 from the list of ratios.
- A square crop box appears over the photo. Drag the photo itself until the face or logo sits in the middle of the box, then press Esc or click outside the picture.
- With the picture still selected, click the arrow under Crop again and choose Crop to Shape.
- Click the Oval in the Basic Shapes row. The picture changes to a circle right away.
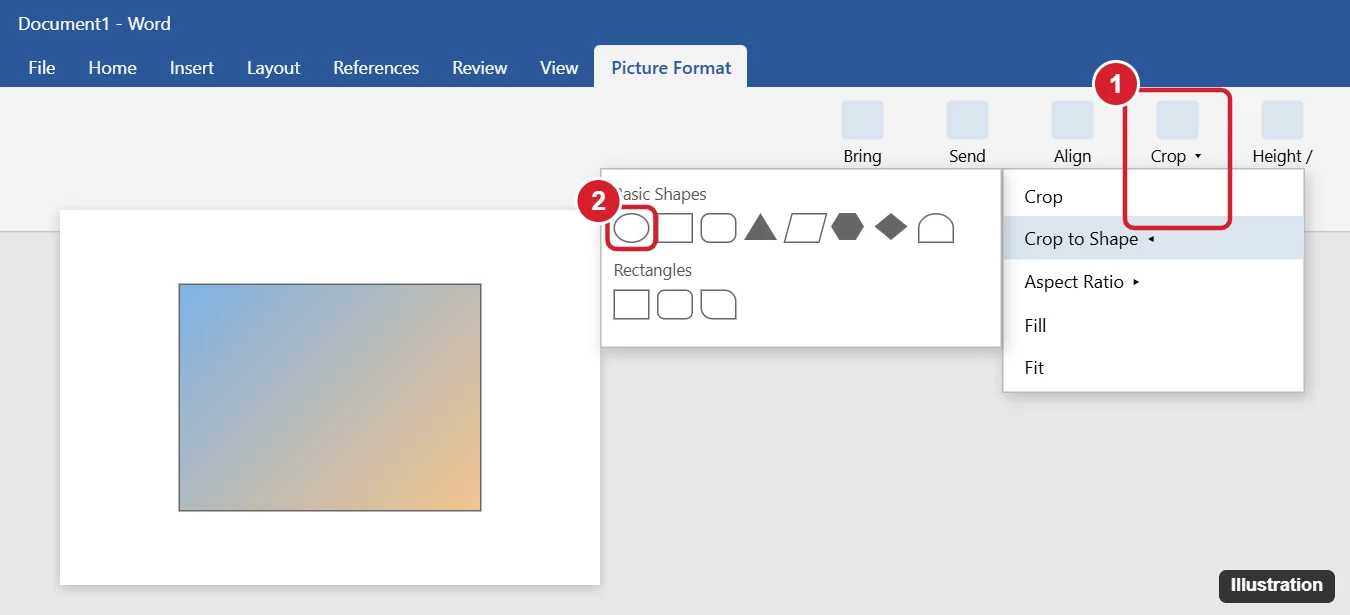
If you already applied the Oval to an uncropped photo, you don’t need to start over. Open the Crop arrow, pick Aspect Ratio, choose 1:1, and the oval tightens into a circle.
Choose what shows inside the circle
The first attempt often cuts off the top of a head or puts a logo off center. You can fix that without redoing the crop.
- Select the circle and click the top half of the Crop button. Black crop handles appear on the edges and corners.
- Drag the photo (not the handles) to slide it inside the circle until the important part is centered.
- To zoom in, drag a corner handle inward. To trim two opposite sides evenly, hold Ctrl and drag a side handle.
- Press Esc or click outside the picture to finish.
Two options on the Crop menu decide how the photo fills the circle:
- Fill covers the whole circle with the photo. Some outer edges of the picture may be cut off, but there is no empty space.
- Fit squeezes the whole photo into the circle. Nothing is cut off, but you may see empty margins inside the circle.
For a headshot, Fill nearly always looks better. Fit suits a logo whose edges must stay visible.
The cropped part is still in the file
Read this before you send the document. A circle crop only hides the corners. Microsoft’s picture cropping article warns that cropped areas stay in the file and can potentially be seen by others, including search engines if the image is posted online. Someone who opens the file can drag the crop back out.
If the hidden part shows something private (a house number, another person, a document on a desk), delete it:
- Finish all crop adjustments first. Once the file is saved, the deletion is permanent.
- Select the circle and go to Picture Format > Compress Pictures (in the Adjust group).
- Make sure Delete cropped areas of pictures is checked. Leave Apply only to this picture checked if the other images should stay as they are.
- Click OK, then save.
You can still use Undo to bring the corners back until you save. File size savings and resolution choices are covered in compressing pictures in Word.
Word for Mac and Word for the web
Word for Mac: Microsoft’s instructions include a macOS version of Crop to Shape, and the same Picture Format tab and Crop arrow are there. Menu wording can differ slightly from Windows, so look for Aspect Ratio and Crop to Shape under the Crop arrow.
Word for the web: Microsoft says the web version doesn’t include crop to shape. You can apply one of the quick Picture Styles that use a rounded frame, but for a true circle, open the document in the Word desktop app and crop it there.
Build a set of matching circles
Match the size exactly
A document with several round photos looks tidier when every circle is the same size, for example 1.5 inches across.
- Select the circle and look at the Height and Width boxes at the right end of the Picture Format tab. Type the same number in both. If Word changes the other box as you type, that is the aspect ratio lock at work, and both should end up equal.
- To resize by hand, drag a corner handle rather than a side handle. Holding Shift while dragging a corner keeps the proportions, so the circle doesn’t turn back into an oval.
If the two numbers don’t match after resizing, the circle has stretched. Type matching values again, or reapply Aspect Ratio 1:1 from the Crop menu.
Pour a photo into a drawn circle
Some layouts work better if you draw the circle first and pour the photo into it, for instance a row of empty circles you plan to fill one by one as photos arrive.
- Go to Insert > Shapes and choose the Oval.
- Hold Shift while you drag on the page so the shape stays a circle.
- With the circle selected, open Shape Format > Shape Fill > Picture and choose the image.
- If the photo looks squashed, go to Picture Format, open the arrow under Crop, and choose Fill or Fit, then drag the photo to center it.
The trade-off: Microsoft notes that the cropping tools aren’t available for shapes themselves. You fine-tune the photo with Fill and Fit, and to change the outline of the shape you use Shape Format > Edit Shape > Edit Points. For one photo, the picture crop above is simpler. For a template you will reuse, the shape route keeps every circle identical.
Crop several pictures at once
Microsoft says you can select several pictures and crop them all at once, and they all get the same shape. Word has a catch: you can’t multi-select pictures that use the default In Line with Text layout.
- For each picture, click the Layout Options icon beside it and pick any wrapping option other than In Line with Text, such as Square.
- Click the first picture, then hold Shift or Ctrl and click the others.
- Apply Aspect Ratio > 1:1, then Crop to Shape > Oval from the Crop arrow.
- Click each circle on its own afterward to recenter the photo inside it.
To crop one photo into a circle and keep the original rectangle too, copy and paste the picture first, then crop only the copy.
Finish and place the circle
Add a ring around it
A thin ring around a round photo helps it stand out on a white page. Microsoft’s picture border instructions cover the controls, and the outline follows the circle, not the original rectangle.
- Select the circle and open Picture Format > Picture Border.
- Pick a color from the palette.
- Open Weight to make the ring thicker or thinner, and Dashes if you want a dotted or dashed ring.
- To take the ring off later, choose No Outline from the same menu.
Picture Effects, next to Picture Border, adds options such as a shadow or soft edges. More border styles and frame ideas are in adding a border to a picture in Word.
Wrap text and fix the position
New pictures sit in line with text, which means they behave like a large letter in the paragraph. That is fine for a centered logo at the top of a page. For a round photo with text wrapping beside it, change the layout:
- Click the Layout Options icon next to the selected picture and choose Square or Tight. Tight can wrap text closer to the circle’s edge than Square.
- In the same menu, Move with text keeps the circle beside its paragraph as you edit, while Fix position on page pins it in place.
- To nudge the circle in small steps, select it and press Ctrl with an arrow key.
Microsoft’s page on wrapping text and moving pictures in Word lists every option. For centering and side-by-side photos, see aligning pictures in Word, and for a bio paragraph beside a headshot, putting text next to an image covers the wrap settings in detail.
- Crop is grayed out or Picture Format is missing: You have probably selected a shape rather than a picture. Cropping tools don’t work on shapes; use Fill and Fit as described in the shape section, or insert the image as a picture instead.
- The circle looks soft after saving: Word compresses pictures by default. Go to File > Options > Advanced, find Image Size and Quality, and check Do not compress images in file, per Microsoft’s picture compression setting. Expect a larger file. Starting from a higher-resolution photo also helps, since a small circle cut from a small image has few pixels left.
- Still an oval: Check that Height and Width match, then reapply Aspect Ratio 1:1.
Other crops and the PowerPoint version
This page sticks to circles. For trimming the edges of a picture, start with cropping a picture in Word. For other shapes, exact crop measurements and resetting a crop, see cropping an image in Word with shapes and ratios. Building slides instead of a document? The same idea applies in cropping a picture into a circle in PowerPoint.
Circle crop questions
Does cropping to a circle make my Word file smaller?
Not by itself. The hidden corners are kept, so the file stays about the same size until you run Compress Pictures with Delete cropped areas of pictures checked.
How do I get the whole rectangular picture back?
Select the circle, open the arrow under Crop, choose Crop to Shape and pick the Rectangle, then click Crop and drag the black handles outward to bring back the trimmed edges, or use Undo. Either works only if the cropped areas haven’t been deleted and saved. After that, Microsoft notes the deletion can’t be undone, so insert the original photo again.
Why is there empty space inside my circle?
The picture is set to Fit, which shrinks the whole photo to fit inside the shape. Open the Crop arrow and choose Fill to cover the circle edge to edge.
Once one circle looks right, set its exact size and copy that layout for every other photo in the document.

Kermit Matthews runs Live2Tech from just outside Philadelphia. He is an IT specialist with over 20 years of experience, from a university help desk to small-business IT, IT management and his own consulting practice, and has written tech guides full time since 2020. Steps are checked against the current software on a real device or the maker’s official documentation. More about Kermit.