When you need to block time for yourself (a dentist visit, a focus session, a school pickup) and nobody else needs an invitation, create an appointment. In classic Outlook for Windows, open Calendar and select New Appointment (or press Ctrl+N), fill in the subject and times, then select Save & Close. In new Outlook for Windows and Outlook on the web, select New Event instead. The sections below go through each field in the order the form shows it.
Appointment, meeting or event?
Outlook uses three words that overlap, and knowing which one you want saves confusion later:
- Appointment: an entry on your own calendar with no invited attendees. Nothing is sent to anyone. This is the classic Outlook term.
- Meeting: a calendar entry with attendees. Outlook sends an invitation, collects responses and keeps everyone’s copy updated when you change it.
- Event: the term new Outlook, Outlook on the web and Outlook for Mac use for any calendar entry. An event with no attendees works just like an appointment.
You can start with an appointment and turn it into a meeting later, which is covered near the end.
Create an appointment in classic Outlook for Windows
These steps follow Microsoft’s instructions for classic Outlook in Microsoft 365, Outlook 2024 and Outlook 2021. Older versions such as Outlook 2016 and 2013 work the same way, although the ribbon looks a little different. The screenshots below are from Outlook 2013.
Start a new appointment
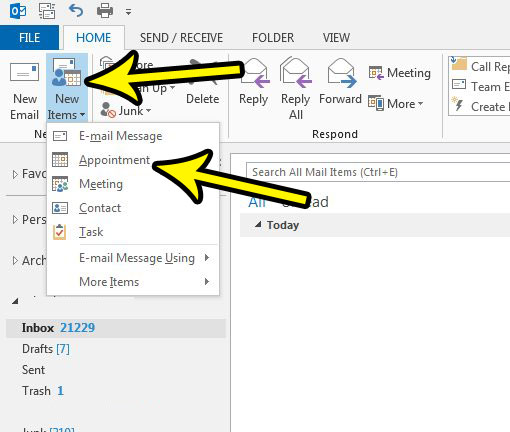
Pick whichever way is closest to where you are in Outlook:
- From the Calendar: select New Appointment on the ribbon, or press Ctrl+N.
- From Mail or any other folder: press Ctrl+Shift+A, or open the New Items menu on the Home tab and choose Appointment.
- From the calendar grid: right-click a time block and select New Appointment, or double-click a blank area of the calendar. Starting from the grid fills in the date and time you clicked.
Fill in the basics and save
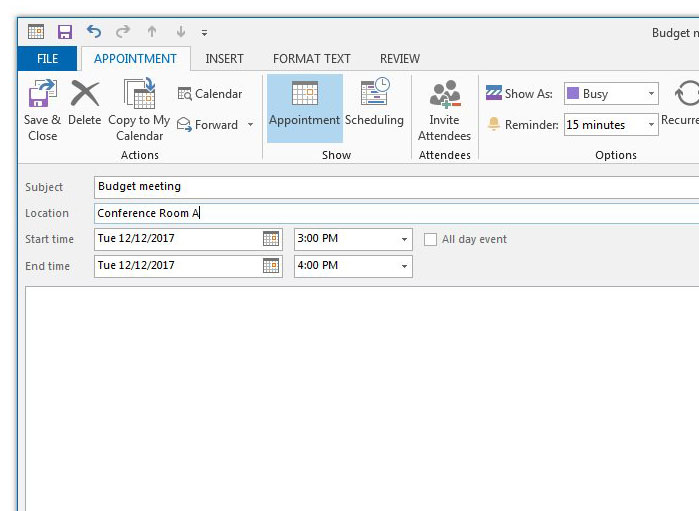
- Type a Subject. This is the text you will see on the calendar, so make it specific, such as “Dentist, cleaning” rather than “Appointment.”
- Add a Location if it helps. It can be an address, a room name or anything else you want to see at a glance.
- Set the Start time and End time. Choose a date from the calendar picker and a time from the list, or type both directly (see the tips below).
- Add notes in the large body area if you need them, such as a confirmation number or what to bring.
- Select Save & Close at the left end of the ribbon.
The appointment now appears on your calendar in the slot you chose. Double-click it at any time to reopen the form.
Set the time, status, reminder and repeats
The basics are enough for a one-off entry, but the options on the appointment ribbon are what make the calendar useful. Most of them sit in the Options group.
Times and dates
By default, Outlook starts and ends appointments on the hour or half hour. For anything else, such as 9:10, click in the time box and type the exact time.
The date boxes also understand words. Microsoft lists examples such as Today, Tomorrow, Two Weeks from Tomorrow and holiday names like New Year’s Day. Typing “Tomorrow” and pressing Tab is often faster than opening the date picker.
For something that spans the whole day, like a vacation day or a conference, look for the All day check box next to the time boxes. With it selected, the time boxes disappear and the appointment shows as a banner at the top of the day rather than a block in the grid.
Show As
The Show As box controls how the time appears to anyone who can see your free/busy information, for example colleagues scheduling a meeting with you. The choices are:
| Show As | Good for |
|---|---|
| Free | Reminders you want on the calendar that do not stop others booking you, such as a deadline note |
| Working Elsewhere | Time you are working but not at your usual desk or office |
| Tentative | Plans that might change |
| Busy | Time you cannot be booked, such as a focus block or appointment |
| Out of Office | Time away, such as a medical appointment or vacation day |
Setting a self-booked focus block to Busy is the simplest way to stop meetings landing on top of it.
Reminder
New appointments get a reminder 15 minutes before the start by default. To change it for this appointment, open the Reminder box and pick another time, such as 1 hour or 1 day. Choose None if you do not want a reminder at all.
To change the default for every new appointment in classic Outlook, look under File > Options > Calendar for the Default reminders setting. If the reminder chime is the problem rather than the timing, you can also turn off the Outlook reminder sound.
Recurrence
For something that repeats, such as a weekly class or a monthly bill payment:
- Select Recurrence in the Options group.
- Choose Daily, Weekly, Monthly or Yearly and set the pattern, for example every second Tuesday.
- Set when the series ends (no end date, after a number of occurrences, or by a date), then select OK.
Once recurrence is on, the ribbon tab changes from Appointment to Appointment Series, which tells you the changes you make apply to the whole series. When you later open one occurrence, Outlook lets you choose between changing just that occurrence or the entire series.
Categories and private entries
Many people color-code the calendar with categories, for example green for personal and blue for work. In classic Outlook, look for a Categorize button on the appointment ribbon and pick a color. If others can see your calendar (a manager or an assistant with shared access), a Private button, usually shown as a padlock, hides the details so they see only that you are busy. The exact ribbon placement varies by version and window size.
Create an appointment from an email
If the details are already in a message, such as a booking confirmation, you can avoid retyping them. Microsoft’s approach in classic Outlook is a Quick Step:
- On the Home tab, in the Quick Steps gallery, set up a new Quick Step that uses the action Create an appointment with attachment, and give it a name you will recognize.
- Right-click the email, point to Quick Steps and select Create an appointment with attachment (or the name you gave it).
- An appointment opens with the email attached. Set the subject and times, then select Save & Close.
The Reply with Meeting button on the ribbon looks similar, but it creates a meeting request addressed to the sender, so use it only if you do want to invite that person.
New Outlook for Windows and Outlook on the web
New Outlook for Windows and Outlook on the web share the same calendar design and call every entry an event. If you are looking for New Appointment and cannot find it, you are in one of these apps.
- Go to Calendar using the calendar icon in the left bar.
- Select New Event. In Outlook on the web, you may need to choose Event from the New Event menu.
- Add a title.
- Set the date and start and end times, or turn on All day.
- To make it repeat, select Recurring, set the pattern in the Repeat window, then select Save.
- Add a location and notes if you want them. Leave Invite attendees empty to keep it a private appointment.
- Save the event.
If you add anyone to Invite attendees, the entry becomes a meeting and the save button sends invitations, so check that box is empty before you finish. You can also select an empty time slot on the calendar grid to start an event at that time.
Outlook for Mac
In current Outlook for Mac:
- Open the calendar and select New Event.
- Add a title, then set the date and times.
- Use Add a location for a place and the Does not repeat menu to set a repeating pattern.
- Leave Add required people empty if you want an appointment rather than a meeting.
- Save the event. If you added people, the button sends invitations instead.
Microsoft also keeps instructions for legacy Outlook for Mac and said support for that older design would end in October 2026, so if your Mac still shows the older interface, update Outlook or switch to the current design.
Outlook mobile
In the Outlook app for iPhone and Android, open the calendar view and tap the button for a new event, usually a plus sign. Add a title and times, leave the people field empty, and save. Labels and button positions vary between app versions, but the entry syncs to your calendar on every device once saved. If it does not appear on your computer, see how to sync your Outlook calendar on Windows.
Edit, move or delete an appointment
- Move it: drag the appointment to a new slot on the calendar grid. Drag its top or bottom edge to change the length.
- Change details: double-click it, make the changes and select Save & Close (or save the event in new Outlook).
- Delete it: select it and press the Delete key, or open it and use the delete option on the ribbon or toolbar. Deleted appointments go to Deleted Items, where you can restore one if you remove it by mistake.
Turn an appointment into a meeting
If plans change and you need others there, open the appointment and select Invite Attendees in the Attendees group (classic Outlook), or add people to Invite attendees in new Outlook and Outlook on the web. Type the names, then select Send. The entry is now a meeting: each person receives a request, and their responses are tracked on your copy. To start a meeting from scratch in classic Outlook, choose New Items > Meeting or press Ctrl+Shift+Q.
Appointment questions
Can other people see my appointments?
It depends on how your calendar is shared. People who can only see free/busy information see the time block and its Show As status; people you have given more access to can also see the subject and details, unless you mark the appointment Private.
Why does my appointment not start at the time I picked?
Check the time zone shown on the form and in your Outlook settings, especially if you travel or work with another region. Also confirm you edited the start time rather than only the end time, since moving the start can shift the end with it.
Can I make my appointments shorter automatically?
Classic Outlook has a Shorten appointments and meetings option under File > Options > Calendar in the Calendar options section. It ends entries a few minutes early so you get a break between them.
Appointments are easier to place once you change your work hours in Outlook, because the hours outside them are shaded. If the forecast strip above your calendar is a distraction, here is how to remove weather from the Outlook calendar. Waiting on a booking confirmation by email? You can set how often classic Outlook checks for new mail. For Microsoft’s own reference, see Create or schedule an appointment in Outlook.

Kermit Matthews runs Live2Tech from just outside Philadelphia. He is an IT specialist with over 20 years of experience, from a university help desk to small-business IT, IT management and his own consulting practice, and has written tech guides full time since 2020. Steps are checked against the current software on a real device or the maker’s official documentation. More about Kermit.