If newsletters or alerts are burying the mail you need, an Outlook rule can sort them. A rule pairs a condition (such as “from this sender”) with an action (such as “move to this folder”), and Outlook applies it to every matching new message. The quickest start is to right-click a message from that sender, choose Rules > Create rule, and pick a folder. Gmail, Yahoo and iCloud accounts can’t use rules in the new Outlook, so check the table below first.
Before you build: will your account and app run rules?
Rules run in one of two places. A server-side rule is stored in your mailbox on Microsoft’s mail servers and runs whether or not any Outlook app is open. A client-only rule lives in classic Outlook on one PC and runs only while classic Outlook is open there, signed in with the account that created it. Only classic Outlook supports both kinds, according to Microsoft’s page on fixing broken rules; the other apps make server-side rules only.
| App | Where rules live | Rule types | Gmail, Yahoo, iCloud |
|---|---|---|---|
| New Outlook for Windows | Settings > Mail > Rules | Server-side only | Not supported |
| Classic Outlook for Windows | File > Manage Rules & Alerts | Server-side and client-only | Not stated by Microsoft |
| Outlook on the web and Outlook.com | Settings > Mail > Rules | Server-side only | Not applicable |
| Outlook for Mac (current) | Outlook > Settings > Rules | Server rules only | Not covered on Microsoft’s Mac rules page |
| Outlook for iPhone and Android | No rules editor | Server rules made elsewhere still apply | Not applicable |
To tell the Windows apps apart, look at the top-left corner: Microsoft’s test is that if you see File, you’re in classic Outlook. If the new Outlook shows a message that rules aren’t supported, the “Rules are not supported for this account” explainer walks through the fixes. For a Gmail address, the provider’s own tool usually does the job better: see creating filters in Gmail.
Problem: one sender floods your inbox
This is the four-click rule: everything from one address goes to one folder. Create the folder first (right-click your Inbox and add a new folder) so it’s ready to pick.
In the new Outlook for Windows
- Right-click a message from the sender.
- Point to Rules and select Create rule.
- Choose the destination folder and select OK.
Every future message from that sender now skips the Inbox. If you’d rather change the condition or add a second action, select More options in step 3 to open the full editor with the sender already filled in. Outlook on the web uses the same right-click menu.
In classic Outlook
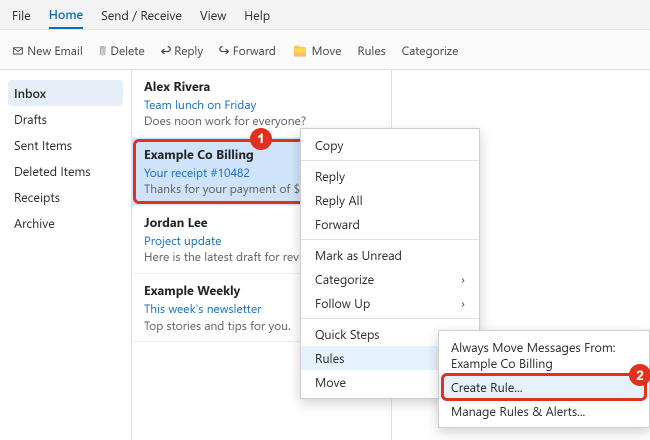
- Right-click the message, point to Rules, and select Create Rule.
- Check the sender box. For a subject-based rule, check the subject box instead and shorten the text to the key phrase, because one message’s full subject rarely matches the next.
- Check the option to move the item to a folder, choose the folder, and select OK.
- When Outlook confirms the rule, check the box to run it now on messages already in the current folder if you want existing mail sorted too, then select OK.
For forwarding, categories or exceptions, select Advanced Options in the Create Rule box. That opens the Rules Wizard covered further down.
Problem: the mail needs more than one test (the new Outlook editor)
Suppose you want messages from a billing system moved to a Receipts folder, but not the ones marked “Overdue.” That takes a condition, an action and an exception, which is what the full editor in the new Outlook for Windows is for.
- Select Settings (the gear) > Mail > Rules.
- Select Add rule and type a name you’ll recognize later, such as Receipts to folder.
- Under Add a condition, choose a test such as From, and enter the value.
- Under Add an action, choose what happens, such as Move to, and pick the folder.
- Optionally select Add an exception (for example, subject includes Overdue).
- Check or clear Stop processing more rules (explained in the rule order section below), then select Save.
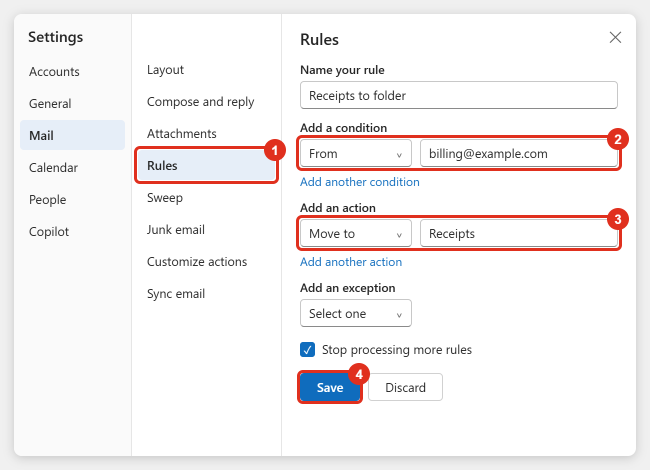
In the rules list, each saved rule has a toggle to pause it, a More actions (…) menu with Edit rule and Delete rule, and up and down arrows to change its position. These steps match Microsoft’s rules article for the new Outlook.
Outlook on the web and Outlook.com
The browser version uses the same layout as the new Outlook for Windows: Settings > Mail > Rules, then add a rule and fill in the name, condition, action and any exception. Work or school accounts sign in at outlook.office.com and personal accounts at outlook.com. Rules created here are server-side, so they also run when you read mail in the new Outlook, on a Mac or on your phone.
Classic Outlook’s Rules Wizard for the harder cases
Classic Outlook has the widest set of conditions and actions, and its Rules Wizard also offers rules for messages you send.
- Select File > Manage Rules & Alerts, and on the E-mail Rules tab select New Rule.
- Pick a template, or under Start from a blank rule choose Apply rule on messages I receive or Apply rule on messages I send, then select Next.
- Check one or more conditions. Each appears in the description box with an underlined value, such as specific words or people or public group; select it, fill it in, and select Next. If you check no condition, Outlook asks whether the rule should apply to every message; say yes only if that’s what you want.
- Check the actions, fill in their underlined values the same way, and select Next.
- Add exceptions if needed and select Next.
- Name the rule, keep Turn on this rule checked, optionally check the box to run it now on existing messages, and select Finish.
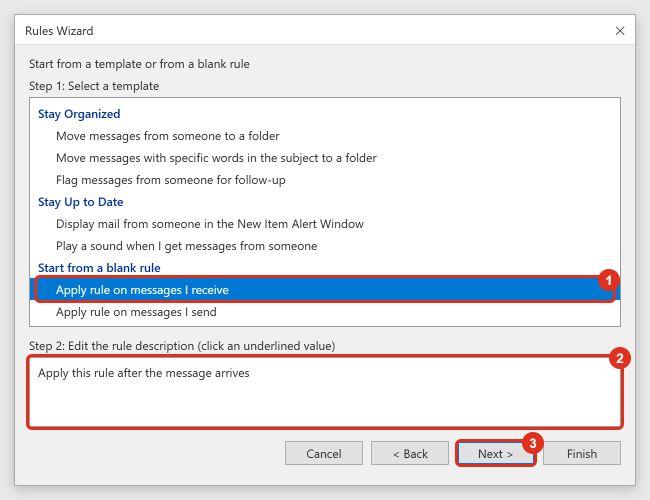
If Outlook warns that the rule will run only while Outlook is running, you’ve built a client-only rule. That’s fine for a sound or a desktop alert, but a rule that should work around the clock needs server-side actions, such as moving mail to a folder in your mailbox. A server-side rule can’t move mail to a folder stored only on your PC, which Microsoft lists as a common reason a rule fails.
Outlook for Mac
Microsoft’s Mac rules page says the current Outlook for Mac creates only server rules; client rules are no longer supported.
- Choose Outlook > Settings from the menu bar, then Rules.
- Select +Add Rule and name it.
- Use Select a Condition and Select an action. Add more with Add another condition or Add an exception.
- Leave Stop processing more rules on (it’s on by default) unless later rules should also act, and save.
The three dots next to a saved rule hold Edit rule, Delete rule and Run rule now; the toggle turns it off and the arrows reorder it. Microsoft’s page gives October 2026 as the end of support for legacy Outlook for Mac, and these steps describe the current Mac app.
Problem: the mail belongs to someone else
Rules can pass mail to a coworker or a shared address, but the three forwarding actions behave differently. Microsoft’s forwarding rules page explains the reply behavior:
| Action | What the recipient sees | Where replies go | Use it when |
|---|---|---|---|
| Forward to | A message from you | Back to you | You want to stay in the loop |
| Forward as attachment | The original message as an attachment | Not described by Microsoft | The recipient needs the original intact, such as for a records system |
| Redirect to | The original sender on the From line | To the original sender | Someone else should handle it as if it came to them |
A copy stays in your mailbox either way, and a full mailbox can stop forwarding from working. Each rule also has a limit on how many addresses it can forward to. Your organization may also block automatic forwarding to outside addresses, so if a forward to a personal account never arrives, ask your IT team.
Problem: old mail is still sitting there
A new rule acts only on messages that arrive after you save it. To clean up what’s already in a folder:
- New Outlook for Windows: go to Settings > Mail > Rules and select the Run rule now icon next to the rule.
- Outlook for Mac: open the three dots next to the rule and choose Run rule now.
- Classic Outlook: in File > Manage Rules & Alerts, select Run Rules Now, check the rules to run, choose the folder, and run them. You can also check the run-now box on the last page of the Rules Wizard.
- Outlook on the web and Outlook.com: Microsoft doesn’t document a run-now option for the web. If you don’t see one in your rules list, sign in to the same account in the new Outlook for Windows and run the rule there, since it’s the same server rule.
Problem: two rules fight over one message
Outlook checks rules from the top of the list down, and one message can match several rules. When a matching rule has Stop processing more rules turned on, Outlook ignores every rule below it for that message.
Here’s how that plays out. Rule 1 moves anything from your manager to a Manager folder. Rule 2, lower down, moves anything with “newsletter” in the subject to a Reading folder. Your manager forwards a newsletter. With Stop processing on for Rule 1, the message stays in Manager. With it off, Rule 2 also acts, and the message ends up in Reading, where you might miss it.
- Put specific, important rules at the top and broad catch-alls at the bottom.
- Turn Stop processing on for rules that file a message somewhere final.
- Leave it off for rules that only add a category or flag, if later rules should still move the message.
So if another rule seems to win, look for a rule higher up with Stop processing on, and move yours above it or change that rule. Reorder with the up and down arrows in the new Outlook, on the web and on a Mac. In classic Outlook, select the rule in Rules and Alerts and use the move up and move down arrows.
Five rules worth setting up
The addresses below use example.com; replace them with your own senders and folders.
| Goal | Condition | Action | Exception or note |
|---|---|---|---|
| File receipts | From [email protected] | Move to Receipts | Stop processing on |
| Quiet newsletters | Subject includes newsletter | Move to Reading, mark as read | Except if from your manager |
| Separate a team list | Sent to [email protected] | Move to Team | Except if subject includes action required |
| Send invoices to accounting | Subject includes invoice | Forward to [email protected] | Outside forwarding may be blocked |
| Hear one important sender (classic only) | From [email protected] | Play a sound | Client-only; works only while classic Outlook is open |
Test a new rule by sending yourself a matching message, then check the folder. If it also catches mail it shouldn’t, the condition is too broad (a subject word such as order also matches reorder), so use a longer phrase, add the sender as a second condition, or add an exception. If a rule deletes mail, run it as a move to a holding folder for a week first, since a moved message is easy to get back. For messages you can’t deal with yet but don’t want to file, snoozing an email in the new Outlook brings them back at a time you choose.
What the new Outlook can’t do in a rule yet
The new Outlook’s rules are “partially available” compared with classic Outlook in Microsoft’s feature comparison. Microsoft’s broken-rule page lists these as not supported in the new Outlook: assigned to a category, clear categories, clear message’s flags, defer delivery by x minutes, display a custom message in the New Item Alert window, flag with specific time, form type, on this computer only, permanently delete, print it, reply with specific template, RSS feeds, send an automatic server reply, sender in an address book, sender is in specified address book, uses form, and with selected properties of documents or forms. Assign to specific category and through the specified account are partially available, and display a desktop alert and play a sound are marked as upcoming. The same table shows the gap running the other way for one action: Mark as Junk is available in the new Outlook but not in classic Outlook.
If a rule depends on one of these, keep it in classic Outlook. The template reply is the one most people miss, because it’s the classic way to send out of office replies from a Gmail or IMAP account; that method is covered in setting up automatic replies in Outlook.
Moving from classic to the new Outlook
Server-side rules are part of your mailbox, so they appear in the new Outlook automatically. Client-only rules don’t make the move: Microsoft says a migrated client-side rule shows This rule can’t be edited or viewed and can’t run. Delete it and build it again in the new Outlook if its condition and action are supported there.
Back up your rules before switching. In classic Outlook, select File > Manage Rules & Alerts > Options > Export Rules and save the .rwz file. Import Rules in the same box loads a file on another PC; imported rules are added to the end of the list, and you can import one set at a time. Microsoft’s import and export page notes this works only in classic Outlook, and the new Outlook doesn’t support rule import or export.
Outlook inbox rule questions
How many rules can I have?
There’s no fixed number. In Exchange Online, all enabled Inbox rules share a space limit of 256 KB at most (an administrator can set it as low as 32 KB), and each rule’s size depends on its name length and how many conditions it has. Turned-off rules don’t count toward the limit, and Microsoft’s rule space page says users are warned when it’s full.
Can Copilot create a rule for me?
Microsoft 365 Copilot in Outlook can create, view, update and delete rules from a plain request such as “move messages from this sender to Receipts.” It shows a summary for you to confirm before it changes anything, and its rules apply to future messages only, according to Microsoft’s Copilot rules page.
Can I make a rule for a shared mailbox?
Yes, if the shared mailbox has been added as an account in the new Outlook for Windows: Microsoft lists rules among the features that work for it there, and the rule runs on the server for that mailbox. If you can’t add it, ask the mailbox owner or your IT team.
Start with two or three rules for the mail you can predict best, such as receipts and newsletters, and let them run for a week before adding more. Small, specific rules are easier to fix than one rule that tries to do everything.

Kermit Matthews runs Live2Tech from just outside Philadelphia. He started on a university help desk, spent years as the IT person for small businesses, and has been writing tech guides full time since 2020. Each guide is checked on a device he owns, and re-checked when a menu moves. More about Kermit.