Paper size in Word comes down to one choice: pick a size from Word’s list, or type your own width and height when the list does not have it. Both end up on the Paper tab of the Page Setup dialog, which you open from the Layout tab, and the same dialog lets you limit a new size to part of a document. These steps are for the Word desktop app on Windows, with a short Mac section further down.
Choose a size from the list
For common sizes such as Letter, Legal or A4, the quickest route in current versions of Word for Windows is the Size button on the ribbon:
- Open the document and select the Layout tab.
- Select Size.
- Pick a paper size from the menu. Every page in a document without section breaks changes at once.
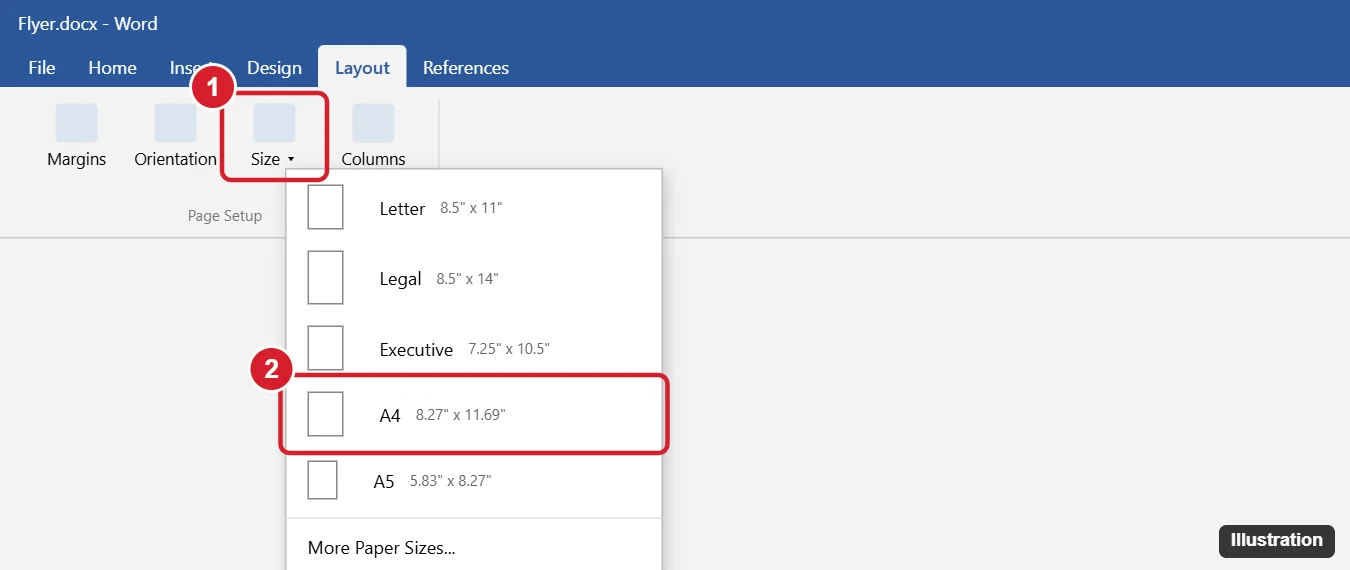
Microsoft’s current support pages do not describe this Size menu, so its exact layout may differ in your copy of Word. The sizes on offer may also depend on the printer you have selected, which could explain a size you saw on another computer being missing. If the menu does not have what you need, use the Paper tab method in the next section; Microsoft documents that one.
Only need A4? The shorter walkthrough in setting A4 paper size in Word covers that single case.
Enter your own size on the Paper tab
The Paper tab is where Microsoft says you choose the paper size for your printed document, and it is the only place to set a size Word does not list, such as a card, a flyer trimmed to a custom width, or a print shop’s page format.
- Select the Layout tab, then select the Page Setup dialog launcher (the small arrow at the corner of the Page Setup group).
- Open the Paper tab.
- Select the Paper size drop-down. Choose a listed size, or choose Custom size at the bottom of the list.
- For a custom size, enter the Width and Height you want.
- Select OK.
Two details on this tab catch people out. First, if you pick a standard size and then change its width or height, the Paper size box switches to Custom size on its own; that is expected, not an error. Second, the width and height boxes use whatever measurement unit Word is set to. To switch between inches and centimeters, select Print Options on the Paper tab, choose Advanced, scroll to Display, and change Show measurements in units of.
A worked example: a teacher printing name cards on stock that is 5 inches wide and 7 inches tall would open the Paper tab, choose Custom size, enter 5 and 7 (with units set to inches) and select OK. The text then reflows to the smaller page, so a final check of the layout is worth a minute. The steps follow Microsoft’s page on Page Setup paper options in Word.
Give some pages a different size
A report with one oversized chart page, or a document that ends with a mailing envelope page, needs more than one paper size. Word handles this with sections. Microsoft documents an Apply to box in this same Page Setup dialog for orientation changes, and you use it the same way for paper size.
- Click where the new size should begin.
- Select Layout > Breaks > Next Page. Microsoft describes this break as starting the new section on the following page.
- With the cursor in the new section, open the Page Setup dialog launcher on the Layout tab and go to the Paper tab.
- Choose the size, then next to Apply to choose This section and select OK.
To change everything from the cursor to the end of the document instead, choose This point forward in the Apply to box instead of inserting a break first. When text is selected, the same box can offer Selected text. Microsoft’s page on landscape orientation in Word shows these same three Apply to choices for orientation.
Sections also let you vary margins. For that side of the job, see using different margins on different pages in Word.
Word on a Mac
Word for Mac does not use the same Page Setup dialog as Windows. Microsoft’s older Mac instructions put paper size under File > Page Setup, where you pick a size from the Paper Size list or choose Manage Custom Sizes to define your own width, height and non-printable area. Microsoft’s current Mac printing page opens Page Setup from Format > Document, with an Apply to setting, when it explains changing the orientation of some pages. Menu names on a Mac can shift between updates, so treat these as the starting points to look for.
When the printout does not match the page
Changing the page size in Word does not change the paper loaded in your printer. If pages print cut off, shrunk or on the wrong stock, check these in order:
- The printer’s own paper setting. Make sure the tray holds the size you chose and that the printer’s settings agree.
- Paper source on the Paper tab. Microsoft’s Paper tab lets you choose a source for the first page and another for the remaining pages, which is handy for letterhead on page one. The options come from your printer driver and can include Default tray (Automatically select), Automatically Select, Auto, Manual feed and numbered or upper and lower trays. Auto picks a tray by paper size and availability. If you are unsure which to choose, Microsoft suggests your printer’s manual.
- Margins and page breaks. A smaller page reflows the text, which can push content onto an extra page. If a blank page appears at the end, deleting a page in Word explains how to remove it, and fitting everything on one page in Word helps when a short document spills over.
Microsoft’s layout training for Word for the web covers only Margins and Orientation, so if you cannot find a paper size option in your browser, open the file in the Word desktop app to change it.
Page size and printing questions
Does changing the paper size change the orientation?
No. Portrait and landscape are a separate setting under Layout > Orientation, so check it after changing the size.
Can I make one size the default for every new document?
Microsoft says new documents take their settings from the Normal template, but its current support pages read for this article do not give steps for saving a paper size as the default. Look for a default option in the Page Setup dialog of your version, and check that a new blank document opens at the size you expect.
Working in Google Docs instead? Changing the page size in Google Docs covers the same job there. In Word, once the size looks right on screen, print a single test page before running the whole document.

Kermit Matthews runs Live2Tech from just outside Philadelphia. He is an IT specialist with over 20 years of experience, from a university help desk to small-business IT, IT management and his own consulting practice, and has written tech guides full time since 2020. Steps are checked against the current software on a real device or the maker’s official documentation. More about Kermit.