Landscape pages in Word for Mac come from section breaks: select what should turn sideways, then apply the new orientation to the selected text only. On the Mac, that choice lives under Format > Document > Page Setup, where you pick Landscape and then set Apply to to Selected text. The rest of the document stays portrait.
These steps are for the Word desktop app on a Mac (Microsoft 365 or a recent one-time purchase).
Which Apply to choice fits your page?
Word for Mac sets orientation per section, not per page. Microsoft’s help for printing in landscape orientation says changing part of a document on a Mac requires section breaks, and that if the whole document flips, the change was not applied to Selected text, This point forward or This section. Those three choices do different jobs:
| Apply to choice | What Word changes | Needs |
|---|---|---|
| Selected text | Only the pages that hold your selection | Something selected first |
| This point forward | Everything from the cursor to the end, until you set it back | The cursor where landscape starts |
| This section | One section already set off by breaks | Section breaks around it |
| None: Layout > Orientation | The whole document | Nothing |
For the last row, the simpler whole-document switch is covered in changing a Word document between horizontal and vertical.
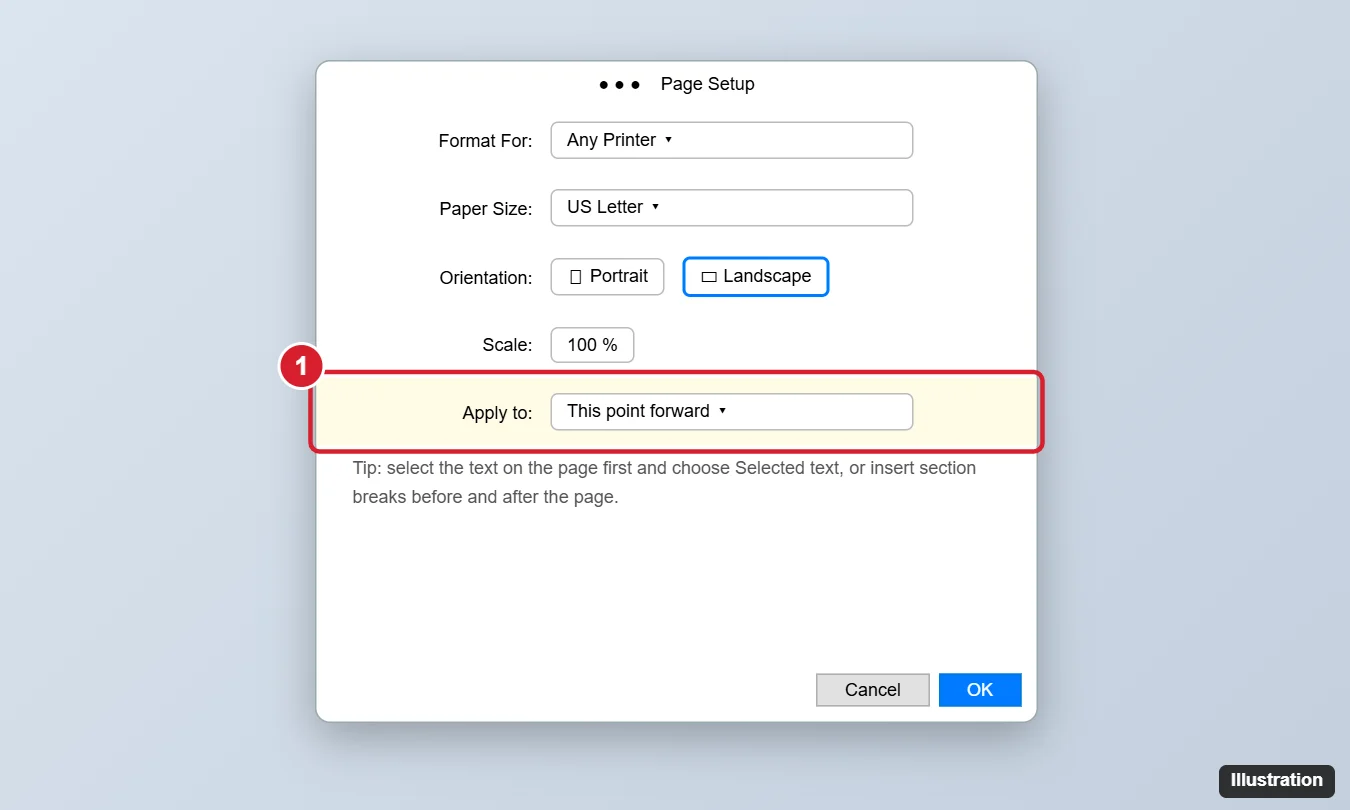
Use Selected text in the Document dialog
Selecting everything on that page is what tells Word where the landscape area begins and ends.
- Select all the text, table rows or the chart on the page you want sideways. Drag from the first character to the last, or click at the start and Shift-click at the end.
- On the Format menu in the Mac menu bar, select Document.
- Select Page Setup at the bottom of the Document dialog.
- Next to Orientation, choose the landscape icon, then select OK. You return to the Document dialog.
- Next to Apply to, choose Selected text, then select OK.
The order matters: the orientation is picked inside Page Setup, but the Apply to choice sits back in the Document dialog. Microsoft’s tip: if the whole document changes orientation, the change was not applied to Selected text, This point forward or This section.
To see what Word did, select Show all nonprinting characters on the Home tab. Section break markers should now sit before and after the landscape content. If a short paragraph spilled onto the landscape page or a heading was left behind on the page above, undo the change, adjust your selection and repeat.
A wide table may still be too big even after rotation. Shrinking margins or font size, as shown in fitting everything on one page in Word, usually closes the gap.
If the whole document flipped
When the whole file flips, one of three things usually happened:
- Layout > Orientation was used. That button changes the whole document. Use the Format > Document route instead.
- Apply to stayed on the default. Open Format > Document again and check the Apply to setting before you select OK.
- Page breaks were used instead of section breaks. A page break only starts a new page; it does not start a new section, so orientation still covers everything. Microsoft notes that Word for the web adds page breaks but not section breaks.
Undo the last change right away, then repeat the steps with Selected text or This point forward. If old breaks are in the way, deleting a Next Page section break walks through removing one, and removing section breaks in Word covers clearing several.
Use This point forward, then set it back
This route turns everything after the cursor, so it always takes two changes: one to landscape and one back to portrait.
- Click where the landscape page should begin, usually at the start of an empty paragraph after the last portrait text.
- Select Format > Document, then Page Setup.
- Choose landscape and select OK.
- Next to Apply to, select This point forward, then OK.
- Add your wide content. Then click at the start of the next page that should be upright.
- Repeat steps 2 to 4, but choose portrait. Everything after that point turns back to portrait.
Skipping the second change is the most common reason this method leaves the rest of the report sideways. If that happens, click where portrait should resume and do steps 2 to 4 again with portrait.
Build the section with Next Page breaks
Some people prefer to place the breaks first so they can see exactly where the landscape page starts and stops. It also helps when the same page will change size or margins later.
- Click at the very start of the content that should be landscape.
- Go to Layout > Breaks and choose Next Page. Microsoft’s page on inserting a section break describes Next Page as starting the new section on the following page.
- Click at the end of that content and insert a second Next Page break.
- Double-click the section break that follows the content (the second one).
- Select Page Setup, choose landscape and select OK.
- Next to Apply to, choose This section, then OK.
Pick Next Page, not Continuous. A continuous break starts the new section on the same page, and one sheet of paper cannot be half portrait and half landscape.
Clicking in the wrong spot is easy here. If the page above also turns sideways, the first break probably landed after the content instead of before it. With nonprinting characters showing, you can see which side of each break your content sits on.
Check the header, numbering and margins in the new section
Microsoft’s landscape pages don’t describe what happens to headers and page numbers in the new section, so check the landscape page before you print or share the file. Look at three things:
- Does the header still show the right text, or did it disappear?
- Does the page number continue from the previous page instead of restarting at 1?
- Does the header sit along the long edge of the landscape page where you expect it?
If any of these is off, the sections are probably linked or unlinked in a way you did not intend. Linking sections in Word explains how headers, footers and page numbers carry across breaks. Margins work the same per-section way, as shown in using different margins on different pages.
Other versions of Word
Word for the web: Microsoft’s section-break page says Word for the web can’t add section breaks yet and suggests the Open in Word command to add them in the desktop app. Make the landscape page in Word on your Mac instead.
iPad and iPhone: Microsoft’s landscape help says it applies to the desktop versions of Word, so set up the landscape page in Word on the Mac.
Windows: the idea is identical, but the path differs. Go to Layout, open the Page Setup dialog launcher, choose landscape and set Apply to to Selected text.
Back on the Mac, Microsoft’s article on printing a document in Word for Mac repeats the Page Setup and Apply to steps next to the print options, which is handy if you are rotating a page right before printing.
Landscape page questions on a Mac
Why does Apply to not list Selected text?
Selected text appears only when something is selected before you open Format > Document. Close the dialog, select the content on the page and try again. If nothing is selected, use This point forward instead.
Does the landscape page need its own section?
Yes. Orientation belongs to a section, so a sideways page in the middle of a portrait report needs a section of its own. Selected text and This point forward create that split for you; the Next Page method makes it by hand.
What if a blank page shows up next to the landscape page?
Turn on Show all nonprinting characters and look for an empty paragraph mark (¶) or a page break sitting just before or after a section break. Deleting the stray mark usually removes the blank page. Delete the mark, not the section break itself.
How do I put the page back to portrait?
Click inside the landscape page, open Format > Document > Page Setup, choose portrait, select OK and set Apply to to This section. The page turns upright and the surrounding pages are untouched. Remove the extra breaks afterward only if you no longer need them.
Once the landscape page looks right, save the document and scroll through it with nonprinting characters on one last time to confirm every break sits where you meant it to.

Kermit Matthews runs Live2Tech from just outside Philadelphia. He is an IT specialist with over 20 years of experience, from a university help desk to small-business IT, IT management and his own consulting practice, and has written tech guides full time since 2020. Steps are checked against the current software on a real device or the maker’s official documentation. More about Kermit.