To show hidden files on Windows 11, open File Explorer, click View in the toolbar, point to Show, and click Hidden items. Hidden files and folders appear right away, slightly faded. To also show protected system files, click the three-dot menu > Options > View tab and uncheck Hide protected operating system files (Recommended).
While you’re in File Explorer’s options, you can also stop the pop-up descriptions on desktop icons and files.
The same Show menu also controls endings like .docx, and you can hide file name extensions from there.
Below are all the ways to show hidden files in Windows 11, how to unhide a single file, and how to hide files again.
- Press Windows + E to open File Explorer.
- Click View in the toolbar at the top.
- Point to Show and click Hidden items. A check mark appears.
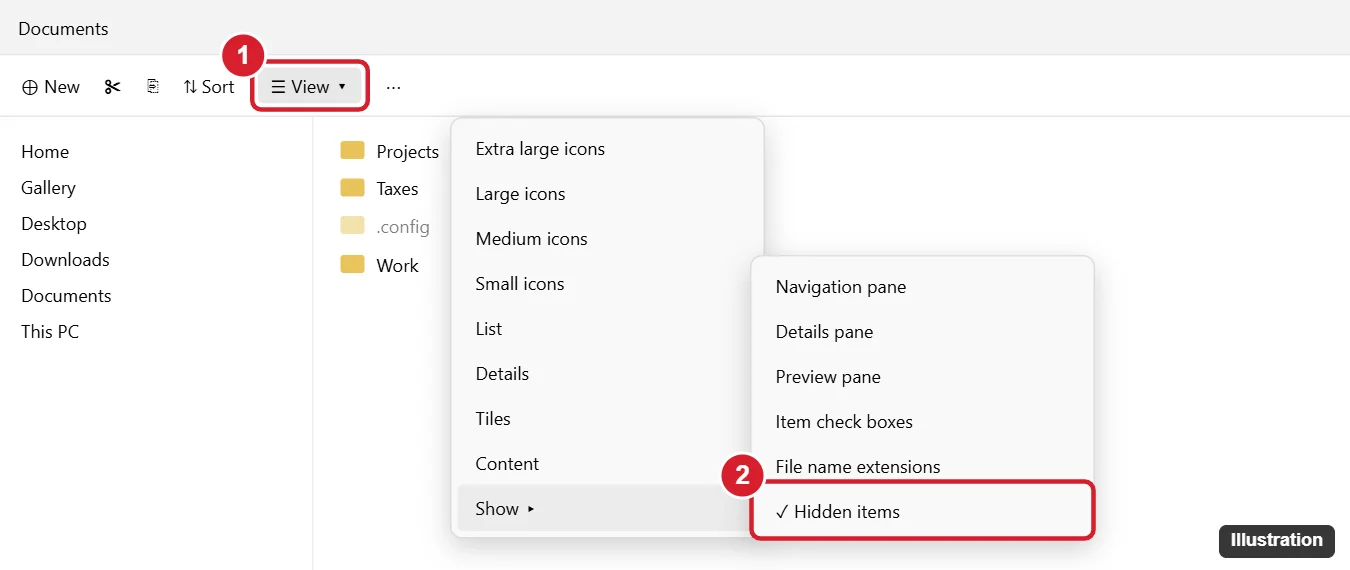
This applies to every folder. Click Hidden items again to hide them.
Method 2: Folder Options
- In File Explorer, click the three-dot See more menu > Options.
- Open the View tab.
- Select Show hidden files, folders, and drives and click OK.
To see protected system files as well, uncheck Hide protected operating system files (Recommended) on the same tab and confirm. Don’t delete or move these files, and turn the setting back on when you’re done.
Method 3: Settings app
Go to Settings > System and open Advanced (called For developers on earlier versions of Windows 11). Expand File Explorer and turn on Show hidden and system files.
How to unhide a specific file or folder
- Show hidden items using any method above.
- Right-click the file and choose Properties.
- Uncheck Hidden and click OK.
- AppData: Press Windows + R, type %appdata% (Roaming) or %localappdata% (Local), and press Enter.
- ProgramData: Type C:\ProgramData in the File Explorer address bar.
Hidden Files vs Protected System Files
| Type | Shown by | Examples |
|---|---|---|
| Hidden files and folders | View > Show > Hidden items | AppData, ProgramData, desktop.ini, files you hid yourself |
| Protected operating system files | Folder Options > View > uncheck Hide protected operating system files | pagefile.sys, hiberfil.sys, $Recycle.Bin |
Most people only need the first setting. Protected system files are needed for Windows to run, so show them only when a guide or support technician asks you to, and hide them again afterward.
Show Hidden Files From the Command Line
- Command Prompt:
dir /alists everything in the current folder, including hidden and system files. - PowerShell or Terminal:
Get-ChildItem -Forcedoes the same. - Unhide a file:
attrib -h "C:\path\to\file.txt"removes the hidden attribute. Add-sonly if the file is also marked as a system file and you’re sure it’s yours.
The command line is useful when a USB drive’s files have been hidden, for example after a malware infection. Scan the drive with Windows Security first, then use attrib -h -s /s /d E:\* (replace E with the drive letter) to unhide its folders and files.
How to Hide a File or Folder Again
- Right-click the file or folder and choose Properties.
- Check Hidden and click OK. For a folder, choose whether to apply it to subfolders and files too.
- Turn off Hidden items in the View menu so it disappears from view.
Hiding is not security. Anyone who turns on Hidden items can see the file, so use a password-protected account or encryption for anything private.
Related: Change a file type in Windows 11.
Frequently asked questions
Why can’t I see a file even with hidden items on?
It may be a protected system file. Uncheck Hide protected operating system files in Folder Options.
Is it safe to show hidden files?
Yes. Just avoid deleting or editing files you don’t recognize.
How do I show hidden files on Windows 10?
See how to see hidden files on Windows 10.

Kermit Matthews runs Live2Tech from just outside Philadelphia. He is an IT specialist with over 20 years of experience, from a university help desk to small-business IT, IT management and his own consulting practice, and has written tech guides full time since 2020. Steps are checked against the current software on a real device or the maker’s official documentation. More about Kermit.