When you need to show someone exactly what happens on your iPhone, a screen recording captures it as a video. Add the Screen Recording control to Control Center, tap it, and wait for the three-second countdown. To stop, tap the red indicator at the top of the screen and choose Stop. The video saves to the Photos app. This works on current iOS and on older versions back to iOS 11, with small label differences covered below.
The recording button lives in Control Center, so it helps to know how to open Control Center on any iPhone.
After the button is added, you can move or resize it in Control Center so it sits on the first page near your thumb.
What you need before you start
- Any iPhone that runs iOS 11 or later. Screen Recording is built in; there is no app to download.
- Free storage. Recordings are ordinary video files, and a long one can take up a lot of space. If storage is nearly full the recording may stop or fail to save, so it helps to check your iPhone storage before a long session.
- The Screen Recording control in Control Center. On many iPhones it isn’t there until you add it, which is the first section below.
Two terms come up a lot. Control Center is the panel of buttons you open with a swipe (Wi-Fi, flashlight, volume and so on). A control is one of those buttons. Screen Recording is a control that looks like a solid circle inside a ring.
Add Screen Recording to Control Center
How you add the control depends on your iOS version. Apple redesigned Control Center editing in iOS 18, so current iOS uses the editor inside Control Center itself, while iOS 17 and earlier use the Settings app. If you aren’t sure which you have, check Settings > General > About and look at iOS Version.
Current iOS (iOS 18 and later)
- Open Control Center (swipe down from the top-right corner, or up from the bottom on an iPhone with a Home button).
- Touch and hold an empty area of Control Center, or tap the + at the top left, to enter editing mode.
- Tap Add a Control.
- Search for Screen Recording or scroll to it, then tap it. The control drops into your Control Center layout.
- Tap an empty area to leave editing mode.
If the control is already in Control Center you can skip this. You can also drag it to a spot that is easy to reach with your thumb while you are in editing mode.
Older iOS (iOS 11 to iOS 17)
- Open Settings > Control Center. On iOS 13 and earlier, also tap Customize Controls.
- Under More Controls, tap the green + next to Screen Recording.
- Screen Recording moves to the Include list. Drag the handle beside it if you want it higher in Control Center.
Don’t see Screen Recording in either list? Screen Time restrictions or a work profile can hide or disable it; jump to the troubleshooting section.
Start a screen recording
- Go to the screen or app you want to record, so the video doesn’t open on Control Center.
- Open Control Center:
- iPhone with Face ID (iPhone X and later): swipe down from the top-right corner.
- iPhone with a Home button (iPhone 8 and earlier, iPhone SE): swipe up from the bottom edge.
- Tap the Screen Recording control. A three-second countdown starts on the button.
- Swipe Control Center away (or tap outside it) before the countdown ends, so the recording begins on the app rather than on the controls.
- Do what you want to capture. A red indicator shows the recording is running: a red circle in the Dynamic Island on newer models, or a red timer at the top left on others.
Starting from the Lock Screen: Control Center opens from the Lock Screen only if that is allowed under Settings > Face ID & Passcode (or Touch ID & Passcode) > Allow Access When Locked. If Control Center doesn’t open there, see how to enable Control Center on the Lock Screen. Getting past the Lock Screen first is still the simpler route, because the recording continues once you are in the app.
Without the microphone on, the recording captures the picture plus sound from most apps (game sound, video playback, alerts), but not your voice.
Record your voice with the screen
Narration is useful when you are explaining something, such as walking a relative through a settings change. Turn the microphone on before you start.
- Open Control Center.
- Touch and hold the Screen Recording control (don’t just tap it). A larger panel opens.
- Tap Microphone to turn it on. The microphone icon turns red when it is on.
- Tap Start Recording and wait for the countdown.
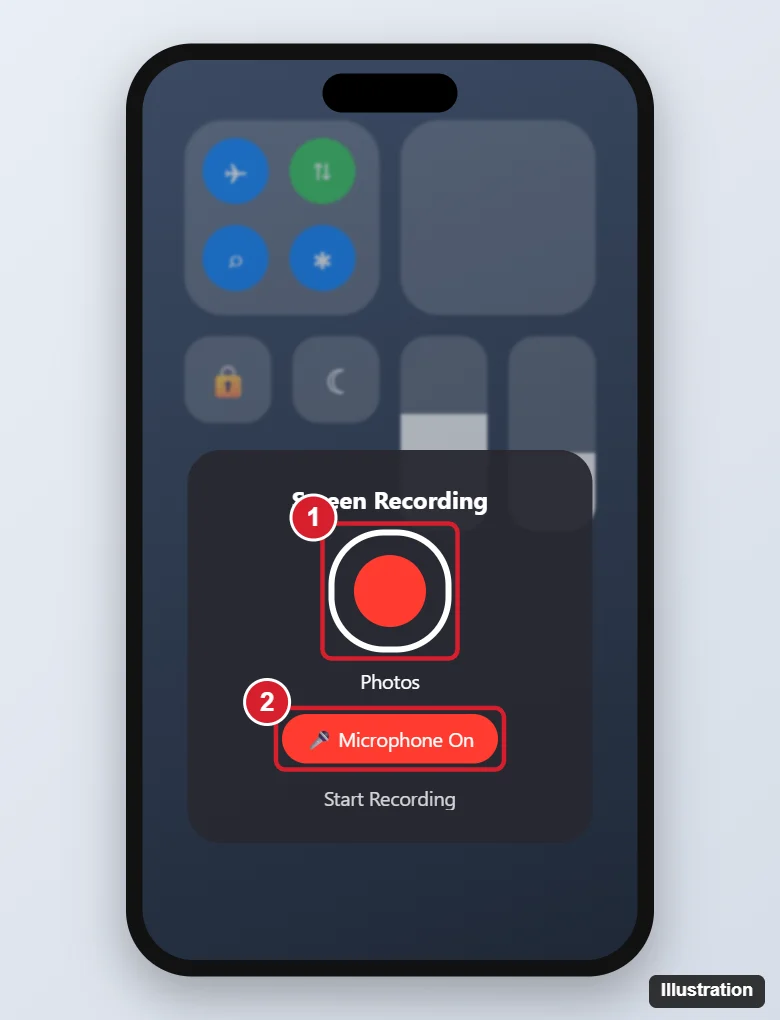
The microphone setting stays on for later recordings until you turn it off the same way. If you only want app sound in the next video, touch and hold the control again and tap Microphone to switch it off.
The same panel may list apps that can receive a broadcast, such as streaming or meeting apps. Leave Photos selected if you want an ordinary video saved to the phone.
Stop the recording and find the video
Stop recording
- iPhone with a Dynamic Island: tap the red circle in the Dynamic Island, then tap the stop button.
- Other iPhone models: tap the red timer at the top left of the screen, then tap Stop.
- Any model: open Control Center and tap the red Screen Recording control.
A notification confirms the screen recording was saved to Photos.
Find it in Photos
Screen recordings land in your photo library with your other videos, sorted by the time you made them. To see only screen recordings, open Photos and go to Collections > Media Types > Screen Recordings. On older iOS versions the same Media Types list sits under the Albums tab.
Trim the start and end
Almost every screen recording begins with a second of Control Center and ends with you reaching for the stop button. Trimming fixes that.
- Open the recording in Photos and tap Edit.
- Drag the left and right ends of the timeline (the frame viewer under the video) inward to the parts you want to keep.
- Tap Done, then choose to save the trimmed video or save it as a new clip if your iOS version offers both.
Crop out the status bar or part of the screen
Screen Recording always captures the whole display. If you only want one area, such as a single chart in an app, record normally and crop afterward: in the Photos editor, tap the crop tool, drag the corners of the frame around the part you want, and tap Done. Cropping also removes the clock and battery icons at the top if you would rather not show them.
Share the video
Tap the Share button on the video to send it through Messages, Mail or AirDrop, or to save it to Files. Long recordings can be too large for a text message, so trimming helps them go through. For a big file, AirDrop to a nearby Apple device or a shared link from iCloud Drive usually works better than an attachment.
Can’t find the video?
If the saved notification appeared but the video isn’t where you expect, scroll to the very end of your library (it is sorted by date), check the Screen Recordings collection, and look in Recently Deleted in case it was removed by mistake. With iCloud Photos turned on, a recording made on the iPhone shows up on your other devices after it syncs, which can take a while for a large file on a slow connection.
Get a cleaner recording
| Before you record | Why it helps |
|---|---|
| Turn on Do Not Disturb or another Focus | Banner notifications appear in the video, including message previews you may not want to share |
| Close apps and tabs you don’t want seen | The app switcher and any screen you pass through are captured too |
| Rotate to the orientation you will share in | Rotating partway through makes the video awkward to watch |
| Charge the phone for long sessions | Recording keeps the screen on and uses more battery than normal use |
A quick worked example: a parent recording how to set up a new app for a child’s teacher might turn on Do Not Disturb, open the app, start the recording with the microphone on, narrate the three steps, stop, and trim the first and last second before sending it. The whole video stays under a minute and contains nothing private.
Screen Recording missing, greyed out, or silent
The control is greyed out or missing
The most common cause is a Screen Time restriction. Go to Settings > Screen Time > Content & Privacy Restrictions, open the content restrictions (labeled Content Restrictions on many iOS versions), scroll to the Game Center section, and set Screen Recording so it is allowed. If Screen Time has a passcode you need it to make the change; on a child’s phone set up through Family Sharing, the parent changes it from their own device (on current iOS, under Settings > Family > the child’s name). The walkthrough on how to turn off restrictions on an iPhone explains the Screen Time screens in more detail.
A phone issued by an employer or school may block screen recording through a management profile. In that case the setting can’t be changed on the phone, and the organization’s IT team is the right contact.
The recording has no sound
- No voice: the microphone was off. Touch and hold the control and turn Microphone on before the next recording.
- No app sound: some apps don’t allow their audio to be captured. Check that the app’s own volume is up, too.
- Quiet everywhere: raise the media volume with the side buttons during playback, and check the Ring/Silent switch or Action button if alerts are what you expected to hear.
More fixes for silent videos are in the article on screen recordings with no sound.
The video is black or an app is missing
Apple notes that some apps might not allow you to record. Streaming video services commonly block capture of protected content, so the recording shows a black area or skips the picture while the rest of the screen records normally. That is a restriction set by the app, and there is no setting on the iPhone to change it.
It won’t start while mirroring
You can’t record the screen and use screen mirroring at the same time. Stop AirPlay mirroring to a TV or Mac first (open Control Center and tap Screen Mirroring, then Stop Mirroring), then start the recording.
The recording stopped on its own or failed to save
A recording can end early when storage runs out, when a call interrupts it, or when you open an app that blocks capture. If you see a “failed to save” message, restart the iPhone, free up some storage, and try a short test recording. Installing the latest iOS update from Settings > General > Software Update can also clear a bug.
Screen recording questions
Does the iPhone 7 support screen recording?
Yes. Screen Recording arrived in iOS 11, and the iPhone 7 can run up to iOS 15, so it uses the older Settings > Control Center steps above and opens Control Center with a swipe up from the bottom.
Does the other person know if I record a call or chat?
Many apps don’t notify anyone, but some apps detect screen recording and may alert the other person or block the capture. Recording a call or private conversation without consent can also be illegal where you live, so ask first. Call audio often isn’t captured anyway; for app calls, see the options for how to record WhatsApp calls on iPhone.
Is there a time limit?
There is no fixed limit. A recording keeps going until you stop it, the storage fills up, the battery runs low, or something interrupts it, such as a call.
Will locking the iPhone stop the recording?
Locking the screen generally ends the recording, so stop it yourself first to make sure the last part is saved the way you want.
How do I take the button out of Control Center again?
On current iOS, enter Control Center editing mode and tap the minus sign on the control. On older iOS, go to Settings > Control Center and tap the red minus next to Screen Recording. The steps to remove the Screen Recording button cover it in more depth.
Does the same method work on an iPad?
Yes. iPad has the same Screen Recording control in Control Center, opened with a swipe down from the top-right corner, and the recordings also save to Photos. The microphone long-press works the same way.
Can I screen record on an Android phone the same way?
Android has its own built-in recorder in Quick Settings; for a Pixel, the steps to screen record on a Google Pixel show where it is.
Apple’s own screen recording page in the iPhone User Guide is worth a look if a label on your phone differs from the ones here, since it updates with each iOS release. Once the control is in Control Center, a test recording of a few seconds is the quickest way to confirm the microphone setting and see where the video lands.

Kermit Matthews runs Live2Tech from just outside Philadelphia. He is an IT specialist with over 20 years of experience, from a university help desk to small-business IT, IT management and his own consulting practice, and has written tech guides full time since 2020. Steps are checked against the current software on a real device or the maker’s official documentation. More about Kermit.