Need a video of your screen with sound, such as a how-to, a bug report or a game clip? Windows 11 can do it for free. Press Windows + Shift + R to record any area with Snipping Tool, or Windows + Alt + R to record a single app or game with Xbox Game Bar. Clipchamp, PowerPoint and OBS Studio cover editing, slides and long sessions, and Sound Recorder handles audio with no video.
Pick the right recorder
| Tool | Records | Audio | Windows version | Best for |
|---|---|---|---|---|
| Snipping Tool | Full screen or any area, including the desktop | Microphone and system sound (in current versions) | Windows 11 | Quick tutorials and bug reports |
| Xbox Game Bar | One app or game window | Game/app sound or all sound, plus mic | Windows 11 and 10 | Games and single apps |
| Clipchamp | Screen, window, browser tab, plus webcam | Microphone; system sound only from a browser tab | Windows 11 (also a web app) | Short videos you want to edit |
| PowerPoint | Full screen or any area | Audio and pointer, both on by default | Windows 11 and 10 with Microsoft 365 or Office 2016 and later | Work PCs where you can’t install apps |
| OBS Studio | Anything, with scenes and overlays | Desktop audio and mic on separate controls | Windows 11 and 10 | Long or polished recordings |
| Sound Recorder / Voice Recorder | Audio only | Microphone | Windows 11 / Windows 10 | Voice notes, narration, interviews |
If you only need sound coming out of the PC (no video), see recording computer audio on Windows 11 for the system-audio options in more depth.
Method 1: Snipping Tool (any area, with sound)
Snipping Tool is built into Windows 11 and is the quickest way to record part or all of the screen. It works on the desktop and in File Explorer, which Game Bar can’t capture. If you don’t see a Record option, open Microsoft Store, click Library, and update Snipping Tool; the audio buttons arrived in later updates.
- Press Windows + Shift + R. Or open Snipping Tool from Start, switch to Record mode (the video camera icon), and click New.
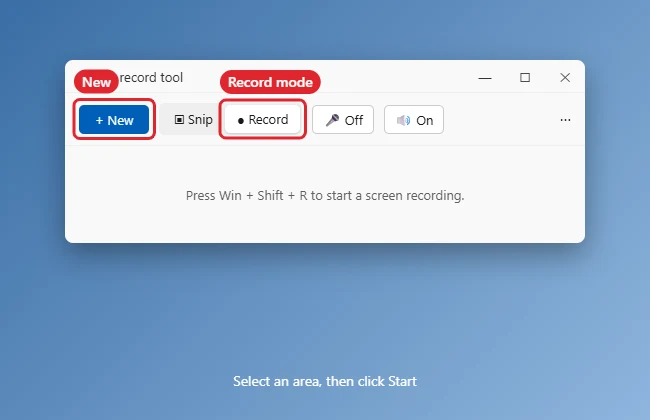
- The screen dims. Drag across the area you want to record, or select the whole screen.
- Check the audio buttons on the recording bar before you start. The microphone button adds your voice; the speaker (system audio) button adds sound from videos, apps and games. Depending on your version, one of them may be off by default.

- Click Start. A three-second countdown runs, then recording begins.
- Use Pause if you need a break, then click Stop (the red square) when you’re done.
- The clip opens in Snipping Tool for preview. Click Save (or press Ctrl + S) to keep it as an MP4, or choose Edit in Clipchamp to trim it.
Saved recordings usually land in Videos > Screen Recordings, or in whatever folder you pick in the Save dialog. In Snipping Tool’s See more (three dots) > Settings, current versions let you choose whether recordings include microphone input and system audio by default, and whether they save automatically. Labels can vary by version, so check that menu if a setting seems missing. Microsoft’s Snipping Tool help page covers the basic recording steps and the Clipchamp option.
Recording system sound only: turn the speaker button on and the microphone button off. This is the setup for capturing a webinar replay or app demo without room noise.
Method 2: Xbox Game Bar (one app or game)
Game Bar is built into Windows 11 and Windows 10. It records the window that has focus, which makes it ideal for games, browsers and single apps. It does not record the desktop or File Explorer, which is why the shortcut sometimes seems to do nothing.
- Make sure Game Bar is on: Settings > Gaming > Xbox Game Bar, then turn on the toggle. If it won’t open, see opening and fixing Xbox Game Bar.
- Open the app or game you want to record and click inside it.
- Press Windows + Alt + R to start recording. Or press Windows + G and click the record button in the Capture widget.
- Press Windows + Alt + M to turn your microphone on or off while recording.
- Press Windows + Alt + R again to stop.
- Find the MP4 in Videos > Captures, or click See my captures in the Capture widget.
Choose which sounds Game Bar records
Game Bar can record just the game or app, or every sound the PC plays. Press Windows + G, open Settings (the gear), go to Capturing, and choose All to include all system sound, or the game-only option to keep notifications and music out. In Windows 11 Settings, related options sit under Settings > Gaming > Captures, where you’ll also find a maximum recording length and the captures folder location. The exact option names there are not fully documented, so treat them as a guide. Microsoft lists the Game Bar shortcuts on its Game Bar recording page.
Gamers with NVIDIA or AMD graphics cards also have the overlay that comes with the graphics driver software, which can record full-screen games. Game Bar is enough for most people.
Method 3: Clipchamp (record and edit in one place)
Clipchamp is Microsoft’s video editor. It is included with Windows 11 and also runs in a browser. Use it when you plan to cut, caption or add a webcam bubble.
- Open Clipchamp from Start and create a new video.
- Click the Record & create tab, then choose Screen (or Screen and camera for a webcam overlay).
- Allow access to your camera and microphone when asked, and pick the microphone you want.
- Click the red record button, then choose a browser tab, a window or your entire screen.
- To include sound from a video or web app, share a browser tab and turn on its audio-sharing option. Windows and the entire screen record with your microphone only. In the Clipchamp Windows app, only Microsoft Edge tabs appear in the list; to record a Chrome tab with sound, open Clipchamp in Chrome and record there.
- Click Stop sharing, then Save and edit.
Two things often surprise people. First, Clipchamp downloads a WebM copy of the raw recording; to get an MP4, edit the video on the timeline and click Export. Second, each screen or webcam recording is capped at 30 minutes, so split longer sessions. Microsoft’s Clipchamp screen recording page covers the steps, and its project length page confirms the 30-minute cap.
Method 4: PowerPoint screen recording
If your work PC has Microsoft 365 but blocks other apps, PowerPoint can record the screen and save the result as a video file. This works in PowerPoint for Microsoft 365, 2024, 2021, 2019 and 2016, on both Windows 11 and Windows 10.
- Open PowerPoint and a blank presentation.
- Go to Insert > Screen Recording. PowerPoint minimizes and shows a small control dock.
- Click Select Area (or press Windows + Shift + E) and drag over the part of the screen to record. The area must be at least 64 by 64 pixels. Press Windows + Shift + B to select the full screen.
- Audio and Record Pointer are on by default. Click either one to turn it off.
- Click Record. Press Windows + Shift + D to pause and Windows + Shift + Q to stop.
- The video appears on your slide. Right-click it and choose Save Media as to save it as a separate MP4.
Microsoft’s PowerPoint screen recording guide lists the same shortcuts. Unless you pin the control dock, it slides up into the top margin while you record; move the pointer to the top of the screen to bring it back.
Method 5: OBS Studio (free, no time limit)
OBS Studio is a free, open-source recorder used for streaming and long tutorials. Download it only from its official site to avoid bundled installers from download mirrors; the OBS Studio quick start guide covers first-time setup.
- Install OBS Studio and open it. If the Auto-Configuration Wizard appears, choose the option to optimize for recording.
- Under Sources, click + and add Display Capture (whole monitor) or Window Capture (one app).
- Check the Audio Mixer. Desktop Audio is the sound your PC plays; Mic/Aux is your microphone. Play a sound and speak; both meters should move. Mute either one with its speaker icon.
- Click Start Recording, then Stop Recording when you’re done.
- Open File > Show Recordings to find the file. The folder and format are set in Settings > Output.
OBS has no recording time limit beyond free disk space, and it can put the mic and system sound on separate audio tracks for editing later. It takes a few minutes to learn, which is why the built-in tools come first here.
Record audio only: Sound Recorder and Voice Recorder
When you need sound and no picture, use the built-in recorder: Sound Recorder on Windows 11, Voice Recorder on Windows 10.
- Open Start, type Sound Recorder (or Voice Recorder on Windows 10), and open the app.
- If you have more than one microphone, choose the right one from the device list in the app.
- Click Start recording or press Ctrl + R.
- Press Space to pause and click Resume recording to continue.
- Click Stop recording or press Esc.
- The recording appears in the list on the left. Right-click it to Rename, Share or Delete it.
Each Sound Recorder file can be up to three hours long. Microsoft says recordings are kept within the app, and uninstalling the app deletes them, so share or copy important recordings out before removing it. Many PCs also show the files in Documents > Sound Recordings, but Microsoft doesn’t document that folder. The Sound Recorder FAQ covers the shortcuts and limits.
If the voice recording hisses or crackles, work through removing static noise from a mic. For music with several tracks, a free digital audio workstation fits better; see the legitimate GarageBand alternatives for Windows.
Where your recordings are saved
| Tool | Default location |
|---|---|
| Snipping Tool | Usually Videos > Screen Recordings, or the folder you choose when you click Save |
| Xbox Game Bar | Videos > Captures (MP4) |
| Clipchamp | A WebM copy downloads after recording; Export creates the MP4 in the folder you choose |
| PowerPoint | Inside the presentation until you use Save Media as |
| OBS Studio | The folder in Settings > Output (File > Show Recordings opens it) |
| Sound Recorder | Inside the app’s list; use Share or the app’s file options to copy it out |
If a saved MP4 won’t play, see playing MP4 files on Windows 11. To cut the dead air at the start and end, trim the video in Clipchamp or the Photos app before sharing; trimming also shrinks the file.
Fix the sound after recording
If the recording is done but the audio is too quiet, too loud or partly unwanted, you don’t have to record again. From Snipping Tool, click Edit in Clipchamp (or import the MP4 into Clipchamp), then:
- Select the clip on the timeline and open the Audio tab in the properties panel.
- Drag the volume slider. It runs from 0 to 200%, so you can boost a quiet microphone or mute the clip entirely.
- To edit sound separately from the picture, choose Detach audio (in the Audio tab, or by right-clicking the clip). The audio becomes its own track you can trim, delete or replace with a cleaner narration from Sound Recorder. Clipchamp also downloads a copy of the detached audio to your Downloads folder.
- Click Export to save a new MP4. The original recording stays untouched.
Example: a two-minute how-to for a coworker
Say you need to show a coworker how to submit an expense report in a web app, with your voice explaining each click. A practical setup looks like this:
- Tool: Snipping Tool, because the steps move between the browser and File Explorer (to attach a receipt), and Game Bar can’t record File Explorer.
- Area: drag around the browser window only, not the whole screen. The video is easier to follow and the file is smaller.
- Audio: microphone on, system audio off, so notification sounds and music don’t leak into the clip.
- Take: one quick test, then the real recording. If you stumble, keep going and trim the mistake in Clipchamp afterward rather than starting over.
- Share: a two-minute MP4 is usually small enough to send through a chat app or upload to OneDrive and share a link.
If the same how-to needed your face in a corner, Clipchamp’s Screen and camera mode would be the better pick, keeping in mind its 30-minute cap.
On Windows 10
Snipping Tool’s recording mode is Windows 11 only. On Windows 10, use Xbox Game Bar (Windows + Alt + R) for one app or game, PowerPoint’s Screen Recording or OBS Studio for the full desktop, and Voice Recorder for audio. Clipchamp is also available for Windows 10 through Microsoft Store or in a browser. Windows 10 support ended on October 14, 2025, so a Windows 10 PC without Extended Security Updates no longer gets security fixes; upgrading to Windows 11 also adds Snipping Tool recording.
Before you hit record
- Silence pop-ups: turn on Do not disturb in Settings > System > Notifications so messages don’t appear in the video.
- Close what you don’t want seen: email, chat windows and browser tabs with personal details.
- Plug in a laptop: recording uses more power, and some laptops slow down on battery, which makes video choppy.
- Use a headset mic: it usually sounds clearer than a built-in laptop microphone and picks up less keyboard noise.
- Do a 10-second test: record, play it back and confirm both your voice and the system sound are there before the real take.
- Get permission: record meetings and calls only with the participants’ consent, and respect copyright on streamed content.
Recording has no sound or won’t start
- Audio buttons were off: in Snipping Tool, the microphone and system audio buttons must be set before you click Start. In Game Bar, check the mic with Windows + Alt + M and the Capturing setting for All audio.
- Microphone blocked: open Settings > Privacy & security > Microphone, turn on Microphone access and Let apps access your microphone, and allow desktop apps.
- Wrong or quiet input: go to Settings > System > Sound, choose the right microphone under Input, and raise its input volume. Speak and watch the level move. You can also change the default microphone there.
- Bluetooth headset: some headsets switch to a low-quality mode when their mic is in use, or the recorder picks the wrong device. Try the PC speakers or a wired headset.
- Windows + Alt + R does nothing: you’re on the desktop or in File Explorer, Game Bar is off, or the laptop needs the Fn key. Use Snipping Tool instead on Windows 11.
- Black screen or silence from a streaming service: many services block recording of protected video. That’s expected and not a setting you can change.
- Still stuck: update Snipping Tool from Microsoft Store and update your audio driver from your PC maker or through Windows Update.
Prefer a different recorder? You can switch off the Xbox Game Bar overlay so Windows + G stops opening it.
Screen recording questions
Can I record my screen and webcam at the same time?
Yes. Clipchamp’s Screen and camera option does it in one step, and OBS Studio can add a Video Capture Device source over your screen capture. Snipping Tool and Game Bar record the screen only.
Which tool makes the smallest files?
Recording a smaller area or a single window helps more than the tool you pick. Trimming and exporting from Clipchamp at a lower resolution also reduces size for email or chat.
Can I record a phone screen the same way?
No, phones have their own recorders. On Android, see screen recording on a Google Pixel.
How long can a single recording be?
It depends on the tool. Clipchamp caps each screen or webcam recording at 30 minutes, and Sound Recorder files can run up to three hours. Game Bar has a maximum recording length setting under Settings > Gaming > Captures. OBS Studio keeps going as long as you have disk space. Snipping Tool doesn’t publish a limit, but long recordings make very large files, so split long sessions into parts.
For most recordings, start with Windows + Shift + R, check both audio buttons, and do a short test. Switch to Game Bar for games, Clipchamp for editing, and OBS Studio when a session runs long.

Kermit Matthews runs Live2Tech from just outside Philadelphia. He is an IT specialist with over 20 years of experience, from a university help desk to small-business IT, IT management and his own consulting practice, and has written tech guides full time since 2020. Steps are checked against the current software on a real device or the maker’s official documentation. More about Kermit.