A new or self-built PC with an empty drive has no operating system, so it needs Windows installed from a USB drive. Confirm the PC meets the Windows 11 requirements, make a bootable USB (8 GB or larger) with Microsoft’s Media Creation Tool on another computer, boot the new PC from that USB, choose the empty drive in Setup, then finish setup and install drivers and updates. Plan on one to two hours in total.
Which Windows to install, and can this PC run it?
Install Windows 11. Microsoft ended support for Windows 10 on October 14, 2025, so a new PC set up with Windows 10 starts life without free security updates. If a PC must stay on Windows 10 for now, see how to set up Windows 10 after end of support.
Almost every PC and set of parts sold in the last several years meets these minimums from Microsoft’s Windows 11 specifications page:
| Component | Minimum for Windows 11 |
|---|---|
| Processor | 1 GHz or faster with 2 or more cores, on a compatible 64-bit processor (check the CPU against Microsoft’s supported-processor list; that generally means Intel 8th Gen or AMD Ryzen 2000 series and newer) |
| Memory | 4 GB RAM |
| Storage | 64 GB or larger |
| System firmware | UEFI, Secure Boot capable |
| TPM | Trusted Platform Module (TPM) version 2.0 |
| Graphics | Compatible with DirectX 12 or later, with a WDDM 2.0 driver |
| Display | High definition (720p), larger than 9 inches diagonally, 8 bits per color channel |
| Internet and account | Windows 11 Home, and Pro for personal use, need internet and a Microsoft account during first setup |
The minimums are the floor, not a comfortable target. For a PC you will use every day, 16 GB of RAM and a 500 GB or larger SSD make a much bigger difference than any setting you change later. Two terms in the table come up again below: TPM is a security chip (usually built into the processor as firmware) that Windows uses for encryption and sign-in, and Secure Boot is a UEFI feature that only lets trusted software start the PC.
What to have ready
- A USB flash drive of 8 GB or larger. The tool erases everything on it, so copy off anything you need.
- Another working Windows PC to create the installer, where you have administrator rights. A Mac or Linux PC works too, using the ISO route below.
- A Windows 11 license. A retail product key, a digital license linked to your Microsoft account, or the key built into a prebuilt PC’s firmware. You can install first and activate later.
- Internet access on the new PC. An Ethernet cable is the easiest option, because Wi-Fi may not work until its driver is installed. A phone connected by USB with tethering turned on is a good fallback.
- Your motherboard or PC model name, so you can find the right drivers on the maker’s support site.
Step 1: Make the Windows 11 USB installer
- On the working PC, open Microsoft’s Download Windows 11 page.
- Under Create Windows 11 Installation Media, select Download Now, then run the downloaded Media Creation Tool. You need administrator rights on that PC.
- Accept the license terms.
- Confirm the language and edition. If the new PC needs a different language from the one you are working on, clear Use the recommended options for this PC and choose manually.
- Choose USB flash drive, select your drive, and select Next.
- Wait while the tool downloads Windows 11 and prepares the drive. When it reports the USB flash drive is ready, select Finish.
Working from a Mac or Linux PC, or is the new PC Arm-based? The Media Creation Tool only makes installation media for x64 (Intel or AMD) PCs. Download the Windows 11 disk image (ISO) from the same Microsoft page instead (Microsoft offers a separate Arm64 ISO for Arm-based PCs), then write it to the USB drive with a tool that supports Windows images. Copying the ISO file onto the drive does not make it bootable. The walkthrough to create a bootable Windows 11 USB drive covers the ISO and Rufus route in detail.
Step 2: Check the BIOS or UEFI settings
This step is optional on a prebuilt PC, but worth doing on a self-built one, because a firmware setting is the most common reason Setup refuses to continue.
- Plug the USB drive into the new PC and turn it on.
- Press the BIOS key repeatedly as it starts, usually Delete or F2. The startup screen or the manual shows the correct key; the brand table in Step 3 lists common ones.
- Check that the firmware detects your SSD or hard drive and the full amount of RAM. If the drive is missing here, Windows Setup will not see it either.
- Confirm the boot mode is UEFI, not Legacy or CSM.
- Make sure the TPM is enabled. It may be called Intel PTT, AMD fTPM or Security Device, and on some boards it ships turned off.
- Check that Secure Boot is available. The steps to turn on Secure Boot explain where it hides on common boards.
- Save and exit, usually with F10.
On a self-built PC, the memory profile (XMP on Intel, EXPO on AMD) lets RAM run at its rated speed. It is safest to turn it on after Windows installs and runs normally, so a memory problem can’t be confused with an installer problem.
Step 3: Boot the new PC from the USB drive
A brand-new PC with an empty drive usually boots from the USB drive on its own, because there is nothing else to start. If it doesn’t, use the one-time boot menu.
- Restart the PC and press the boot menu key repeatedly as soon as it powers on.
- Select your USB drive. If it appears twice, choose the entry that starts with UEFI.
- When Windows Setup appears, you are ready for Step 4.
Keys vary by model and Microsoft only says the key is usually a function key or Delete, so treat this table of common keys as a starting point and check the startup screen if one doesn’t work.
| Brand | Common boot menu key | Common BIOS key |
|---|---|---|
| ASUS | F8 | Delete or F2 |
| MSI | F11 | Delete |
| Gigabyte | F12 | Delete |
| ASRock | F11 | F2 or Delete |
| Dell | F12 | F2 |
| HP | Esc, then F9 | Esc, then F10 |
| Lenovo | F12 (Fn+F12 on some laptops) | F1 or F2 |
| Acer | F12 (may need enabling in the BIOS first) | F2 |
Putting Windows 10 on an HP laptop instead? The HP-specific steps, keys and drivers are in the guide to install Windows 10 on an HP laptop from USB.
No boot menu? Set the order in the BIOS instead. On an MSI board, for example, press Delete at startup, open Settings > Boot, set Boot Option #1 to the UEFI entry for your USB drive, and press F10 to save. Other boards have a similar Boot tab. If the PC skips straight past the menu, turn off Fast Boot in the BIOS. After Windows is installed, set the internal drive back to first place, or the PC may keep starting Setup.
Step 4: Install Windows 11
- On Select language settings and Select keyboard settings, choose your language, time format and keyboard, then select Next.
- On Select setup option, choose Install Windows 11, check the box agreeing that everything will be deleted, and select Next. Older installers show an Install now button here instead.
- Enter your product key, or select I don’t have a product key to add it later. This screen may not appear if the PC has a key stored in its firmware.
- On Select Image, pick the edition your license covers, usually Windows 11 Home or Windows 11 Pro. A Home key won’t activate Pro, and the reverse is also true.
- Accept the Applicable notices and license terms.
- If Setup asks for an install type, choose Custom: Install Windows only.
- On Select location to install Windows 11, select the new drive, shown as Unallocated Space, and select Next. Windows creates the partitions it needs, so you don’t have to.
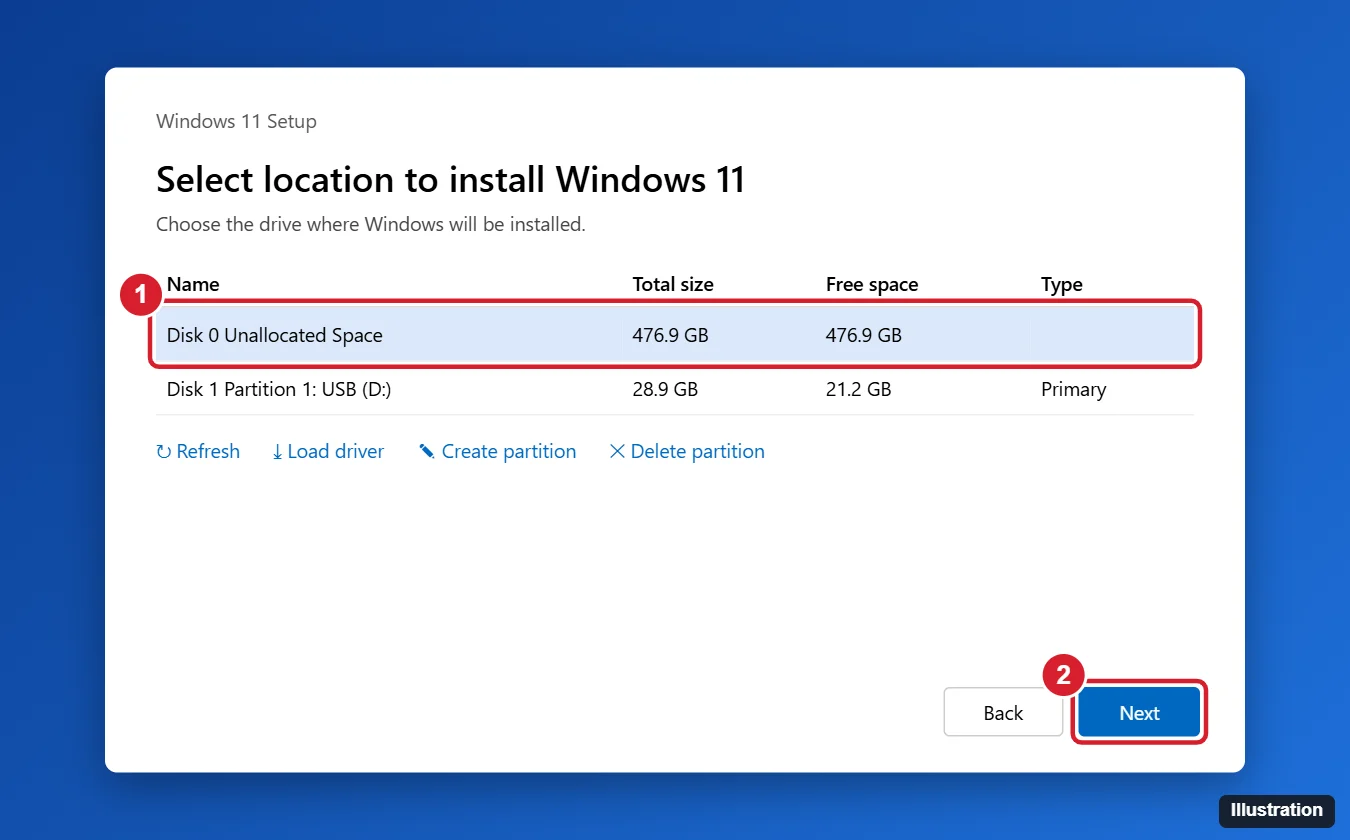
- On Ready to install, select Install. Windows copies files and restarts several times. Don’t press a key to boot from the USB during those restarts.
- Remove the USB drive once the first setup screen asks for your country or region.
On an SSD, the copying stage typically takes 15 to 45 minutes. A PC with two or more drives shows Disk 0, Disk 1 and so on; if you are unsure which is which, the size column helps, and unplugging extra drives until Windows is installed removes any doubt.
No drive in the list?
Many newer Intel systems use Intel Rapid Storage Technology (RST) or VMD, which hides NVMe SSDs from Setup until a storage driver loads.
- On another PC, download the RST or VMD driver for your model from the PC or motherboard maker’s support page.
- Extract the files to the Windows USB drive or a second USB drive.
- In Setup, select Load driver > Browse, choose the folder, and install the driver. The drive should appear.

Some boards let you turn VMD off in the BIOS instead. If neither works, power down and check that the M.2 SSD is fully seated and screwed in, and that the BIOS lists it.
Step 5: Finish the first-run setup
- Choose your country or region, then your keyboard layout.
- Connect to the internet. If no Wi-Fi networks appear, plug in Ethernet or a USB-tethered phone.
- Name the PC if Setup asks.
- Sign in with a Microsoft account. Windows 11 Home, and Pro for personal use, require one along with internet during first setup. On Pro, a work or school account is the other option.
- Create a PIN and choose your privacy settings.
- Choose whether to restore apps and files from a previous PC or set up as a new device.
If you would rather sign in with a local account, finish setup with the Microsoft account first, then add a local account in Settings > Accounts > Other users, or switch your sign-in to a local account. Workarounds that skip the account screen are unsupported and Microsoft keeps removing them.
Step 6: Install drivers and updates
- Go to Settings > Windows Update and select Check for updates. Install everything, restart, and check again until nothing new appears.
- Open Windows Update > Advanced options > Optional updates and install any driver updates listed.
- Download the latest chipset, LAN, Wi-Fi and audio drivers from the motherboard or PC maker’s support page.
- Install the graphics driver from NVIDIA, AMD or Intel, depending on your graphics card or processor.
- Right-click Start, open Device Manager, and make sure no device shows a yellow warning icon.
For more ways to keep them current, see how to update drivers in Windows 11.
Step 7: Activate Windows
Check your status in Settings > System > Activation.
- Prebuilt PCs and laptops usually activate on their own, because the key is stored in the firmware and applies when the edition matches.
- Self-built PCs: select Change product key and enter the key you bought.
- Moving a retail license from an old PC: if the license is linked to your Microsoft account, run the Activation troubleshooter from the Activation page and follow the hardware-change option. Licenses that came preinstalled on a prebuilt PC generally can’t move to a new one.
Buy keys from Microsoft or an authorized retailer; very cheap marketplace keys are often resold volume or OEM keys that can stop working later. The full walkthrough on how to activate Windows covers digital licenses and error codes.
Reinstalling on a PC you already use
The same USB drive does a clean install on an existing PC, but that wipes the drive you install to. Microsoft’s overview of ways to install Windows 11 notes the media is normally meant for a device without Windows, so first decide whether a reset would do. If that PC still runs Windows 10, check it with the PC Health Check app first; upgrading in place through Windows Update or the Windows 11 Installation Assistant keeps your files, so a clean install is only needed when you want a blank drive.
- Back up your files to an external drive or cloud storage.
- Note your apps and license keys, and sign out of apps that limit activations.
- Link your Windows license to your Microsoft account in Settings > System > Activation so it reactivates after the reinstall.
- Boot from the USB drive as in Step 3. From inside Windows you can also hold Shift while selecting Restart, then choose Use a device and pick the USB drive. On Select location to install Windows 11, delete the old partitions on Disk 0 (often labeled Primary, System, MSR and Recovery) until it shows Unallocated Space, then select it and choose Next. Leave partitions on other drives alone.
If you only want a fresh start, Settings > System > Recovery > Reset this PC with Cloud download reinstalls Windows 11 without a USB drive. Running setup.exe from the USB inside Windows is a third option; under Change what to keep it offers Keep personal files and apps, Keep personal files only or Keep nothing.
When Setup stops with an error
| Message or symptom | What to check |
|---|---|
| This PC can’t run Windows 11 | TPM and Secure Boot are off in the BIOS, or the boot mode is Legacy. Turn them on and boot the USB in UEFI mode. If the CPU isn’t supported, Microsoft doesn’t recommend installing, and the PC may not get updates. |
| The selected disk has an MBR partition table | The drive was set up for Legacy boot. Delete every partition on that drive (only if it holds nothing you need) so it shows as Unallocated Space, then select it. |
| PC ignores the USB drive | Try a rear USB port directly on the motherboard rather than a front-panel port or hub, pick the UEFI entry, and remake the USB if needed. If the drive still isn’t offered as a boot option, Microsoft suggests asking the PC maker how to turn off Secure Boot temporarily; turn it back on after Windows installs. |
| Setup freezes while copying files | Remake the USB on a different drive, remove extra USB devices, and leave RAM at default speed (XMP or EXPO off) until Windows is installed. |
| Setup starts again after the install | Remove the USB drive, or move the internal drive to the top of the boot order. |
New PC install questions
Can I install Windows without a product key?
Yes. Select I don’t have a product key. Windows installs and runs, but shows an Activate Windows watermark and locks personalization settings until you activate.
How long does the whole job take?
The install itself takes about 15 to 45 minutes on an SSD. Creating the USB, first-run setup, updates and drivers can add another 30 to 60 minutes, so set aside an hour or two.
Do I need a separate drive just for Windows?
No. Windows can share a drive with your files. Installing it on a fast NVMe SSD makes the whole PC feel quicker, and a second drive for games or media keeps a future reinstall simpler.
Should I install Home or Pro?
Pick the edition your license covers. Pro adds business features such as BitLocker to Go and Client Hyper-V (which needs a processor with SLAT support), while S mode is offered only on Home. You can move from Home to Pro later by entering a Pro key under Settings > System > Activation.
Can I use the same USB drive on another PC?
Yes. The installer can be reused on as many PCs as you like, but each PC needs its own license to activate.
Can I install Windows 10 instead?
You can, using a Windows 10 USB made the same way, but it no longer gets free security updates. For a new PC Windows 11 is the safer choice; the HP Windows 10 guide linked in Step 3 covers that route if you need it.
With Windows activated, updated and every device driver in place, the new PC is ready to use. A good next step is setting up a backup, so a future reinstall only costs you an afternoon rather than your files.

Kermit Matthews runs Live2Tech from just outside Philadelphia. He is an IT specialist with over 20 years of experience, from a university help desk to small-business IT, IT management and his own consulting practice, and has written tech guides full time since 2020. Steps are checked against the current software on a real device or the maker’s official documentation. More about Kermit.